Friday, October 28, 2011

Recycled Journal Remade by Diana Gonzalez

Recently I had shown you a set of journals that I had made. Well, today, I decided to play around with them a bit more, and get a little more crafty with them. So I remade one of them. I hope you like it.


Well, so there it is. Do you like it? The flowers are crocheted, of course.  I used Fantasy Film and Fantasy Fiber, by Art Institute Glitter, and some little cabochons in the middle there, of the flowers.

I LOVE that fantasy film! It’s so cool! This time, I crinkled it up, and THEN I ironed it (in between two pieces of parchment paper).

And of course, the fantasy fiber. I used a forest green shade of film, and glued it over some pink paper, and actually it looks really cool. Then, I added fantasy fiber, that was in a clear(ish) blue shade.

Then, I added that tissue tape, by Tim Holtz and the crocheted flowers by me. And the Cabochons.  Now, this journal is ready to be used!

Tuesday, October 25, 2011

Using Glitter Lace Technique on Fabric by Clare Dempsey


I love the Art Glitter Videos, and one of my favorites is the Glitter Lace Card by Barbara Trombley.  You can find the video here.  This week I set out to see if I could get the same look on fabric.  The look is a bit more subtle, but just as beautiful with Art Glitter!

Here is what you will need to make this card:
Art Glitter Fabric Dries Clear Adhesive
Another Glue that dries tacky such as The Rubber Café or Zig 2 Way glue
Art Glitter Polyester Lace
Art Glitter 343 Chestnut Ultrafine Opaque Glitter
Art Glitter 86 Angel Dust Ultrafine Transparent Glitter
Art Glitter 295 Ensalada Ultrafine Transparent Glitter
Ivory Canvas Fabric
Ivory Calico Fabric
Assorted Ribbons
Metallic cardstock

Cut a piece of canvas at least 1 “ larger than your Art Glitter lace sheet on all sides.  This is more than you will need for your card, but will allow for cutting later.  Press any wrinkles out of your fabric and allow to cool.  Working on top of a sheet of Parchment paper (shiny side up) or a Teflon craft mat, apply your dries tacky glue and smooth over the surface of your ivory canvas fabric.  Here is a photo of the canvas fabric with the dried glue.


You will want good coverage so that the surface for the lace will be flat when glue dries.  Allow to dry overnight.  In the morning,  remove the canvas from the Parchment paper and apply the Art Glitter Lace on top of the glue.  Because these glues dry tacky you will be able to reuse your Art Glitter lace later!  Smooth the lace onto fabric and make sure it is adhering well.  Begin by pouring your darker color first (for this card Chestnut) and tap off the excess.  You will want to see the video for the specifics!  Then remove lace and poor on the Angel Dust glitter.  Highlight the flower centers with the Art Glitter Fabric Dries Clear Adhesive and apply the Ensalada color.  Allow to dry.


Cut the card base with metallic cardstock.  Cut the calico smaller than the card base and pull a few threads on every side to achieve a frayed look.  Glue the calico onto the card base with the Art Glitter Fabric Dries Clear Adhesive.  Glue the glittered lace fabric on top using the Art Glitter Fabric Dries Clear Adhesive also.  Make a banner with a bit of ribbon and your scissors using the same AG Fabric glue.  Tie a box and apply ribbons to the card with Glue dots on the back side of the card.  I love the shabby chic combined with the glamour of the glitter!

Friday, October 21, 2011

Glow in the Dark Glittered Earrings by Emily M. Miller

I have been wanting to glitter these plain earrings with Art Glitter's #143 Glow in the Dark Glitter and I finally did it! I was worried about the detail on the teeth not showing, then it dawned on me. All I had to do was wipe away the glitter around the teeth before it dried. Which I accomplished with the glue tip pin.


I had wanted to take a photo of them with someone wearing them, but it was impossible. Have you ever tried to take a photo of something in the dark? The whole 'no light' thing is a definite hindrance! So this is the best I could get, there's still a little light, hence the shadow. But I promise the glitter really does glow in the dark!

The photo below shows how they looked before, very plain, but a nice white background for the glitter. Which is important for our Glow In The Dark glitter. If you have a transparent or very dark surface you want to glow use our Designer Dries White adhesive. This will give you a good solid white background for glowing results!


This surface resisted the glue quite a bit so I prepared it by cleaning with Rubbing Alcohol first, then I gave it a quick coat of glue and let it dry. Next, I painted on another layer of glue and glittered it. This method usually works pretty well. Even if you find your 'primer' layer of glue resists a little, it will hold with the second coat. If your surface is still resistant, you can rough it up with sandpaper, that usually does the trick!


Here's how they look in normal light. I love the texture with just a hint of twinkle! Really fun. Don't forget that you have to expose Glow in the Dark materials to a strong light source for them to work. We had a debate about using natural light vs. light bulb so I googled it, didn't find an answer. But did find out that the study of phosphorescent materials led to the discovery of radioactivity in 1896. Learn something new every day with google!

Are you using any glitter on a costume this year? Sometimes I just dust myself with an ultrafine transparent glitter for a nice overall shimmer. Hope you have a sparkling and safe night!

Tuesday, October 18, 2011

Glass Glitter Sale - Perfect for Ornaments!

Have you started getting ready for the Holidays yet? Well, I haven't yet either really, these are photos from last year! But you can officially let your plans begin by sprucing up your old ornaments with our Vintage Glass Glitter on Sale! We have a fabulous selection of 3oz jars we just added to our Overstock Sales.

The 3 ounce jars are usually $24.50 and while supplies last you can get these (see sale colors here) for only $12.25! That's right, half off!


The bulbs above are just plain ornaments painted with Designer Dries Clear adhesive and covered in Art Glitter's Vintage Glass Glitter (the red one has some Glass Beads on it too). This is real German Glass Glitter cut from glass films. It has a slightly different appearance than the Ultrafine Glitter, kind of an antique sophistication. It is called "Vintage" because it will age and fade with time. If you do not want an aged look just spray your dry project with a clear acrylic spray, or spray lacquer (both found in spray paint aisles).


We recommend you do not handle the glass glitter with your fingers, please use a spoon at all times. And it is not suitable for children to use. Now go get some glass glitter and let your holidays begin!

Friday, October 14, 2011

Glittery Mermaid by Lori Mendenhall

I use a lot of brass stampings in my work. They generally are silver-plated, gold-plated or raw brass. They also come oxidized or shiny. These stampings can be beautiful, as you can see the mermaid below. In order to give her more interest and give my pendant sparkle and more pizzazz, I embellished her tail with glitter! While it’s a subtle look it does really make the piece much more special.


I found this gorgeous mermaid at VintageJewelrySupplies.com. First I used Designer Dries Clear adhesive along with #86 Angel Dust, Ultrafine Transparent on the mermaid’s tail. Using transparent is really important so that you can still see the details on the stamping. The Angel Dust gives just enough sparkle and iridescence to accent the tail without overpowering.  Let glue dry thoroughly.

You might be surprised at what I used for the setting – it’s an empty make-up tin! I buy them in bulk from TKB Trading. I put in the mermaid and filled in around her with seed beads, pearls, and glass.

I then encased the whole thing in resin. I love the resin with these glittered stampings because I feel secure that the glitter will never come off and it’s a higher-quality piece of jewelry.

Once the resin cured I glued on a bail.

You can see the same technique used on the fairy wings in the mosaic below.  Adding glitter to butterfly or dragonfly wings would look amazing too! 


Note, I received free product in exchange for this article. However, I’ve been using Art Glitter products for years and love them!

Tuesday, October 11, 2011

A Gilded Jewelry Box by Diana Gonzalez

So recently I made a fun little item. I had ordered some amber beads on ebay (to make a teething necklace), and decided to turn the box it came in, into a pretty jewelry box, for someone to receive this Christmas (along with jewelry inside, duh).


Sorry for the crud picture. Wow, crud. I haven’t used that word since I was in high school. How about that. Maybe I’m getting old, eh?


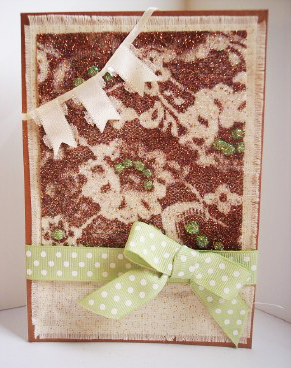
Cute, eh? I made this using some acrylic paint, and a typewriter font rubber stamp.

After that, I used some wondrous Fantasy Fiber by Art Institute Glitter. What I did, was spread out some fantasy fiber sandwiched between two layers of parchment paper, and just ironed it.

Then, I just glued it on, with Art Glitter's Designer Dries Clear adhesive, and stamped it again with the typewriter font rubber stamp and some black ink. Then, I found this lovely keyhole trinket (by Tim Holtz) that I also glued on with Designer Dries Clear.

What else?

Food tastes better and worst when you’re pregnant. You’re favorite stuff tastes better, and the bad stuff tastes even worst. But then, I am a foodie. I really am. There’s nothing better than staying home on a cool autumn night, with your family, while you cook and make a nice meal together. It’s so gratifying to know that I make better chocolate cake than most coffee shops in New York City. This of course, makes me wonder who the heck they have working back there. I went to a “cupcake” cafe near my most favoritest pizza places in manhattan, and ordered a red velvet cupcake, which of course, tasted dry, nasty and nothing like a real red velvet cupcake. Sad. So that weekend, I went and made one myself.

Anyway, that’s all for now, I suppose. Keep on crafting! And I do reccomend that Fantasy Fiber, that stuff is so darned cool. You can iron it, stamp it, use your heat gun on it….so cool!

Later, crafty peeps.

Friday, October 7, 2011

Holiday & Party Lights for Less! by Clare Dempsey


I love a look for less, and these days we are all looking for ways to stretch our dollar!  So, I pulled out my salad packaging again to decorate for Halloween and make some custom lights with Art Glitter!  You could use triangle boxes for Candy Corn lights like it did, or Christmas Trees!   I used my Cricut Tags, Bags and Boxes and More cartridge to cut the triangle box.  This cartridge has some great purse boxes that would make great lights for a little girl’s birthday party too!  You could use a box shape for ABC blocks for a baby shower.  Any box shape could be adapted to the make the perfect custom lights with Art Glitter!  So, let’s get started on the how to’s!

Supplies:
Salad Packaging or other Packaging
Box Template,  or Cricut or other electronic Cutter, or Sizzix Die
Art Glitter Dries Clear Adhesive
Art Glitter 56 Pumpkin Ultrafine Opaque Glitter
Art Glitter 92 Bananan Ultrafine Transparent Glitter
Art Glitter 86 Angel Dust Ultrafine Transparent Glitter
Low Temp Glue Gun with Glue Sticks
Paper Hole Punch
Strand of lights
Paper Scoring tool
Scissors

Cutting & Scoring your Box Light:
Cut the lips off the lids from salad packaging or some other packaging, so that your packaging lies flat, using a scissors.  You will need one top per light bulb.  The edges will be sharp, so be careful!   Cut your box shape from the packaging using a template or electronic cutter such as a Cricut.  If you use an electronic cutter, try the deep cut housing blade and or the multi-cut function to get through your packaging material.  Sizzix also has some box templates that cut through packaging like butter! Punch a hole with a regular paper hold punch where you want your lights to be inserted.  I chose the center of my triangle box (see photo).


Once, the box is cut, I scored it.  I have found that if I fold my box after the glitter is applied it messes up the glitter and creates more glitter dust.  So, I score first and glue second.

Gluing your Box Light:
To glue your glitter, start by applying the glue to the box where you want your darkest colors first, being sure to leave your box flaps free of glue and glitter for gluing and assembling later.  Sprinkle on the glue, shake off excess and carefully dust the unglued plastic with Swiffer cloth.  I have found that the glitter likes to cling to my plastic more than to paper, so I keep a box of Swiffer clothes handy in my craft room!  Continue gluing in this manner applying one color of Art Glitter at a time.  Since the box is scored, you will need to weight the edges to keep the box flat while your glue dries.


And for your convenience, I did a glue review!  If you are a serious crafter, you have some serious opinions and loyalty to your glue!  This is how I feel about the Art Glitter Dries Clear Glue:  It’s the best for glitter!  In this comparison, I tried the Terrifically Tacky Tape by PC and found that did not hold as much glitter and was not as rich.  Take a look at these lights and you will see how much more glitter is held in place by the Art Glitter Dries Clear Glue!  The light on the left was created with the Art Glitter dries clear Adhesive and the one of the left was created with the Terrifically Tacky Tape.


Once your Art Glitter Dries Clear Glue is dry, you can finish gluing your box together with the low temp glue gun.  Then just insert your lights through your punched hole and you have a great custom look for less!


Tuesday, October 4, 2011

Fantasy Fiber Fairy Pendant by Lori Mendenhall

Since it’s almost Halloween, I thought this piece would be a perfect project for October. This sassy lady is all decked out in her peacock fairy queen outfit! The idea of this project is to find a great piece of clip art with Fantasy Fiber as a gorgeous background.  The project would work just as well using Fantasy Film as a background! The artwork is then enclosed between glass and faux soldered using epoxy clay.


Let’s get started!

1. To begin with I found a fantastic piece of clip art. Etsy can be a really good source for this. I think this one came from Simply Swank. I printed the picture on cardstock and cut it out. In some cases I would add glitter highlights to the clip art.

2. To make the background, I fused some Art Glitter Fantasy Fiber in Ultra Violet. Two layers are used here because my sheet was too thin and I wanted it to be opaque. I cut out two squares from the fused Fantasy Fiber sheet.

3. I layered the Fantasy Fiber squares and the fairy cut-out on top of a clear piece of glass. This is Memory Glass by Ranger. Then I added a few pieces of Art Glitter’s Movie Star Shapes for a subtle accent. I glued the pieces down using a tiny amount of Art Glitter Designer Dries Clear Adhesive with the Ultrafine Metal Tip. The corresponding glass square went on top to make a sandwich.

4. Using silver-colored Apoxie Sculpt epoxy clay I did some faux soldering.  This idea came from Carmie Cimicata in a write-up she did for the John Bead blog. I have made/sold hundreds of pieces of jewelry using Apoxie Sculpt. It has similar properties to polymer clay, yet it air dries and it sticks to everything – as opposed to polymer clay, which requires glue to adhere embellishments. I used a thick snake of Apoxie Sculpt and wrapped it around my glass sandwich.

5. I then stuck some jump rings into the top. This is much easier than soldering! I’m not too bad with soldering except I have a hard time getting the jump rings on so I really appreciate the ease of this method.

6. I impressed some spirals, suns and flowers into the clay to give lots of interesting texture.

7. I then dusted the clay with Mona Lisa silver metal powder. Carmie’s method uses gilder’s paste to give the metallic sheen.

8. My final embellishments were some Swarovski crystal flatbacks and silver wire spirals.

9. The piece air-dries in a couple of hours. Seal the metallic powder with a sealant. I used Future floor polish.

Note, I received free product in exchange for this article. However, I’ve been using Art Glitter products for years and love them!