Friday, November 29, 2013

All Things That Glisten


Glitter is always a part of the holiday season.  You see it on so many things so why not add it to your own cards and projects to make them extraordinary this year.  Add Tombow Markers to the mix and you have the perfect makings for any holiday project. 
 
In November you can use the PROMO CODE TB20 for 20% off of your $25 or more order.


Supplies Needed:
 From Art Glitter-
Crystal Ultrafine Transparent Glitter-http://www.artglitter.com/retail/Rartglitter.html
Designer Dries Clear Glue-http://www.artglitter.com/retail/Radhesives.htm-
Ultrafine Metal Tip-http://www.artglitter.com/retail/rtools.htm
Glitter Spoons-http://www.artglitter.com/retail/rtools.htm
Fantasy Film-Krista's Eyes-http://www.artglitter.com/retail/fantasyfilm.htm
 
  From Tombow-
 Retro Dual Brush Pens-http://tombowusa.com/craft/markers/dual-brush-pen-set-6-retro.html
 N65 Cool Gray Dual Brush Pen-http://tombowusa.com/craft/markers/dual-brush-pen.html
 
Also Needed: White Card Stock, Blue Card Stock,Embossing Folder and Die Cut Machine, Dark Pink Ink Pad, Light Pink Ink Pad, Printer or Stamp for Sentiment,  Tape Runner
 
 
Begin by creating a 5"x 7" card base from white card stock.  Lay it aside.  Next, cut a piece of white card stock to fit into the embossing folder you have chosen and run it through your die cut machine.  Color in some of the areas using the Dual Brush Pens from Tombow.  
 Now, use the metal tip on the Designer Glue and outline some of the embossed areas.  Sprinkle the glitter over them and remove the excess returning it to the jar. 
 Add some glue and glitter around the areas that you colored with the markers to make them shine, too.  Also, add some directly over the areas such as the tops of these ornaments and allow the marker to show through the clear glitter when it dries.  It adds a little shine and sparkle to what you've colored. 

  Bring some color to your projects with Tombow markers.  Then, add  a little sparkle and together they will bring join into the season.   You can't go wrong with this combination! 


http://www.pegscraftingcorner.blogspot.com/ 

Monday, November 25, 2013

Birthday Card with Sparkle


This  month the Art Glitter designers got to work with Tombow.
I love the true color of these markers they were very easy to work with.

 
Supplies:
Art Glitter Ultrafine Transparent  # 312 Fresh Green
 
Art Glitter Ultrafine Opaque ## 263 Bright Gold
Cardstock
pattern paper
twine


I stamped my image onto pattern paper and used the Tombow brush pens to color the numbers.
then I added a bit of glitter to the year of the birthday for some bling. I used the Tombow markers on the little cut out dollie as well. I also outlined my pattern paper
before I adhered it to the card.


Be sure to check out all the other designers this month. Also if you purchase $25.00 in product
 use  the TB20 code and you can save 20%.

My Blog: zippity-do-dah-tabitha.blogspot.com


Saturday, November 23, 2013

Golden Bells Gift Tag


Tombow


To celebrate, Art Glitter is having a 20% off retail sale of any $25 purchase.  Just use code TB20 at Check out!


Today Heather has shared how to create her 
Golden Bells Gift Tag in an informational Video.
Sit back and enjoy!


Here are a few other projects for Christmas that Heather has made.


Heather outlined her Angel with the Ultra fine Metal Tip and Art Glitter Designer dries clear Glue then applied the #174 Pink Cadillac to her dress, #284 French Lilac to the wings, outline of the sentiments and little sweater in her arms, #196 Lion's Mane to her hair, #295 Ensalada to the tiny tree and  #314 Dew Berry to her stockings and boots.
Here is the look at the Back.
Here is a Vintage Santa Ornament Heather created.
Close up
On this piece Heather used:  #349 Garnet on Santa and the red scallop,  #196 Lion's Mane on the outer circle ring, clothes pin, and Santa's bag. She outlined the horn in Santa's bag with  #352 Chamois, Santa's beard with #717 Poupon.  #162 Just Peachy was used on the text boxes and items in Santa's bag.  Some  #295 Ensalada  and #267 Cheeky Pink Glitters were used in Santa's bag too.  
Feel free to stop by and see Heather's other projects using Art Glitter on her blog.
heatherahudson.blogspot.com

-- Please visit my blog: My Artistic Adventures :0) Check out my tutorials & Creations on Youtube My Etsy: My Aristic Adventures

Thursday, November 21, 2013

Every Day Greeting

Uniquely You


 This month Art glitter and Tombow are teaming up with amazing projects.  Be sure to visit frequently to see how great the go together!  Also use the code at www.artglitter.com of TB20 for 20% off of your glitter order of $25 or more!
Supplies:
Art Glitter #85 crystal glitter
Art Glitter dries clear adhesive
Tombow Dual Brush Pens (pink and purple)
Cardstock (white and purple)
Assorted bling

For this project a back to basics approach is being highlighted.  This card can be recreated using just  a few simple items, and requires no fancy cutting machines or dies, yet the finished look is really great! 

Begin by stamping on white cardstock using Tombow markers instead of an ink pad.  If you are unfamiliar with this technique be sure to check out this post on the ART GLITTER BLOG  where I talk about another way to use this method.  After stamping, use the brush markers to "ink" the edges of the cardstock. 
After inking the edges, spread Art Glitter dries clear adhesive along the edges of the cardstock (I like to get messy and spread it with my fingers) and apply Art glitter #85 crystal glitter.  Because the tombow markers are water based using this adhesive helps to blend the inks into the paper- a look that I love!


Thanks for stopping by to see my creations.
Missie Todd
createdbymissie.blogspot.com


Tuesday, November 19, 2013

Holly Hair Clip!

Today, I am presenting a cute, easy hair clip.  It isn't only for hair.  It can be used for the Christmas tree, or decorations, or even as a clip on a purse or coat.  It was really simple to make.  Let me show you how.


MATERIALS:
Art Glitter Ultrafine Transparent 167 Rain Forest
Art Glitter Dries Clear Fabric Adhesive
Art Glitter Designer Dries Clear Adhesive
Tombow Marker Dual Brush Pen 296 Green
Tombow Marker Dual Brush Pen 158 Dark Olive
Tombow Marker Dual Brush Pen 192 Asparagus
Tombow Marker Dual Brush Pen 837 Wine Red
Tombow Blending Mister
Paper Towel
Small Stencil Brush
3 Connie Crystals from the Red Suncatcher
Hair Clip
22 Gauge Floral Wire
Muslin Fabric (any plain cotton will do)
Canvas (or Duck Cloth)
Tim Holtz Holly Leaves Die
Manual Die Cut Machine (or you can use scissors and a drawing, if you like)

DIRECTIONS:
1)  Use the Tim Holtz die and a manual die cut machine to cut out holly leaves from muslin and canvas.  You could also just use your own design and some scissors, if you prefer.
2)  Color the muslin with Tombow markers.  Make sure that you use a lot of color.  You can shade them any way you like, but I prefer 2-3 different colors of green and one "surprise" color--in this case, Wine Red.
The coloring doesn't have to be particularly good, as you can see below.
3)  Fill your mister with water and spray the leaf.
 You can see the "bleeding" that happens when you have it full of water.  At this point, if you want to "pick up" some of the color that has dripped off the side, you can just slide the leaf over those spots of color.
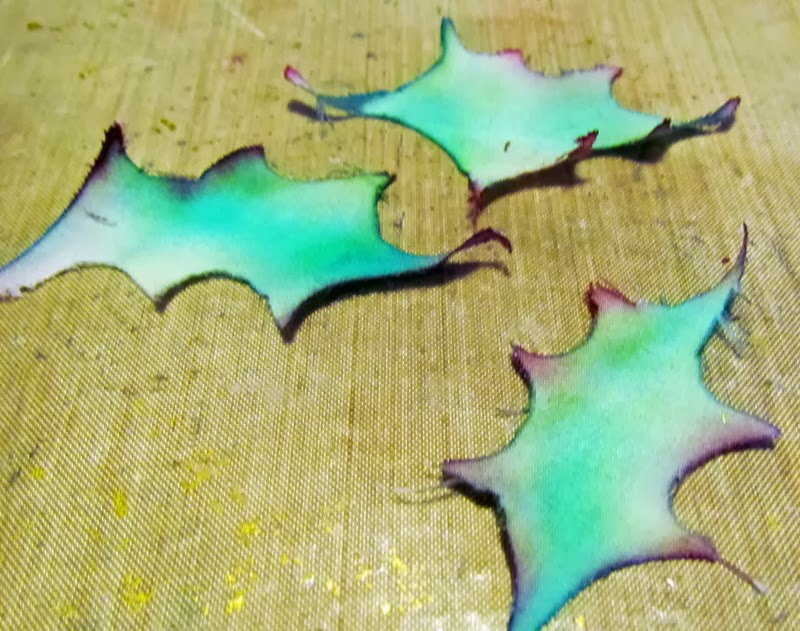
 4)  Blot with paper towel to remove excess water and let dry.
 This is the three leaves dried.
 5)  Squeeze a little of the Art Glitter Fabric Glue onto your work space.  In this case, I actually used the inside paper of a just opened bottle of glue.
 6)  Pick up some of the glue with your stencil brush.
 7)  Blot the stencil brush on the paper towel.
 8)  Rub onto parts of the leaf that you would like glittered.  I always make sure that I glitter the areas that have grayed out with the spraying.
 9)  Pour glitter over the glued areas.  You can use any color that works with the project, but when layering like this, transparent glitter is the best choice.  Let it dry.
 This is what one leaf looks like done.
 10)  Match up the fabric leaf with the canvas leaf and glue together, using fabric glue.  Let dry.
 This is what all three leaves look like done.  Notice how the glitter is in different spots on each leaf.
 11)  Glue the leaves onto the hair clip with Designer Dries Clear.  You only need a little glue--don't use too much!  When gluing the first one on, be sure to hold it into place for a few minutes while it sets.
 12)  When all the leaves are on and dry, use the wire to attach the beads.
It was really easy and fun.  The coloring and spraying could even be done by a child. I hope you enjoyed this project today.  If you would like to get started using some beautiful transparent glitter with the awesome Art Glitter Fabric Glue, use the code TB20 on the Art Glitter Site to receive 20% off any order of $25 or more.
Until next time, glitter on!

Sunday, November 17, 2013

Tombow and Art Glitter

Supply List
Small Water Color Brush
Anna Griffin Embossing Folder
Patterned paper
WhiffOFJoy.com Shopping Willow Stamp
K. Andrew Designs Fashionable Friends Stamp Set (sentiment)
Paper Doily


One of Clare's favorite glitter techniques is a simple way to add sparkle strips.  It is made with double sided sticky tape and looks great on a card or a page.  Clare got this look by just cutting the double sided sticky tape and notching one end.  She removed one red side and adhered the tape to the project.  She then removed the final side of the red tape protector and pored on the Art Glitter.  Clare stamped  her shopping girl and colored her with Tombow Markers, using the Blending Mister and a small water color brush.  One of Clare's favorite things to do with the Tombow markers is to distress her paper edges!  It is difficult for to find distressing inks in brighter colors.  So, Clare' often runs the markers along the edge of the paper, using the paint brush side of the Tombow Marker and then blending it with the Blending Mister and a small water color brush.  Clare used this technique to get the yellow edge on the plaid paper stripe behind the doily.  And this is also a great way to repeat the color in your stamped image.

If you would like to see more of Clare Dempsey's work, you can find here blog Here.

Wednesday, November 13, 2013

Glistening Holiday Greeting


Add a little color and sparkle to all of your projects this holiday season with Tombow Markers and Art Glitter.  The Art Glitter design team has been having fun already creating things for the holidays.  Peg likes the traditions of the holidays and one of the symbols of a traditional Christmas to her is the poinsettia.  Every year she buys one to enjoy.  Speaking of enjoying, be sure to enjoy the PROMO CODE TB20 for 20% off of your $25 or more order this month. 
 
Supplies Needed:

From Art Glitter: 
     Crystal Ultrafine Transparent Glitter-http://www.artglitter.com/retail/Rartglitter.html
     Designer Dries Clear Glue-http://www.artglitter.com/retail/Radhesives.htm
     Ultrafine Metal Tip-http://www.artglitter.com/retail/rtools.htm
     Spoons-http://www.artglitter.com/retail/rtools.htm
 
From Tombow
     Retro Dual Brush Pens-http://tombowusa.com/craft/markers/dual-brush-pen-set-6-retro.html
 
Additional Supplies:
 
      Card stock for card base, patterned paper for card, 1 piece of ribbon, fine paint brush, image printed off internet (remember to find ones that are copyright free to use)
 
After you have printed your image use the markers to color it.  Here Peg chose to search for a poinsettia image online using the search terms," poinsettia clip art." 

Place the metal tip on the bottle of glue and add a small amount of it to one section of the image.  Be sure to work in small sections so the glue doesn't dry before the glitter is added.  Once the line of glue is on the image, use the paint brush to spread it out over the area.
Then, sprinkle the glitter over the glued area. Allow it to sit for a minute to adhere well and then shake the excess back into the container.  Once the glue has dried the color will show through. How cool is that?   Continue repeating these steps until all of the areas are covered that you want.  For this image, Peg chose to leave some areas open for contrast.  She added glitter over the flower centers to make them stand out from the poinsettia. 
 
 Allow it to completely dry and then assemble the card.
 
Now, you can send a little sparkle to someone this holiday season or any time of year.  Color an image with the fabulous Tombow markers and then add some clear glitter for a look that's out of this world.  Gather those supplies and get to work.  The holidays will be here before you know it! 


http://www.pegscraftingcorner.blogspot.com&nbsp/;