Showing posts with label fabric dries clear adhesive. Show all posts

Saturday, September 1, 2012

Fashion Forward with KC


Back to school means shopping for school clothes.  And with a growing 8 year old, it also means pitching most of last year's jeans that are all to short.  I had wanted to work on some up cycled projects, and the denim I was about to throw out seemed like the perfect material for a fun glittering fiber project.

For this project I used:
Materials:  Denim from old pair of kids jeans, a cardboard core from a roll of packing tape, Blue acrylic paint, Acrylic sealer (brush on type), Acrylic sealer (Spray on type)  Art Glitter Fabric Dries Clear Adhesive (FDCA), Art Glitter Ultrafine glitter:  #117 Goldilocks, #65 Old Gold, #48 Emerald, #249 Woodberry, Embossing powder, Art Glitter Fantasy Fiber - English Ivy.

Tools and supplies:  Iron, Teflon sheet or parchment paper, Sizzix Big Shot, Tim Holtz Tattered Flowers Die, assorted bottle lids and caps, paint brushes


Cut a section about 1" - 1 1/2" out of the tape core and gently bend it into the size and shape needed to get on and off your wrist and wear comfortably.    

Paint the inside and edges of the core with blue acrylic paint and seal by brushing a layer or two of acrylic sealer.

Used Sizzix and Tim Holtz Tattered Flowers Die to cut flowers from excess denim.

Paint a little Art Glitter Fabric Dries Clear Adhesive on the tips of the flower petals.

Sprinkle a mix of Art Glitter Ultrafine glitters on the adhesive, one color at a time.  

Repeat this on each of the flowers.

Spray the front of the flowers with clear acrylic sealer and gently press the flowers into various caps to give them a little shape, and set them aside to let them dry.
Cut a piece of denim that is long enough to go around the outside of the core + 1/2" and about 1/2" wider than the core.  You want to cut with the grain of the fabric (not on the bias), so this piece was cut by cutting straight across the back of one leg.

Run it through the washer and dryer with a load of clothes to fray the edges

Sprinkle the fabric with embossing powder.  Any embossing powder should work, but will show through the fibers slightly, so you'll want to pick a complimentary color.  This one has gold sparkles that show through for a little extra sparkle.

Position clumps of Art Glitter Fantasy Fiber over the fabric.

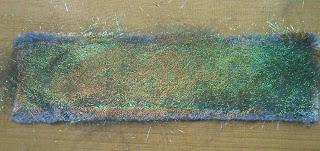
Cover with a Teflon sheet or parchment paper and iron according to directions.  I actually held the iron too long in one spot and got a little more copper color there - see the iron imprint to the left?  Since I liked the variation of color I wasn't too worried about that.  But note that if your colors are changing to a lot of copper tones, you are probably holding the iron on too long, or have it too hot.

Trim off the extra fibers that are extending past the edge of the denim.

Use FDCA to glue the layers of the flower together and glue the flower to the bracelet piece.  I decided not to use the daisy shaped piece in my flower, so I'll save that for another project.  Glue a button or other bling in the center of the flower.

Use FDCA to adhere the denim bracelet to the tape core


Thanks for visiting!  Please visit my blog for more glittering fun!  


Saturday, July 28, 2012

Title: Glittered Canvas Tote by Carrie Hannegan

We all have a canvas tote bag or shopping bag laying around. Why not add some glitter to make it stand out? :)


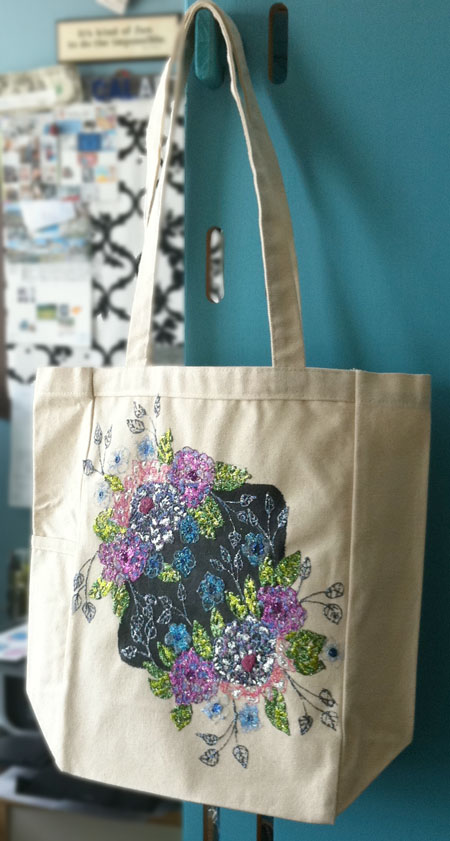
Today, I'm going to take a plain canvas tote and glitter it up with a floral print.
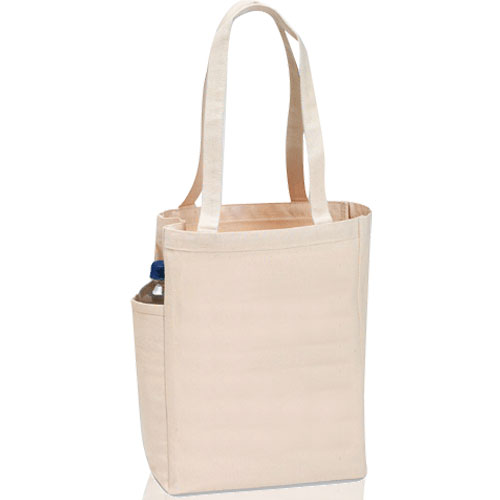
Here is the tote before anything was added. If you need to purchase one, I happen to have them for sale right here on my website!


This is what you'll need:
  1. One canvas tote bag
  2. 1 piece of 8 1/2 x 11 card stock or thick paper
  3. Black acrylic paint
  4. A white chalk pencil and a regular pencil
  5. Fabric glue - I used Dries Clear fabric adhesive from Art Institute
  6. Art Institute Glitter - #89 Martini Ultrafine Transparent Glitter
  7. Art Institute Glitter - #358 Jungle Green Ultrafine Opaque Glitter
  8. Art Institute Glitter - #358 Cavalado Green Ultrafine Opaque Glitter
  9. Art Institute Glitter - #270 Chesapeake Blue Ultrafine Transparent Glitter
  10. Art Institute Glitter - #24 Royal Wink Ultrafine Opaque Glitter
  11. Art Institute Glitter - #322 Paris purple Ultrafine Transparent Glitter
  12. Art Institute Glitter - #130 Eclipse purple Ultrafine Opaque Hologram Glitter
  13. Art Institute Glitter - #77 Pewter gray Ultrafine Opaque Glitter
  14. Art Institute Glitter - #D10 Gypsy purple Dazzlers Glitter
  15. Art Institute Glitter - #141 Magnolia Pink Ultrafine Transparent Glitter
  16. Art Institute Glitter - #806 Sonata Small Glass Beads
First, I put a piece of thick paper inside the tote, so when I painted it or put glue on it, it wouldn't bleed through to the other side.


I then painted a black square in the front. That way, the glitter will have a dark background and light background to make it pop and give it an interesting focal point. Notice my little color palette and flower design note clothes pinned to the side of the bag.


Then, I used a chalk pencil and a regular pencil to sketch out a general outline of my flowers.


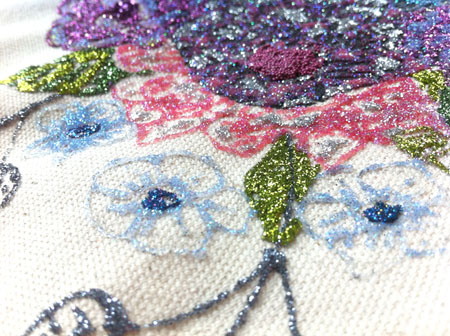
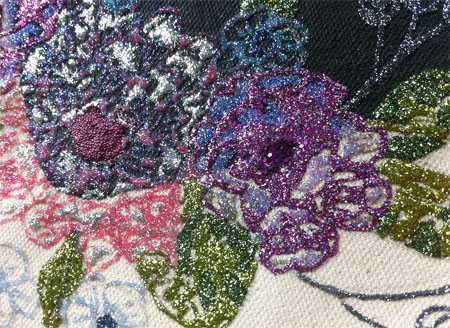
I then started glittering up a storm!


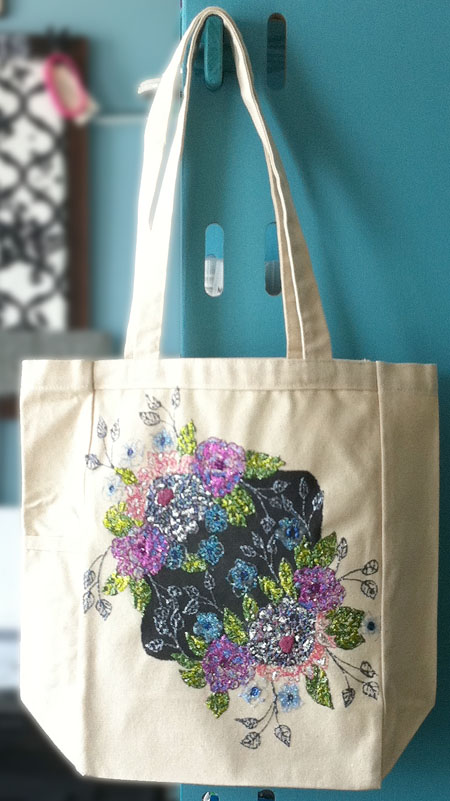
And here is the final piece...


A simple boring tote bag no more! It's even prettier in person... it catches the light and really sparkles and has a lot of vivid color. Use this bag at the grocery store and not only will it make food shopping more exciting, you'll totally brighten the bagger's day ;)

Thanks for taking a look at this project and take a look at my blog!
www.violetcottage.com/blog
Carrie

Tuesday, February 28, 2012

Fantasy Film and Fiber Fish Art Quilt by Laura Fraedrich

I had so much fun with my last project for the Art Glitter Institute (Fantasy Film Art Quilt....No Sewing Required) that I decided to make another one and add Fantasy Fibers this time! This is getting addicting...


Supplies I used:
Tulip® Brand Fabric Spray Paint™, Beads in a Bottle™, Slick Dimensional Paint, cotton broadcloth (approx. 18" x 24"), cotton muslin, parchment paper,  Art Glitter Institute's Fantasy Film and Fantasy Fibers, Pellon's Wonder Under®, Fabric Dries Clear Adhesive

I started with a piece of muslin that I sprayed with various colors of Tulip® spray fabric paint for my background. I used a fish that I made in a workshop I took with Pattie Wilkinson where she taught how to use Tulip® Fabric Markers with a paintbrush and water to create a watercolor effect. I ironed Pellon's Wonder Under® onto the back of the fish (remember to always cover your project with parchment paper when ironing so you don't get your iron gooey), cut him out, peeled off the backing sheet and ironed him onto the background. I took a few pinches of each color Fantasy Fibers and arranged them randomly around the fish, put parchment paper over them and ironed for a few seconds. To hold it in place I brushed some Fabric Dries Clear Adhesive behind the fibers with a paintbrush.

I then cut three same size pieces of yellow Fantasy Film, layered them on top of one another, sandwiched them between two sheets of parchment paper and ironed for a few seconds. I repeated this process for the pink and blue Fantasy Film. Next I applied the Wonder Under to the ironed Fantasy Film pieces according to package directions.  I cut out random long wavy triangle shapes to represent seaweed with the pink and yellow film, and different size circles of blue for the bubbles. I peeled off the backing paper from the Wonder Under, arranged the shapes I cut out onto my quilt, covered it with parchment paper and ironed them on. Again, so easy! I applied a few more layers of the different colors of fibers to make the piece look more dimensional.

I finished off the project by applying Beads in a Bottle™ to areas of the fish and outlined the shapes in Slick Dimensional Paint.


Wednesday, November 23, 2011

A Scrap Bookers Book Purse by Clare Dempsey


One of the members of my scrap booking guild has been asking me to teach a class on how to make a purse from a book.  With Christmas approaching, I thought now would be the perfect time to try this project out.  And if you know me, I love purses, Art Glitter and making gifts!  I visited my thrift store and purchased some books for future book purses and figure I can make this project for $5.00 or less with careful shopping!  I have also been admiring the rose purses on the market, but they are always so big and expensive.  So, here is my take on the book purse.


I started by choosing a book, and I chose a scrap book. Now, this might seem to miss the whole book point, but I love a handbag with photos on the outside!  And this scrap book from Target had an outside photo (around $15.00).  I then Googled Book Purse tutorials and found at least five.  My favorite was this one from Hungry Panda Clothing:  http://www.hungrypanda.net/blog/2010/02/book-purse-tutorial.


I used her instructions for cutting out the insides, adding handles, and added a flap with my Art Glitter embellishment.  The purse handles I purchased at Joann Fabrics with a coupon.  I like a handbag that is pretty on both the front and the back.  To make the flower, I cut a strip of fabric an inch wide and ran a basting stitch down the center.  Using the Art Glitter Fabric Dries Clear Adhesive, I ran a bead on both raw edges of the strip.  I added Art Glitter #79 Black Ultrafine Opaque Glitter and allowed it to dry.  I  then gathered the strip to form a ruffle.  Starting in the center of a piece of felt, I hot glued the ruffle in a circle along the stitch line working in small portions at a time (about 1“).  I then hot glued this to my purse flap.


For the book lining piece, I needed access to swap out that photo.  I like to change the photo my season.  So, I got out my trusty Vogue sewing book and made myself a bound button hole.  Yes, that tailoring class I took in my fashion design program helped, but a standard buttonhole stitch would work too!  Because I wanted access to change that photo I varied from the instructions on the Hungry Panda by making my purse liner removable with hook and loop tape.  And I chose not to make a hook and loop tape closure as I added the flap.  Another fun idea, is to make different purse linings for this purse for each season.  Because it is held in place with hook and loop tape you can swap it out.  And if you need a gift idea for the next holiday, you’re all set!  Mother’s and grandmothers are so hard to shop for, but mine love a hand made gift!  I am also including a side view of the purse and a view of the purse with it wide open. 


Supplies Used

Scrap book (Target)
Art Glitter Fabric Dries Clear Adhesive
Art Glitter #79 Black Ultrafine Opaque Glitter
Purse handles (JoAnn Fabrics)
Fabric
Hook and Loop Tape
Felt
Sewing machine
Thread
Exacto Knife
Scissors

Tuesday, November 8, 2011

Thanksgiving Hostess Gift by Clare Dempsey


I love to bring a little something for the hostess on Thanksgiving!  I know how much work goes into cooking for this holiday and love to have a little thank you for the cook! This year, I will be bringing a pin I made with Art Glitter and organza. And just so the host does not feel left out, I will pin it to a ribbon and tie the ribbon around a bottle of their favorite beverage!

Supplies:
Art Glitter Ultrafine Opaque Glitter #343 Chestnut
Art Glitter Fabric Dries Clear Adhesive
Brown Organza fabric cut 3” x 42”
Thread
Sewing Machine
Low Temp Glue Gun
Pretty Button
Chipboard 2 inch circle
Brown Felt 2 inch circle
Pin back


Start by cutting your organza.  I actually used a  roll of organza I found at JoAnn’s and cut it 21 inches long.  I then cut it in half lengthwise, so that I had two strips  3 inches wide by 21 inches long.  I overlapped my two strips by an inch and ran a basting stitch down the center lengthwise.


I then added a bead of glue using Art Glitter Fabric Dries Clear Adhesive and sprinkled on my Chestnut glitter.  Shake off excess and allow to dry.  I pulled my basting thread so that the finished length of the strip was 14” and folded the strip in half.


I followed the instructions on the Maya Road Flower video HERE.http://www.youtube.com/watch?v=Ez6MLD_hTDc
Some tips for the organza instead of ribbon: 
    •     Tie a knot at both ends after to gather and clip off the lose threads before gluing with the hot glue gun.
    •    Don’t wrap your center too tight or you won’t have a good space for your button.  Use a hole about the size of a pencil in the middle of your flower.
    •    You will have to fold your organza in half as you go.

Here is a close up of the finished flower pin.


I just used more of the organza strip to tie a bow around the bottle and then pinned the flower to the center. 

Tuesday, October 25, 2011

Using Glitter Lace Technique on Fabric by Clare Dempsey


I love the Art Glitter Videos, and one of my favorites is the Glitter Lace Card by Barbara Trombley.  You can find the video here.  This week I set out to see if I could get the same look on fabric.  The look is a bit more subtle, but just as beautiful with Art Glitter!

Here is what you will need to make this card:
Art Glitter Fabric Dries Clear Adhesive
Another Glue that dries tacky such as The Rubber Café or Zig 2 Way glue
Art Glitter Polyester Lace
Art Glitter 343 Chestnut Ultrafine Opaque Glitter
Art Glitter 86 Angel Dust Ultrafine Transparent Glitter
Art Glitter 295 Ensalada Ultrafine Transparent Glitter
Ivory Canvas Fabric
Ivory Calico Fabric
Assorted Ribbons
Metallic cardstock

Cut a piece of canvas at least 1 “ larger than your Art Glitter lace sheet on all sides.  This is more than you will need for your card, but will allow for cutting later.  Press any wrinkles out of your fabric and allow to cool.  Working on top of a sheet of Parchment paper (shiny side up) or a Teflon craft mat, apply your dries tacky glue and smooth over the surface of your ivory canvas fabric.  Here is a photo of the canvas fabric with the dried glue.


You will want good coverage so that the surface for the lace will be flat when glue dries.  Allow to dry overnight.  In the morning,  remove the canvas from the Parchment paper and apply the Art Glitter Lace on top of the glue.  Because these glues dry tacky you will be able to reuse your Art Glitter lace later!  Smooth the lace onto fabric and make sure it is adhering well.  Begin by pouring your darker color first (for this card Chestnut) and tap off the excess.  You will want to see the video for the specifics!  Then remove lace and poor on the Angel Dust glitter.  Highlight the flower centers with the Art Glitter Fabric Dries Clear Adhesive and apply the Ensalada color.  Allow to dry.


Cut the card base with metallic cardstock.  Cut the calico smaller than the card base and pull a few threads on every side to achieve a frayed look.  Glue the calico onto the card base with the Art Glitter Fabric Dries Clear Adhesive.  Glue the glittered lace fabric on top using the Art Glitter Fabric Dries Clear Adhesive also.  Make a banner with a bit of ribbon and your scissors using the same AG Fabric glue.  Tie a box and apply ribbons to the card with Glue dots on the back side of the card.  I love the shabby chic combined with the glamour of the glitter!

Tuesday, September 13, 2011

Fiber Skeletion Picture Frame by Diana Gonzalez

So, recently I finished up altering a wooden picture frame, with a lovely Halloween theme.


Nice, right? I don’t have any ONE picture big enough for this frame, but I do have a few small ones that will go inside.

I used a memory frame by Plaid Crafts. I used glitter and products by Art Institute Glitter.
Want to make one? It’s easy peasy.


First, you’ll need to paint it black, using Plaid Folk Art paint, in Ultra black.


Then, use their extreme glitter paint (also in black). This gives it a nice shine, and gives it a little more….spook, I guess.

After that, you’ll need your fantasy fiber in a nice foresty green. (English Ivy)

In between two pieces of parchment paper, spread out a thin layer of fantasy fiber, and iron it.
I had to do this a couple times, so that I had enough of it, to fit on the frame.

Then, using Art Institute Glitter’s Designer Dries Clear Adhesive, just dab on a little bit of glue, and adhere it to the frame.


For the next step, get yourself some yellow cardstock, embossing ink, and black embossing powder, and a skeleton rubber stamp. I used one by Deadbeat Designs.

You know the drill: ink up, stamp up, and emboss.

Then, get yourself some alphabet rubber stamps. Stamp the letters BOO with black ink, then go over it with Designer Dries Clear Adhesive, and Art Glitter's FABULOUS Dazzler’s Glitter line, in Hexis Gunmetal.

Cut out the skeletons, and the letters (once they are dry), and glue them on.

Voila!


And that’s that!


The flower was just laying around somewhere. It’s by Prima, if you want to know.

So, if you don’t have the Extreme glitter paint, you can make some yourself with some #79 Black Ultrafine glitter, by Art Institute, and mix it with Mod Podge.

Anyway, this year I’m going to really try for Halloween. I mean, I really want to go all out. Maybe it’s me being pregnant. We’ll see.  What else? It is a beautiful sunny day. Here I was, set for a week of full rain, and the sun comes out and betrays me. So I’m going out today, for a little bit. I mean, that’s what you do, when you have a kid. You know? Playgrounds, and glitter paint, and glue and things.