Pages

Saturday, April 28, 2012

Birds Of A Feather Sparkle Together by Sherri Reehil-Welser


With the fun popularity of feathers these days the kids and I decided to create fun some feather earrings and feathers for the hair for this Art Glitter project. We began with different colors and sizes of feathers, wrapping 24 gauge colored wire with seed beads around the top of the feathers. This will then be a place to attach the jump ring and fish hook ear wires for the pierced earrings. For creating the feathers for the hair, we did the same thing but attached the feather to the wire with a small rubber band to then be wrapped in the hair.


It was fun using Art Glitter for these feathers as the sparkle is amazing and it is the perfect touch for these fun and funky earrings. And of course the girls felt that the more “sparkle” the prettier the feather design!! Some just dipped the tip of the feather by first lightly brushing Art Glitter Designer Dries Clear Adhesive at the tip of the feather (or wherever you would like some awesome sparkle!) and then either sprinkle Art Glitter over the feather for a light sparkle or dip it for more of a vibrant effect! To finish these beauties up attach a small jump ring and fish hook ear wire to the wire wrapped area at the top of the feather and voila…. beautiful, sparkly colorful earrings in no time! The girls loved this project and wanted to wear them even before they were dry!!! Hope you all have a wonderful experience creating these easy and fun feather earrings and hair adornments!


Here we used 2 corresponding feathers on each side to give a fun effect!


~Another group of double feathered earrings~


Wednesday, April 25, 2012

Dressed Form...Love by Connie K

I am loving all the mixed media pieces I have been seeing lately...you can check them out on pinterest if you haven’t seen them. Such a great place for inspiration.

I thought I would combine my love for all things found, with this new to me medium...so here is my take on it. They are fun to make...

I took mine off the canvas and altered a paper mache dress form I had in my stash*, add to that a found silver candle stick from the thrift and a wooden finial from my junk drawer!


So gather your supplies...

Art Glitter: Ultrafine Transparent Martini #89
Art Glitter: Ultrafine Transparent Lipstick #88
Art Glitter: Fine Vintage Glass Glitter Ultramarine #604
Art Glitter: Ultrafine Transparent Mellow Yellow #158
Designers Dries Clear Adhesive

Paper mache dress form
Pattern tissue paper vintage
Multi matte medium.Ranger
Craft paint in the following colors: Cadimium Red/Americana, White/Americana, Bahama Blue/Americana, Yellow Green/Americana
Look at me blue / folk-art
Script rubber stamp
Archival ink black
Assorted stencils for texture including
Punchinella, fiberglass screening, netting
Rubons various...pink paisley, KaiserKraft, Melissa Francis
Faber Castell big brush pitt pens: scarlet red, nougat, cobalt blue, yellow
Pink paisley birds/butterflies
Small Prima flowers
Chipboard
Black pen for doodling


Lets get started...

My dress form had a base on it...I cut it off. Next adhere random strips of pattern tissue to the dress form with multi matte medium. Let dry thoroughly.

Next apply, paint in a random pattern using the bahama blue, green and blue. After you apply the paint wipe some of it with a wet wipe ...if you see the pattern tissue, it’s all good.


Once the base coat is dry you can start using your stencils to create texture and a random background. I applied the darkest colors last. Stamp the script stamp in a few random spots.

Adhere the two birds to the lower left side of the dress with matte medium. Shade the birds using a pitt big brush pen, once dry doodle around each bird with a fine point black pen. Add lipstick glitter to the red bird and blue bird with designer dries clear adhesive.


The butterflies were added to the back and glittered with mellow yellow and lipstick art glitter.

Cut two tiny leaf shapes from chipboard. Paint with yellow green paint. Once dry, shade with the green pitt pen & adhere to the dress form. Add two small prima flowers as shown on the sample. Add lipstick glitter to the red flower and vintage glass glitter in ultramarine to the blue flower. Martini glitter was used on the leaves.


Cut a small heart from the chipboard and paint with red paint, adhere to dress form as shown. Doodle around heart...using designer dries clear adhesive highlight the heart with the lipstick glitter...love that name of this glitter!

Add rubons as shown...seal with matte medium when complete.


Finally, I painted the wooden finial with red paint...and then stenciled some small patterns in white over top. Glue to the top of the dress form with a glue gun. Then adhere the dress form to the silver candlestick. Embellish with a bow made from the rayon seam binding...

 I hope you have fun with this...it is a no rules kinda of project where anything goes. It lets you think outside of the box. I’ve done many of these on canvas and have loved the results also.


*I have a huge stash...you never know what will show up in there.

Sunday, April 22, 2012

Fun Times by Emma McDonald

I love going to second hand stores for 2 reasons: First, I love the thrill of searching for hidden treasures amongst all the abandoned junk. Secondly, you can’t beat the prices. On many occasions I let the “stuff” speak for itself. For example, I was walking up and down the aisles at Goodwill and suddenly I see an old tart pan for 50 cents. I quickly grabbed it, thinking someone else would see its immense potential for greatness, but when I looked around, no one really cared. I proudly placed it in my cart and as I did, I saw it transform -into a Kitschy CLOCK!


Materials used

Art Glitter: SHABBY CHIC Pee Wee Kit
Designer Dries Clear Adhesive
Ultrafine Metal Tip
Noodgers
old metal tart pan
power drill
quartz clock movement kit (for 6mm/ 1/4 inch surfaces)
buttons
scrapbook paper/ printed design
circle cutter / pencil compass
scissor
paintbrushes
decoupage glue: matte
piece of paper


Since we are turning this tart pan into a clock you will need to drill a hole into the center. My husband, kindly helped me with this task. Then use a circle cutter or a pencil compass to create an 8 inch circle out of scrapbook paper and decoupage it onto the pan. Next, cut out your design and decoupage it on top. I found a cute 50’s design in a scrapbook paper pad that had the saying already on it. You can also search, download, and print free retro images on-line to use as well.


Now place the Ultrafine Metal Tip to the end of the Designers Dries Clear adhesive and fill in the images you want to glitter.


Working with one color at a time, sprinkle the SHABBY CHIC kit glitter over the wet glue. Turn the tart pan over onto a piece of paper that is creased down the middle and lightly tap the back of the pan to remove excess glitter onto the paper. Pick up the paper, slightly folding it and transfer the unused glitter back to its container. This is an easy trick that I picked up from my 3rd grade teacher. Thanks Mrs. White!


Use the Noodgers to straighten the edges of the glued and glittered images. After everything has dried, use a soft dry paint brush to remove any excess glitter.


Follow directions on packaging to assemble the clock to the pan. Finally, use Designers Dries Clear again to glue the buttons instead of numbers onto the clock. Let it dry, set the time, and hang it where ever you need a reminder to be child- like and have FUN!!!!

Friday, April 20, 2012

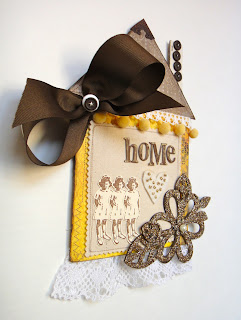
Home is Where the Heart is... by Connie K.

This little house shaped banner is for a sweet  friend of mine who recently bought her first house...she was so excited! I thought is would be so cute to send to her instead of a card congratulating her!

For those of you who have read my blog..you know I am a little obsessed with anything house shaped ..so this project is not a big surprise!


Most of the items I used here I had on hand...so use what you have to make it yours...

supplies to gather:

chipboard medium weight
heidi swapp chipboard letters
pattern tissue
authentique paper blissful  euphoria
authentique paper blissful foundations
button card (chimney)
1.5 wide brown grograin ribbon 3/4 yd.
random button ivory
1/2 lace trim 8 inches
yellow ball fringe 8 inches
1.5 inch gathered lace 8 inches
tim holtz idealogy metal corner hardware
french vanilla card stock bazzill basics paper
coffee archival ink
rubber stamp..Janet Klein
scrap of natural quilt batting
scrap of canvas  6”X6”
gold seed beads 2 doz
ivory thread coats and clark
chipboard floral piece from my stash...
craft paint raw umber
art glitter opaque ultrafine glitter #264 ash
designer dries clear adhesive
sewing machine..baby lock
khaki thread coats and clark
xyron tape runner


lets get started..

cut a house shape out of chipboard...
my dimensions are 6” wide and 10” tall...
cover the roof portion of the house with authentique euphoria paper and the lower portion with authentique foundations.
I used a xyron tape runner to adhere to chipboard.
Along the right hand side of the house I adhered some pattern tissue with multi matte medium. Top stitch around, all the edges with khaki thread..using a variety of straight stitches and zig zag.

Cut canvas and quilt batting with pinking shears, to 4.75" X 5" top stitch together close to the edges..set to the side for now.

Using the raw umber craft paint, dry brush all of the edges to distress. Once the paint is dry adhere the wide white ruffled lace to the lower edge. Adhere the yellow ball fringe to the top of the house, wrap to the back. Cover upper edge of ball fringe with narrow white lace adhering to the backside also.

Take a narrow button card and adhere to the right side of the house...this will be your chimney. Adhere large bow made with grograin ribbon to the left side of house and adorn with ivory button. On the top of roof add an idealogy metal corner and pinch it together.

Stamp the little girl image using coffee archival ink on the french vanilla card stock three times and cut out...adhere to the lower left hand section of the canvas using designer dries clear adhesive...
adhere the word home to the upper portion of the canvas. I used upper and lower case letters. I randomly cut a heart from the quilt batting and stitched  on tiny gold seed beads, adhere to canvas as shown on photo.


Now you can adhere the canvas piece to the front of your house.
Paint the large floral chipboard piece with raw umber craft paint..once dry, brush on designer dries clear adhesive and sprinkle with ultrafine opaque glitter #264 ash.
Once this has dried, adhere to the front of the canvas as shown.

I finished the back with a remaining piece of the paper from the front.

Wednesday, April 18, 2012

NEW Lower ART GLITTER Prices

How do you improve Art Glitter?


By dropping the prices! We have been reviewing our pricing structure and made some significant changes. Particularly on the 1 oz. and larger sizes of polyester glitter, dazzlers, adhesives and Barbara's stamps.

ULTRAFINE PRICES!

1 oz jar was $10.10   NOW $7.32
2 oz jar was $18.50   NOW $13.30
4 oz jar was $34.35   NOW $21.94

 (See link below for list of all Polyester Glitter lower pricing)

HEXI DAZZLERS PRICES!

1/4 oz jar was $4.00     
NOW ONLY $2.56 ea.
1/2 oz jar was $5.90   
NOW ONLY $3.28 ea.
1 oz jar was $10.10   
NOW ONLY $4.04 ea.


 GLOWING GLUE PRICES!


2 oz bottle w/ spout was $6.50
NOW ONLY $4.98 ea.
8 oz refill bottle was $18.50
NOW ONLY $12.96 ea.


SHIMMERING STAMP PRICES!

Large Butterfly Stamp was $16.00      NOW ONLY $11.26
Large Dragonfly Stamp was $18.00    NOW ONLY $11.26

Saturday, April 14, 2012

Announcing 2012-2013 Design Team

We are so excited for the changes going on at Art Glitter! We not only have wonderful glitter and glue we have become famous for but we have many other products and to help show off our product line is our NEW design team! This talented group of artists will be posting on their personal blogs, but also creating special projects for the Art Glitter Blog! Help me to welcome...


Design Team Lead: Kristi Parker Van Doren
Kristi Parker Van Doren has been creating since age 12 when her parents gave her a rubber stamp and ink for Christmas. 37 years later she is still creating, designing, writing, teaching and more! Kristi loves to create and has been on several design teams including: Spellbinders, Northwoods, Worldwin Papers, Luminarte, Coronado Island and several others. She served three years as a writer for Scrap Stamp Magazine, as well as having articles published in books and magazines, most recently in Zentangle 6. Kristi is currently serving on design teams for USArtQuest, The Robins Nest, Dreamweaver Stencil, and is the lead for Art Institute Glitter and Connie Crystal design teams. When Kristi is not creating she is hanging out with her family. Check out her blog at www.kristiscreativecafe.blogspot.com!
Now For The Team:
Carrie Hannegan is a Southern California native who grew up near the glitz and glamor of Hollywood, but managed to avoid it (mostly). She has a degree in Animation from the California Institute of the Arts where she learned to appreciate the tedious side of art, one hand drawn frame at a time. After graduation, a bit of panic and a plunge, came the grand opening of her retail gift shop in the Los Angeles area called Violets are Blue.  Partnered with her Mother, they filled the store with their handmade creations, hand painted furniture, hand picked vintage items and other fun stuff sprinkled in. Five years later, new chapter, they (very) reluctantly closed the store and Carrie moved to the other coast and launched a new online adventure called Violet Cottage. Violet Cottage started out as a "Violets are Blue, light" web store with lots of various inventory, but slowly morphed into a greeting card business. Inspired by vintage wrapping paper, fabrics and wallpaper, each card design is hand painted by Ms. Hannegan, who describes her card line as "sweetly sensitive, yet colorfully chaotic". The card line is still in its infancy, but has been well received and is growing daily. Violet Cottage cards can be found in many stores throughout the country or online at www.violetcottage.com.

My name is Cherie. I was born and raised in Minnesota, and went to Iowa State University. I married my husband in 2008 and we have a lab/border collie mix, Lucie, who is 3 years old. I have lived on both the east and west coast since being married, and will be moving to Hawaii this summer! I love to travel, geocache, craft, dabble in photography, and most importantly, play with glitter!
Hello! My name is Karen Taylor.


I am lucky to have two children Jessie and Douglas. I have been blessed with two grandson's, a granddaughter and another on the way.

I have been a paper craftier for six years but creating has always been a part of my life.
I was raised by my grandmother who taught me the love of creating. Inspired by her 1930's scrapbooks
I love all things vintage and old. When I am at home you can find me in my studio.I love to create very special layouts, cards and altered items my mini pieces of art.
I have been lucky to have work with major paper craft companies including Spellbinders Paper Arts,Best Creations, Inc, Nikki Sivils Scrapbooker to name a few and in magazines, on TV (Local TV segments, Creative Memories TV Show, Terri O Show, QVC, Home Shopping Network US and Canada and was published in a book last year as well as work in catalogues and at the Craft and Hobby Association Show for the last six shows. For the past two years I have been a VIP speaker at Midland Memory Expo speaking along side Cardmaker magazines Editor Tanja Fox, Creating Keepsakes Creative Editor, Megan Hoeppner and Nikki Sivlis, Scrapbook Paper Company owner just to name a few.
I currently am the Design Team and Social Media Coordinator for Want2Scrap and a Spellblogger for Spellbinders Paper Arts.

Hi! My name is KC Eddy and I live in Central Missouri, with my husband, two daughters and our collection of furry friends - too numerous to mention. By day I am an accountant, by night I am a craft-a-holic. I also enjoy boating and camping with my family and am a huge Chicago Bears fan! I have crafted in almost every medium imaginable; including paper, ceramics, porcelain and glass. I am especially fond of jewelry, mixed media and anything that glitters and shines. Though I often get lost in a project and make things more involved than they need to be, I try to streamline my projects for teaching and tutorials so that others can learn from my experimentation (mistakes). I am a Design Team newbie so this is a very exciting new adventure for me. I hope you'll join me for the ride!
Laura Drahozal cannot remember a time when she was not creating. As a former art teacher, she has tried almost every traditional medium. She looks for inspiration all around her and loves to combine various products and techniques to achieve what she had previously thought of as impossible. Laura is currently serving on design teams for Dreamweaver Stencils, Twisted Sketches and Connie Crystal and has formerly served as a Guest Designer for Art Glitter. She is thrilled to be joining the Art Glitter Design Team as she loves all things glittery! Check out her blog at www.rememberinglifesmoments.blogspot.com
Linda Neff

I discovered through my first attempt at scrapbooking I could create art – my way. With rubber stamps, inks, paints, paper, fabric and other mediums, I create a soft, vintage look that is sometimes natural and sometimes a bit more romantic, but always evolving. I enjoy making mini albums, scrapbook pages and wall art to capture my little scrapped treasures.

The mother of three adult children, I live with my retired husband in Michigan and spend my time teaching classes at independent scrapbook and quilt stores. I am Ranger certified and always on the lookout for new techniques. I encourage others to dive head-first into the art of paper crafting, whether it be scrapbooking, stamping or altered art.
Hi! My name is Trudy but friends call me True.
My husband, Robert and I were high school sweethearts and are still very happily married today. I am the mother of a wonderful 26 year old son Kurt and MIL to a beautiful DIL Kristin. I am also super excited that I will be a grandma in October! :)
Since I started making cards a few of years ago, I have been blessed with many new card making friends, been asked to speak and teach at major craft events, and have been lucky enough to have my cards published and featured in magazines and books.
I love sharing my craft with others and following other artists for inspiration and fun! I will soon be teaching online classes, so keep an eye out! :)
I am a freelance illustrator, and I also design for: Want2Scrap, Inky Antics, Discount Card Stock, Really Reasonable Ribbon and Helmar. I am also very honored to be on the CardMaker Magazine blog design team.
I can hardly wait to be covered in sparkles with the rest of my new Art Glitter team members!

What an amazing team!& We can't wait to see what wonderful creations they have in store for us. It will be a very sparkling year! Welcome one and all to Art Glitter!


Thursday, April 12, 2012

Gone Fishin' by Sherri Reehil-Welser


The warm weather is upon us and kids are ready for the fishing poles!! We have quite a few beautiful little waterways for the kids to go fishing at around here and thought it would be fun to create some colorful fish before actually being able to throw the line in!


These “rainbow” fish are created using a large fish stencil and kraft paper. The kids then traced and cut out their fish two at time as these fish would be stapled together and stuffed! Next comes the fun and creative part of coloring and making the fish their own with designs, buttons and Art Glitter!


There is never a shortage of colors when using Art Glitter... and they fit the project we had in mind with the fish perfectly! Fish often “shimmer and glimmer”  in the sun after being caught and that is exactly what our fish did when we applied Designer Dries Clear Adhesive and Art Glitter! Topped with old buttons it added some interest and fun to our project~ even though we all know “fish don’t have buttons”.


After designing the fish we stapled them together but left a hole big enough to stuff them with shredded paper.  And for the final touch we hung them from an “old fashioned” fishing pole! This was a very easy project and the kids had a blast creating their fish and hanging them from the poles! In the end we thought it would be fun to hang the pole from the art room’s wall as if someone had just caught the fish!

Monday, April 9, 2012

Love Cross by Emma McDonald

Many of my friends decorate a focal wall in their homes with an assortment of crosses. They vary from big, small, old, new, tribal, Celtic, wooden, painted, mosaic-ed, and now…….. yes you guessed it! SHABBY CHIC-ed and GLITTERED!


Mixing the old world rustic with a punch of red glam is a perfect recipe for this graceful and timeless piece.

Materials used:

Art Glitter: Red Kooky Ultrafine Opaque
Designer Dries Clear Adhesive
wooden cross
small wooden heart
strips of burlap
small piece of scrap wood

acrylic artist paint: white, dark brown, 2 shades of red (I used Liquitex, BASICS: Titanium White, Naphthol Crimson, Burnt Umber/ Liquitex, Soft Body: Quinacridone Crimson)
glazing medium (I used Liquitex: Glazing Medium)
spray bottle of water
paintbrushes
hot glue gun/sticks
paper towels

First, base coat the cross with white paint twice and let dry.  Then squeeze red (Quinacridone Crimson) paint directly on the heart and use brush to spread it out around the edges. Leave the paint shallow in the middle creating an empty heart in the center that will later be filled with…..-GLITTER!


Use a brush to mix in the other shade of red (Naphthol Crimson) along the edges of the heart. Set aside to dry. Remember the thicker amounts of paint will take longer to dry. Mine took about 24 hours.


Mix equal parts of glazing medium with dark brown (Burnt Umber) paint. Quickly brush a thin layer over the entire cross. Before it dries, spray water over the brown. Let it sit a couple of minutes.


Then use a paper towel and gently wipe away the water and any wet paint. This will leave you with a distressed weathered look. Repeat until you get the effect you want. If you want to apply this technique on a bigger surface, just work on small sections at a time. I suggest experimenting on an old piece of wood first until you get a feel for the technique.


After the painted heart has dried completely, use Designer Dries Clear to fill in the concave portion of the heart.


While glue is still wet sprinkle the Red Kooky Ultrafine Opaque. Let dry. Tap heart to remove excess glitter onto a piece of paper that is folded in half. Now take the paper, slightly folding it, and pour glitter back into its container. A soft and dry brush can also be used to dust off remaining glitter when dry.


Brush on the Designers Dries Clear to adhere the strips of burlap around the ends of the cross. Let dry.  Finally, hot glue the scrap piece of wood to the center of cross and then glue the heart to the middle of the scrap piece. This will give a 3-dimentional look to it. The scrap piece needs to be smaller than the heart, so it will be hidden from view.

Glitter has an amazing ability to captures light brilliantly…..so keep that in mind when you decide where to hang it.

Friday, April 6, 2012

Wish Big by Connie K.

Remember when I told this time of year I have lots of birthday celebrations in my family...well here is a little birthday banner that can hang in a place of honor for the birthday boy or girl...


It could be a countdown calendar that can have the days leading up to the big numbered from 14 through your birthday...just tear off each day as you count down...this way the celebration can last for a few weeks.

You can add numbers to the previous days or even photos from past birthdays.

I have the final page shown here...which is all glammed up with baby blue ultrafine opaque glitter.


These are the supplies you will need to gather:

chip board base 8.5 X 7
pink paislee paper soiree collage
pink paislee paper words
tim holtz binder mechanism
2 white buttons
1 pink button
black cardstock
black and white bakers twine
die cut celebrate, silhouette
8 inches ivory crepe paper
5 inhes black ribbon
black archival ink
white card stock
designers dries clear adhesive
#33 baby blue ultrafine opaque glitter
#92 bananan ultrafine transparent glitter

12 inches black wire
2 inch scalloped paper punch
pink paislee soiree clear stamps
white craft paint
pink spray paint


Lets get started...

Spray paint your binder mechanism with pink spray paint. Next you will need to paint the back and edges of the chipboard shape with white craft paint. Once this is dry cover with the yellow  with white dot soiree paper. Adhere the binder mechanism to the upper part of the chip board... approximately 1 inch from the top. Cut a piece from the the words paper 4.5 X 3.75, round the lower corners and adhere just below the binder mechanism. Adhere the word celebrate below this...about 1.5 inches from the lower edge.

Using archival jet black ink stamp the numbers under the left side of the word celebrate. Also using the small flags in the stamp set stamp binders on each side of the pink dotted paper as show in the sample.

I put a small bead of designer dries clear adhesive along the edge of the banner and glittered with #92 bananan glitter, set this to the side to dry.


Using a 2 inch scalloped punch, cut one from the black cardstock and another circle from the yellow dot.

Make a rosette using the crepe paper and attach to the center of the yellow scalloped circle and layer on top of the black with a foam dot. Take the black ribbon and knot it in the middle, trim the tails and adhere to the banner piece with a hot glue gun. Then adhere the rossette to the top. Thread the pink button with bakers twine and tie a bow and adhere to the center of the rosette.

Thread the remaining two buttons with bakers twine and tie bows, adhere to the binder mechanism as shown in the sample. I used my glue gun for this.

On your computer print out the birthday sentiment* (the dimensions are 4 X 4), I rounded the lower outside corners. Once it was printed I went over each letter with designers dries clear adhesive and glittered with the #33 baby blue ultrafine opaque glitter.

Punch and hang on the binder.

Finally I added a wire which is adhered to the back for hanging...

Tuesday, April 3, 2012

Light Up The Night Sky by Sherri Reehil-Welser


Nothing is as pretty as a “shimmer of light on a summer evening” especially when in the garden. Creating these glittering candle holders was a lot of fun with the kids and so easy to create! The look we were wanting to achieve was a stained glass effect with the added bonus of YES you guessed it glitter!! We began with clear glass candle holders (any size), colored tissue paper ( torn into small pieces), Art Glitter Designer Dries Clear Adhesive, Art Glitter Dazzlers (we used D55 “Queen’s Robe”), bead trim and several paint brushes to apply the adhesive.


Gather all the supplies and start by tearing the different colors of tissue paper into random small pieces. Then apply Designer Dries Clear Adhesive and tissue paper to the glass candle holder covering and over lapping tissue paper pieces until the outside of the container is covered. Let dry and apply several more coats, smoothing out after each coat. For the final coat, the glitter is applied.


After coating with adhesive sprinkle glitter over the entire outside of glass candle holder. Let dry, then measure out the ribbon/bead trim around the top of the candle holder. Cut to fit and apply with designer adhesive, smooth out and let dry. You now have a beautiful candle holder to light the night sky in shimmering style!! These also make an awesome Mother’s day Gifts for the kids to make!!