Showing posts with label crystal glitter. Show all posts

Thursday, March 13, 2014

Art Glitter


Spring Break with Art Glitter


Supplies:
Journaling Cards

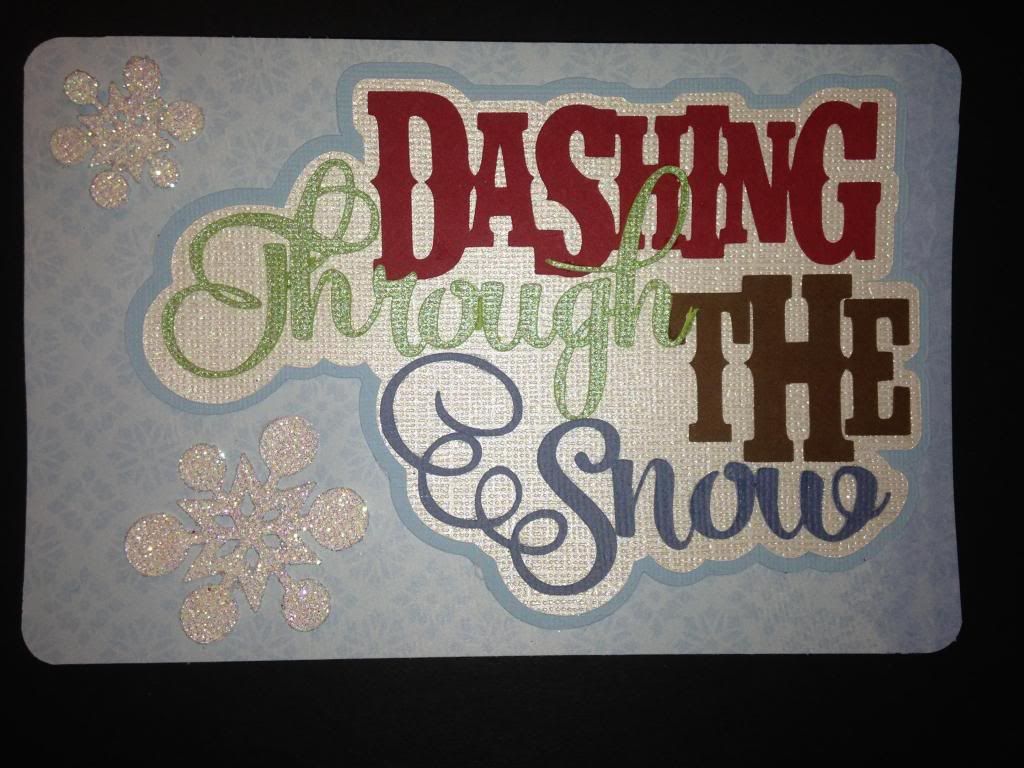
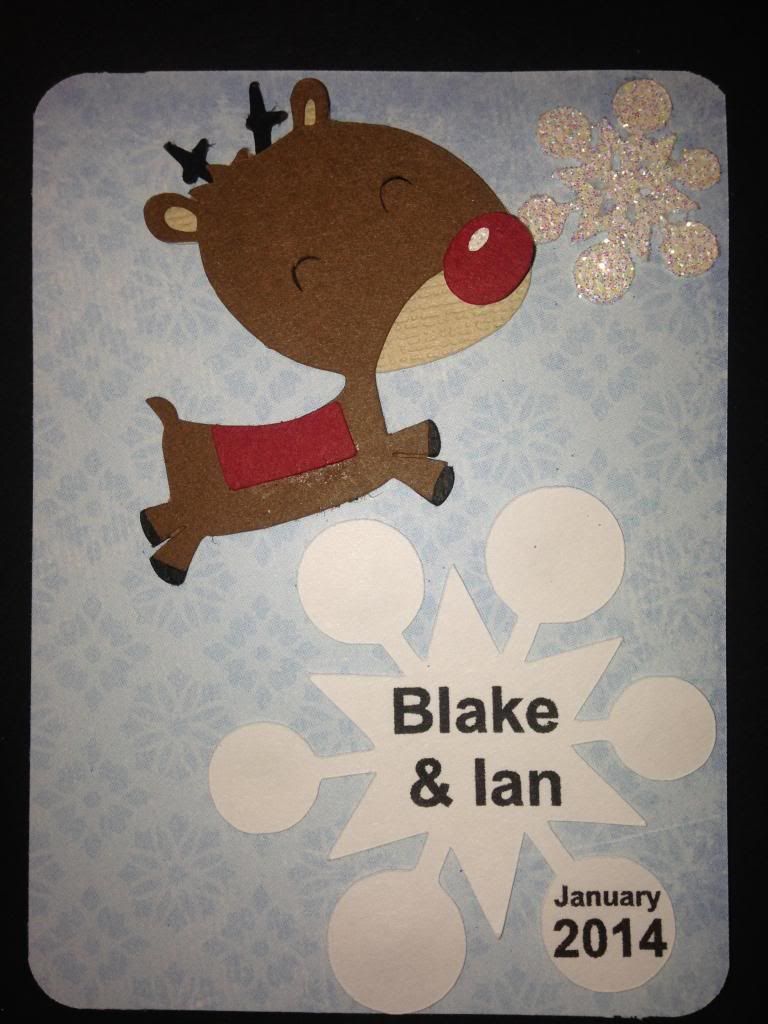
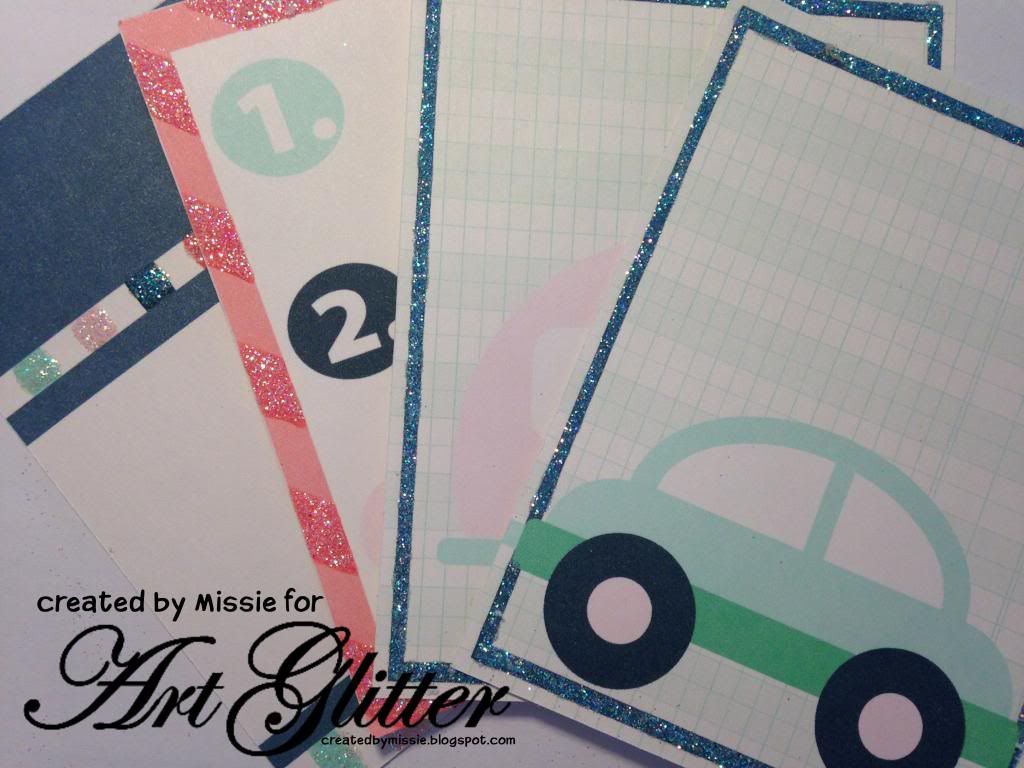
This year I am striving to expand my scrapbooking from traditional pages and add the project life style of pages to my skill list.  So, today, I want to share a fun project life style layout I created for spring break.  The graphics for this page are from Lettering Delights.  They offer a variety of SVG, graphic, and font files.  For this project I used the Spring Break Graphic set.  As you can see a few of the journaling cards above are strait from the graphic set. I then created a few unique journal cards to coordinate with the set (I created the car and camper cards, the cards that have just a background and frame, and the 2014 card.  The images were sized to 4x6 and 3x4, and printed on my home computer using white cardstock.


Here you can see the printed cards just waiting for glitter!


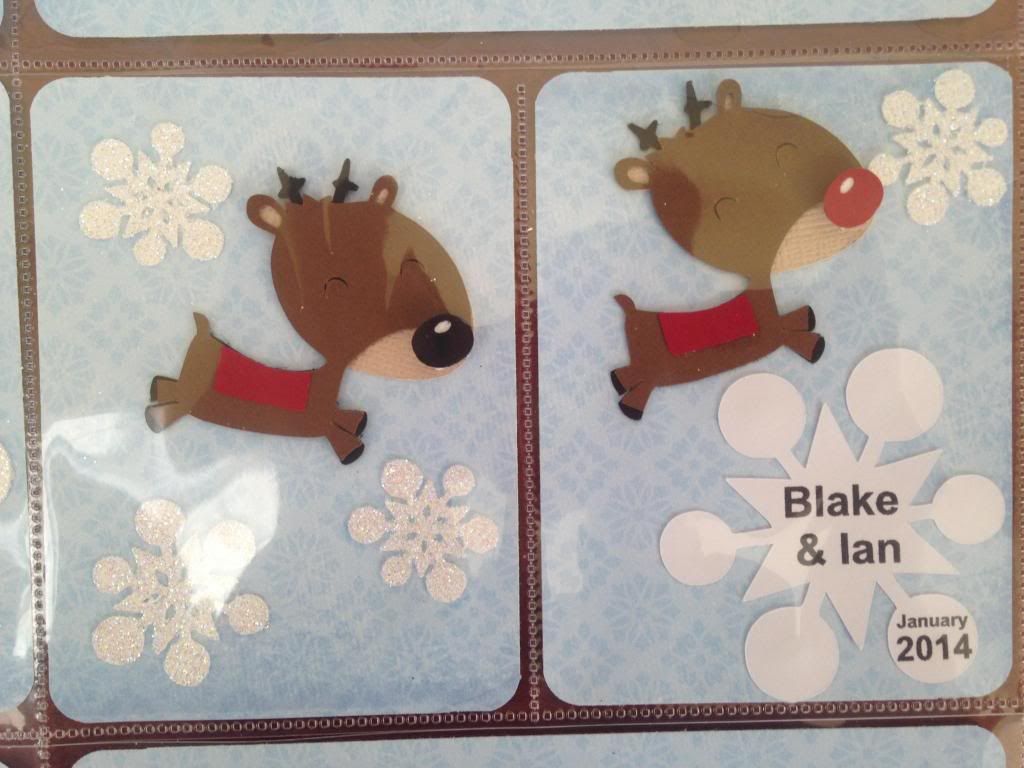
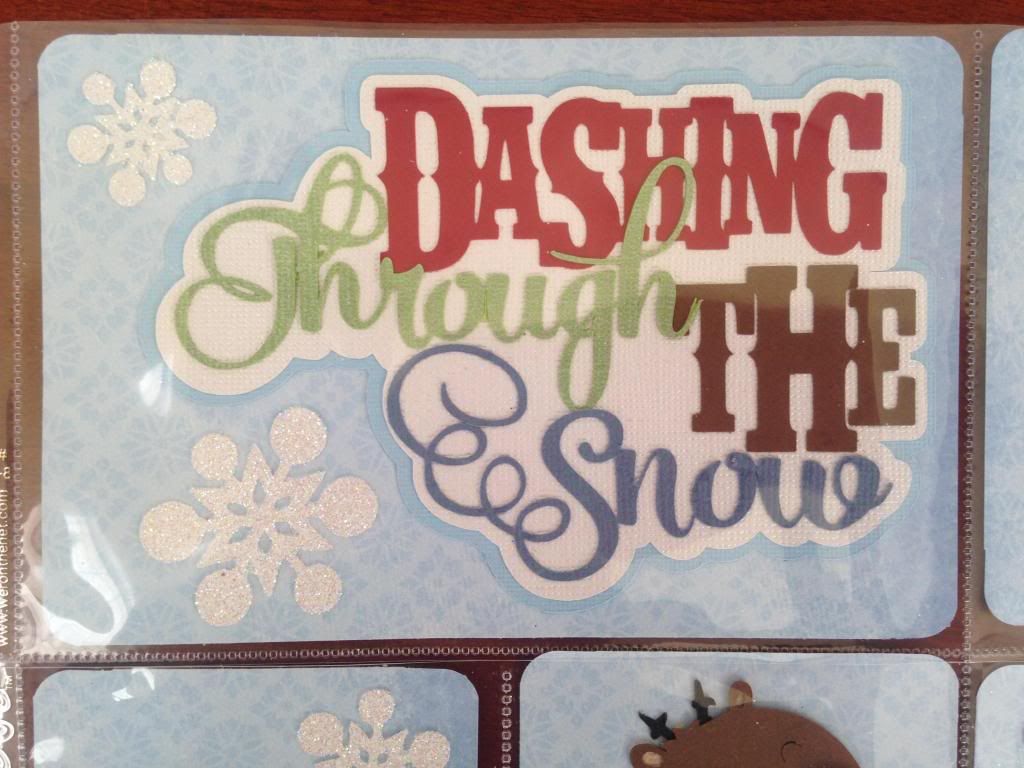
Art Glitter Dries Clear adhesive is selectively applied to the journal cards and then Art Glitter Crystal Glitter is added.

 Beautiful Glittered Journal Cards


Thanks for stopping by to see my creations.
Missie Todd
createdbymissie.blogspot.com


Tuesday, February 25, 2014

St. Patrick's Day With Art Glitter


Lucky banner for Art Glitter
Supplies: 
St Patrick's day theme papers- these were digital printables found HERE
foam adhesive
Die Cut Banner, letters, and flowers


To begin the project Missie used Silhouette Studio to create a printable banner complete with layers and quilled flowers.  The pieces were then cut using the silhouette cameo. 


Cover the letters completely with Art Glitter dries clear adhesive and crystal glitter.


Quill the flowers and use hot glue to keep them in the perfect shape.


Use pop dots to layer the letters onto the banner and attach quilled flowers with hot glue.


Use tulle to string the individual pieces into a banner and adorn the banner with Connie Crystal Crystals.


Want to recreate this banner for yourself?  Missie has provided the Silhouette files for you to download.  Simply use the links below to get them, and be sure to leave a comment here letting Missie know that you will be creating a banner for yourself!

Thanks for stopping by to see my creations.
Missie Todd
createdbymissie.blogspot.com


Wednesday, January 8, 2014

Dashing Through The Snow


Supplies:
Assorted Scrapbook Paper
Die Cut title, reindeer, and snowflakes- these are from MissKateCuttables.com
Art Glitter Crystal Glitter  #85

Starting out the new year by getting organized? This year it is my hope to begin using the "project life" style of scrapbooking for at least some of my photos. While I don't plan to give up traditional scrapbooking, I'm finally ready to give this a try. I have over 3000 photos living in my iPhone and I want to do a better job of getting the photos of my kids into albums.  This layout is my very first attempt at a project life layout and I have to say- I am quite pleased.


Begin by cutting patterned scrapbook paper into 3x4 and 4x6 inch pieces.  For this layout one sheet of scrapbook paper was used for the entire background.


Using the SVG cut files "Dashing through the Snow" from misskatecuttables.com make snowflakes, a title and reindeer for the layout.


Add double sided adhesive to the snowflakes (this was done using a xyron sticker maker) then add Art Glitter Crystal Glitter to the snowflakes. 


Add the die cut pieces to the journal cards to begin assembling the layout.

You can use the Silhouette Cameo's print and cut feature to add names and dates to a snowflake shape to be used as a journaling card.

Here are some close ups of the finished layout.


Thanks for stopping by to see my creations.
Missie Todd
createdbymissie.blogspot.com


Friday, November 29, 2013

All Things That Glisten


Glitter is always a part of the holiday season.  You see it on so many things so why not add it to your own cards and projects to make them extraordinary this year.  Add Tombow Markers to the mix and you have the perfect makings for any holiday project. 
 
In November you can use the PROMO CODE TB20 for 20% off of your $25 or more order.


Supplies Needed:
 From Art Glitter-
Crystal Ultrafine Transparent Glitter-http://www.artglitter.com/retail/Rartglitter.html
Designer Dries Clear Glue-http://www.artglitter.com/retail/Radhesives.htm-
Ultrafine Metal Tip-http://www.artglitter.com/retail/rtools.htm
Glitter Spoons-http://www.artglitter.com/retail/rtools.htm
Fantasy Film-Krista's Eyes-http://www.artglitter.com/retail/fantasyfilm.htm
 
  From Tombow-
 Retro Dual Brush Pens-http://tombowusa.com/craft/markers/dual-brush-pen-set-6-retro.html
 N65 Cool Gray Dual Brush Pen-http://tombowusa.com/craft/markers/dual-brush-pen.html
 
Also Needed: White Card Stock, Blue Card Stock,Embossing Folder and Die Cut Machine, Dark Pink Ink Pad, Light Pink Ink Pad, Printer or Stamp for Sentiment,  Tape Runner
 
 
Begin by creating a 5"x 7" card base from white card stock.  Lay it aside.  Next, cut a piece of white card stock to fit into the embossing folder you have chosen and run it through your die cut machine.  Color in some of the areas using the Dual Brush Pens from Tombow.  
 Now, use the metal tip on the Designer Glue and outline some of the embossed areas.  Sprinkle the glitter over them and remove the excess returning it to the jar. 
 Add some glue and glitter around the areas that you colored with the markers to make them shine, too.  Also, add some directly over the areas such as the tops of these ornaments and allow the marker to show through the clear glitter when it dries.  It adds a little shine and sparkle to what you've colored. 

  Bring some color to your projects with Tombow markers.  Then, add  a little sparkle and together they will bring join into the season.   You can't go wrong with this combination! 


http://www.pegscraftingcorner.blogspot.com/ 

Thursday, November 21, 2013

Every Day Greeting

Uniquely You


 This month Art glitter and Tombow are teaming up with amazing projects.  Be sure to visit frequently to see how great the go together!  Also use the code at www.artglitter.com of TB20 for 20% off of your glitter order of $25 or more!
Supplies:
Art Glitter #85 crystal glitter
Art Glitter dries clear adhesive
Tombow Dual Brush Pens (pink and purple)
Cardstock (white and purple)
Assorted bling

For this project a back to basics approach is being highlighted.  This card can be recreated using just  a few simple items, and requires no fancy cutting machines or dies, yet the finished look is really great! 

Begin by stamping on white cardstock using Tombow markers instead of an ink pad.  If you are unfamiliar with this technique be sure to check out this post on the ART GLITTER BLOG  where I talk about another way to use this method.  After stamping, use the brush markers to "ink" the edges of the cardstock. 
After inking the edges, spread Art Glitter dries clear adhesive along the edges of the cardstock (I like to get messy and spread it with my fingers) and apply Art glitter #85 crystal glitter.  Because the tombow markers are water based using this adhesive helps to blend the inks into the paper- a look that I love!


Thanks for stopping by to see my creations.
Missie Todd
createdbymissie.blogspot.com


Wednesday, November 13, 2013

Glistening Holiday Greeting


Add a little color and sparkle to all of your projects this holiday season with Tombow Markers and Art Glitter.  The Art Glitter design team has been having fun already creating things for the holidays.  Peg likes the traditions of the holidays and one of the symbols of a traditional Christmas to her is the poinsettia.  Every year she buys one to enjoy.  Speaking of enjoying, be sure to enjoy the PROMO CODE TB20 for 20% off of your $25 or more order this month. 
 
Supplies Needed:

From Art Glitter: 
     Crystal Ultrafine Transparent Glitter-http://www.artglitter.com/retail/Rartglitter.html
     Designer Dries Clear Glue-http://www.artglitter.com/retail/Radhesives.htm
     Ultrafine Metal Tip-http://www.artglitter.com/retail/rtools.htm
     Spoons-http://www.artglitter.com/retail/rtools.htm
 
From Tombow
     Retro Dual Brush Pens-http://tombowusa.com/craft/markers/dual-brush-pen-set-6-retro.html
 
Additional Supplies:
 
      Card stock for card base, patterned paper for card, 1 piece of ribbon, fine paint brush, image printed off internet (remember to find ones that are copyright free to use)
 
After you have printed your image use the markers to color it.  Here Peg chose to search for a poinsettia image online using the search terms," poinsettia clip art." 

Place the metal tip on the bottle of glue and add a small amount of it to one section of the image.  Be sure to work in small sections so the glue doesn't dry before the glitter is added.  Once the line of glue is on the image, use the paint brush to spread it out over the area.
Then, sprinkle the glitter over the glued area. Allow it to sit for a minute to adhere well and then shake the excess back into the container.  Once the glue has dried the color will show through. How cool is that?   Continue repeating these steps until all of the areas are covered that you want.  For this image, Peg chose to leave some areas open for contrast.  She added glitter over the flower centers to make them stand out from the poinsettia. 
 
 Allow it to completely dry and then assemble the card.
 
Now, you can send a little sparkle to someone this holiday season or any time of year.  Color an image with the fabulous Tombow markers and then add some clear glitter for a look that's out of this world.  Gather those supplies and get to work.  The holidays will be here before you know it! 


http://www.pegscraftingcorner.blogspot.com&nbsp/;


Sunday, November 3, 2013

Art Glitter and Tombow! Winning Combination

 
Make sure and check out the Tombow Blog for the details on how to win!  Check back every other day this week with us, here on the Art  Glitter blog for, new projects all month long using Tombow and Art Glitter together!
 This pear was made with Tombow Markers and Art Glitter for our collaboration.  It was very simple.
SUPPLIES:
Tombow Dual Brush Markers 025, 026, 055, 062, 098, 173, 177 and 977
Art Glitter Designer Dries Clear
Art Glitter Ultrafine Transparent 85 Crystal
Dreamweaver Stencil Pear LL563
Dreamweaver Stencil Tool
White Card Stock
Graphic 45 French Country Paper
Card Stock in Ivory and Yellow
Adhesive

DIRECTIONS (so, so simple)
1)  Use the Dreamweaver Stencil Tool to emboss the pear image on the white card stock.
2)  Flip the card stock over, so that the pear image is indented into the card stock.
3)  Use the Tombow Markers to color the image.  They blend well because they are water based.
4)  Cover the image with Designer Dries Clear.  It should be easy to do this because the image is indented. (The Tombow team would use Tombow Multi Glue)
5)  Pour the Crystal Glitter over the top and let dry.
6)  Assemble the card.

You can see the beautiful marker colors through the glitter.  It looks sugar coated, which is great for this time of year!  If you want to give it a try, the Art Glitter site is giving you 20% off an order of $25 or more this month.  Just use the code TB20.

Until next time, glitter on!