Monday, October 28, 2013

Wheeeeeeee

 
Winter Fun
 
 Even the woodland creatures like to have fun in the snow and these cute little tobogganing squirrels are no exception.  This wonderful stamps from Northwoods Rubber Stamps makes an awesome card for the holiday season.  This month, the Art Glitter design team has teamed up with Northwoods Rubber Stamps to bring some sparkle to your holiday season.

Add even more sparkle this month by using the PROMO CODE:  NW15 for 15% off the retail prices when making a $25 or more purchase. 

Supplies Needed:

     From Art Glitter: http://www.artglitter.com/%3Cbr /> Glitter:http://www.artglitter.com/retail/Rartglitter.html
     Lime Rind Ultrafine Opaque Glitter
     Varsity Blue Ultrafine Pearlescent
     Garnet Ultrafine Opaque Glitter
     White Satin Ultrafine Pearlescent Glitter
     Designer Dries Clear Glue:http://www.artglitter.com/retail/Radhesives.htm
     Spoon Man! Spoons:http://www.artglitter.com/retail/rtools.htm
     Metal Tip:http://www.artglitter.com/retail/rtools.htm

     From Northwoods Rubber Stamps:
       Nora's Tobogganing Squirrels:  http://www.northwoodsrubberstampsstore.com/p9248.html%3Cbr />
Also Needed:  Ink for stamping, card stock to make card base, white card stock, 1 sheet of patterned paper for layering onto card base, markers, dark blue/grey ink pad for inking sky line and a piece of ribbon

Begin by creating the card base and trimming a piece of patterned paper to fit onto the base.  Add the ribbon across the card.  Lay all of this aside.

Stamp the image onto the white card stock and color.  Trim it to fit the card.  Use the blue/grey ink pad upside down and beginning off the paper move in small circles gradually moving it onto the paper and into the areas needed to be shaded. 
 
 
Place the metal tip onto the bottle of Designer Dries Clear Glue and place small balls of glue onto the tassels of the squirrels hats.  Sprinkle each with glitter and allow it to sit for just a minute to get a good adherence.  Shake off the excess.  You can do this one at a time and put the colors back into their original containers or do them all at once and shake the excess into a separate container to have a glitter mix for other projects.  It's a fun way to create a mixture of colors.  

 Now, add small dots of glue onto the dotted areas of the stamped image.  Work in small sections and add the glitter to them while the glue is still wet.  Continue to cover all of them with glue and glitter.  Allow it to set and shake off the excess. 

 Still using the glue with the tip on it, add some glue to the ends of the branches and trace the lines under the toboggan.  Sprinkle glitter onto those areas and shake off the excess. 

Allow the image to dry and adhere it to the card base. 

Join these fun loving squirrels and have some sparkling fun this season.  Share the fun with someone in your thoughts and send one to him or her, too.  Everyone needs to have a little fun once in a while.


To see more of Peg's work join her on her blog at http://www.pegscraftingcorner.blogspot.com/


Thursday, October 24, 2013

Ornamental Fun


This month at Art Glitter we got to work with the Northwoods Rubber Stamp Company.
I have never used their stamps before but was pretty impressed with such detail. The ink went on very smooth and the image turned out perfect.


 Supplies:
 
Patterned Paper
Copic Markers
Twine
 
 
After stamping the image onto my cardstock I colored with copic markers then added glitter.
 
Be sure to check out Art Glitter and if you purchase $ 25.00 of AG product
and use NW20 coupon code you can save 20%.

My Blog: zippity-do-dah-tabitha.blogspot.com


Tuesday, October 22, 2013

Squirreling Around

 
Ingredients

This month we are happy to be teaming up with Northwoods!

To celebrate, Art Glitter is having a 20% off retail sale of any $25 purchase.  Just use code NW20 at Check out!


Directions
Step 1
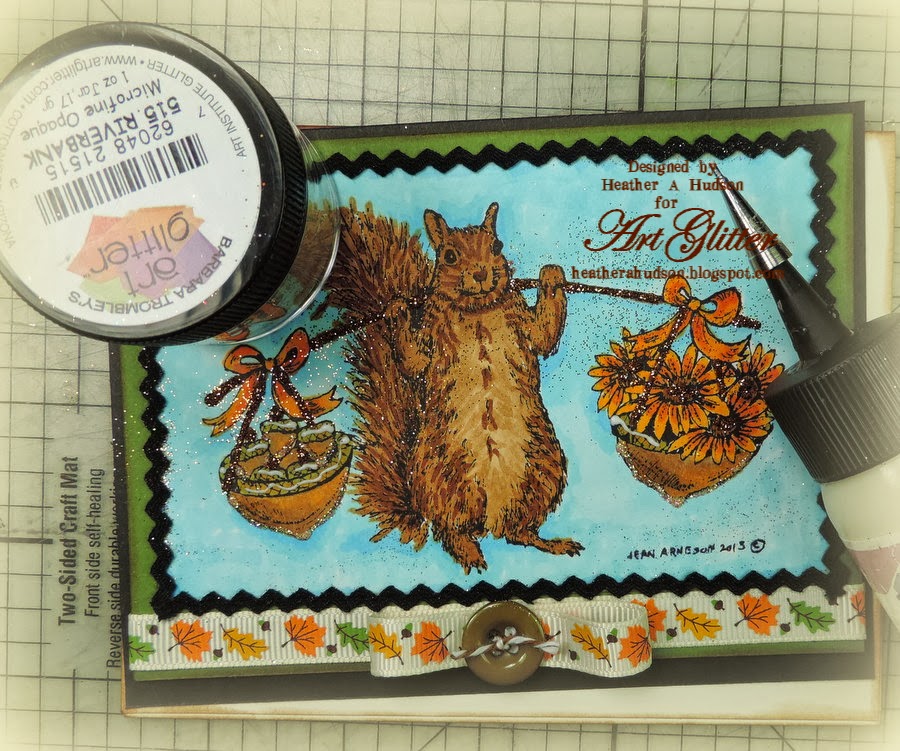
Heather started out by using the Northwoods Nora's Bountiful Squirrel Stamp and the Art Glitter Black ink pad to stamp her image onto white card stock.  Heather LOVES Squirrels, so she loved playing with this adorable image!
She used Copics to color her image. #BO2  #BO1 were used for the background.  The Squirrel, was colored with E35, E55, and E37, bows and flowers were colored with Y38 and YR14, Same with bows with touches of YO4 and Y68,  Acorns and acron baskets with E35 and touches of Y38.  Stick handle was done with E18.  
  Step 2
Heather used the 1/2 perfect layer ruler to cut a 1/2" mat for the bottom.
Step 3
Heather used her perfect layers ruler to create a mat out of green card stock.  Sides were cut with 3/16 ruler..
Step 4
Heather used the 3/16 perfect layer ruler edge for the bottom of the next cardstock layer (black).

Step 5
Heather used the Perfect Layers Ruler to cut the sides of the black cardstock to a 5/16th" mat.  This time she measured off the stamped image piece instead of the green layer.
Step 6
Heather put a strip of the red sticky tape across the bottom edge of card.
Step 7
 Heather applied her Fall Leaves ribbon to the red sticky tape. The Ultra fine tip applicator and Designer dries clear glue were used to add some glue to the edges of the stamped image, and black mini ric rac was attached.
Step 8
Then she used another piece of the ribbon to create a loop, and then glued it down to the ribbon base to create a bow on the front of the card.  A button tied with Brown Sugar Baker's Twine was added to form the center of the bow.
Heather added glue to the acorns and  basket bottoms and used Lion's Mane Glitter.
Step 9
Heather added more glue to her image, and applied Camel Glitter.
Step 10
Glue was applied to the acorn tops and rims of acorn baskets then Riverbank Glitter was added.

Step 11
Heather continued to use the DDCG and UFTA to apply glue to the bows and then applied Butterscotch Glitter.  

Step 12
Glue was applied to the squirrel, and Goldenrod glitter was used.
Step 13
Swirls of glue were added to the background and Blue Angel Glitter was applied.
Step 14
Heather used the red sticky tape and placed on her ivory card stock base which was inked with Ranger's Vintage photo.  This will hold down her matted focal image.  Dot of DDCG were added to the edges of the green card stock and Cavalado Glitter was added.
Step 15
Heather attached her matted image to her cardstock base.
How about a close up of the Cute 
Northwoods' Nora's Bountiful Squirrel Image!
Adorable!!
Some more Close ups.
Left side of card.

Right Side of Card.
Thank you for stopping by and hope you enjoyed Heather's Tutorial using
Art Glitter and the fabulous
 "Northwoods Nora's Bountiful SquirrelStamp!"

Feel free to stop by and see Heather's other projects using Art Glitter on her blog.

heatherahudson.blogspot.com

Sunday, October 20, 2013

Snow Birds with Art Glitter and Northwoods Stamps


Supplies:
Art Glitter #85 crystal Glitter
Art Glitter #2 Christmas Red Glitter
Art Glitter #83 Silver Glitter
Northwoods Stamps (cardinals)
Cardstock, ink, pens, colored pencils, lace, black string, and snow pen
Connie Crystal red crystals and wire


To begin stamp the image on white cardstock.

A great trip for stamping a background stamp:  Use a colored ink all over the stamp (Green seen here) the use a marker to color small areas.  For this stamp the birds were colored with maker in black, then the all over green ink was added.  That way the birds don't look green.

Color the stamped image using colored pencils then use a snow writer to add snow to the scene.  While the "snow" is still wet sprinkle on some crystal glitter. 

After the "snow" dries apply heat using a heat gun to puff up the snow.

Add a glittered mat to below the stamped image, then add glitter to the berries on the stamp using Christmas Red Glitter (to match the mat)

Prepare the card base with an A2 card (white) and the add lace to the cardstock. 

Create an embellishement using wire and red crystals to mimic the berries in the stampped scene.

Finally add snowflakes covered in silver glitter as a final accent to the card. 

IN OCTOBER USE PROMO CODE NW15 FOR 15% OFF THE RETAIL PRICES WITH A $25 PURCHASE! 
Thanks for stopping by to see my creations.
Missie Todd
createdbymissie.blogspot.com


Friday, October 18, 2013

Wreath For Winter

 
MATERIALS
Stayzon in Jet Black
Card Stock
Patterned Paper
Scissors

Once again, I have chosen to "color" with Art Glitter on this beautiful Northwoods image.  This time, I used Stayzon to stamp the image onto a transparency sheet.  I used the Desinger Dries Clear on the back of the film to color the image.  That way, I could go slightly over the edges of the stamp and still maintain the intricate detail.  I colored one area at a time--the ivy, the holly, the pine cones, the bow and the greenery.  The biggest differences:  the transparent had to go on first and the glue needs to dry before you can see the true color.  Give yourself plenty of time.
After the glue completely dried, I sent the project through the Xyron and adhered it to white card stock.  I "fancy cut" it close to the wreath.  The white card stock showed a little around the edges.  Then, I made a gate fold card and adhered the wreath to it.  
I listed the colors that I used, but you can use any colors you like.  To get you started, use the code NW15 at the Art Glitter site to get 15% off your order this month.
Thank you for stopping by today.  I hope you enjoy this project.  Stop by and see my blog at www.rememberinglifesmoments.blogspot.com any time.  I hope to see you soon!


Wednesday, October 16, 2013

A Season Of Blessings

Supply List
Art Glitter Designer Dries Clear Glue
Art Glitter Ultra fine glue tip
Art Glitter 280 Lime Rind
Art Glitter 110 Taupe
Art Glitter D95 Guava Art Hexi Transparent
Northwood Stamp P9239 Berry and Leaf Tree
Copic Markers
Velvet Ribbon
Zipper
Orange Card Stock
DCWV Brown Card Stock
Green Check patterned paper
CTMH chip board arrow
CTMH Flourished Blessings Stamp
Momento Black ink
Distress Ink
Glue Dots
Pop Dots

Clare stamped the fall scene using Momento black ink, so that she could use alcohol markers without the image smearing.  She colored the image and used the Art Glitter Designer Dries clear glitter and Ultrafine tip to apply the 280 Lime Rind Glitter to the leaves and centers of the Sunflowers.  She applied 110 Taupe to the cornstalks in the same manner.  
To achieve the texture I the mums, Clare applied several small dots to some of each flowers petals, but not the entire flower.  She sprinkled on the D95 Guava Art Hexi Transparent glitter.   To add dimension and glitter to the cornstalks, she used Art Glitter Taupe and she used Lime rind on the sunflowers, pumpkin stalks, and leaves. To get the fine detail, Clare loves the Art Glitter ultrafine tip and Designer dries clear glue! She then set this aside and allowed it to dry.  Once dry she matted it on brown card stock.
She stamped the sentiment onto a piece of chipboard and distress inked the edges.  She then matted the arrow on a bit of orange card stock.  She added a scrap of khaki colored zipper and a scalloped velvet ribbon using glue dots.
If you would like to see more of Clare Dempsey's work, you can find here blog Here.

Monday, October 14, 2013

Wreath Fun


Supplies Lynette Used: 
Northwoods Rubber Stamps- PP9242 Berry & Leaf Wreath
 Art Glitter - Very Black Stamp Pad 
Emerald #48 
Lime Rind #280 
Rain Forest #167 
True Red #1 
 Sakura Quickie Pen 
 Pioneer Photo Corners 
 May Arts Ribbon 
 Alphabet Stickers by Bella Blvd 
 Assorted Distress Inks 

Background Paper - Flair Designs by Amy Gatewood 
(Homemade) by Lynette Daniel on WorldWin Cardstock
Assorted Colored Pencils 
 Assorted Watercolors and Acrylic Paints
Sea Sponges


Start by inking up your favorite Northwoods Stamp with Art Glitter Very Black ink.
Press evenly onto cardstock. Tip- do not "rock" the application when you press down, you may get a double edge image and not a clear crisp press. 

Next Lynette used a fine tip metal tip and dries clear adhesive  to get glitter into the fine detailed art in the image. She choose 3 different colors of green Art Glitter shades. Emerald #48 for depth,  Lime Rind #280 for highlights, & Rain Forest #167 for the darker leaves. 


Lynette used micro tipped scissors to get a close cut, but you may use an Excel Hobby Blade to get the cleanest sharpest custom trimming. Then she continued to fill in the stamped image wreath making it full and lavish. She chose Art Glitter True Red #1 for the beautiful Northwoods holiday bow and embellished with rhinestones to look like ornaments. 


Lynette chose a simple country stripe in a sage green so that the wreath would be the focus and created an interesting collage of sponging of water and acrylics paints to match the undertones in the wreath's Art Glitter shades.  


What a joyful holiday it will be receiving this glittered Northwoods card! 


*Be sure to go to www.artglitter.com and if you purchase $25.00 in product and use the coupon code
NW15 you will save 15%.