Thursday, April 11, 2013

Clipping Refridgerator Messages


For years we had child-made magnets and notes on the fridge. But, the kids have been gone for several years now so I decided it is time for a fridge update.

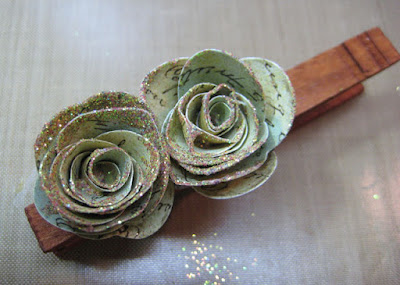
These magnets are made using a clip clothespin from Canvas Corp. as the base. Then I raided my stash to create the gorgeous toppings.

The floral magnet is created using the Sizzix Flowers, 3D die. 


I cut and assembled the flowers, gluing them together with Designer Dries Clear.


 Then I added Art Glitter #305 Goldenrod Ultrafine Transparent Glitter to the edges. To do this I use and a small detail paint brush to apply Designer Dries Clear to the edges.


Then I either sprinkle on the glitter or sometimes dip the flowers right into the jar. Gently tap off excess.


When the glitter and glue is set, use the Designer Dries Clear to adhere the glittered flowers to the top of the clip clothespin.


The magnet is finished off by adding three green gems by Hero Arts to add a bit of extra detail. Flower stamens are also added to the flower centers and Xyron Magnetic Tape is added to the bottom of the clothespin so it sticks to the fridge effortlessly!

 
I've created another fridge magnet from the Sizzix Primitive Heart die and corrugated cardboard. Click on over to my blog to take a gander at that one and for another tutorial so you can make your own!

Linda Neff
linda-neff.com

Tuesday, April 9, 2013

Let Your Glitter Shine

Art Glitter works so well on a variety of mediums but I love the look of it on glass. It is an easy and fun way to make any piece of glass sparkle! I wanted to make some super fun votive candle holders for my table, of course Art Glitter was my first choice.

Products used:
-Art Glitter: Ultrafine Opaque, I used the following colors; #154 Twig, #21 Orchid, #351 Pink Diamond, #361 Cat Eyes, #353 Provence, #56 Pumpkin, #83 Silver, #233 Blue Hawaii, #234 Turquoise, #48 Emerald, #256 Purple Passion, & #356 Grape Nector
-Designer Dries Clear Adhesive
-Votive Candles
-Paintbrush

Glass may be one of my favorite mediums for Art Glitter. You may remember the Glittered Wine Glasses  for the new year. You want to begin by applying  Designer Dries Clear Adhesive to the glass. I us a paint brush for more even distribution.


This is a two step process  doing one half of the holder,  then the other.  I usually squeeze some adhesive on the glass, use the paintbrush to distribute over the glass. Next, cover with glitter and  shake off the excess. Then do the rest of the holder in the same way; brush on the adhesive, shake on the glitter and brush off. This is the result.

shown in #361 Cat Eyes

Or here shown in #356 Purple Passion


shown in #233 Blue Hawaii

I love the look with the variety of colors.  With Cinco de Mayo just around the corner it would be very festive for table decorations. Great for weddings as well.

 Be sure to swing by my blog, one.heart.scrapper. for another Art Glitter project!


Saturday, April 6, 2013

Heart of Fire - Faux Opal Pendant


Most of my glitter collection is made up of Art Glitter Ultra Fine glitters.  I love all the colors and the brilliant sparkle!  But I am absolutely mesmerized by the dazzlers and chunkier styles.  My project today encases Dazzler Glitter and Faux Snow in a resin to create a faux opal effect.

For this project I used:  Art Glitter Dazzlers - #62 Treasure (my fave!!), Art Glitter Faux Snow, Deep bezel pendant (from Metal Gallery), Lisa Pavelka Magic-Glos UV Resin.  UV Light (optional, but very helpful!),  Toothpicks.


Begin by adding UV resin to the interior of the bezel.

Spoon a little Treasure Dazzlers into the bezel.

Use a toothpick to mix the glitter and resin, adding more resin as necessary.  Spread the mixture evenly over the base of the bezel.  Be sure to wipe any excess off the rim of the bezel.  Set under a UV light or direct sunlight - 5 - 10 minutes.  Resin is set when you cannot dent it with your fingernail.


Add more resin to the bezel and spoon in a little Faux Snow.

Again use a toothpick to mix the resin and snow and spread a layer over the gold layer.  Make this layer a little uneven in spots so the the gold shows through here and there.  

The glitter & resin mixture will be lumpy at this point.  Press it down a little so you don't have any pieces that stick out of the resin.  Wipe the bezel edges clean, and set under UV Lamp or direct sunlight.

To finish, add a generous layer of resin.  Use a toothpick to draw the resin out to the edges of the bezel.  It is self-leveling, so it will form a nice rounded, glass-like surface.  Use a pin or toothpick to remove any air bubbles that form before setting this layer under UV lamp or direct sunlight.

Once the resin is set.  Simply add a jump ring (or two) and put the pendant on your favorite chain.  

Please visit my blog for more glittering fun!!


Thursday, April 4, 2013

How To COLOR With Glitter

Today, I am going to share with you a very simple technique to create a stunning title (or two).  First, the scrapbook layout that I made:
MATERIALS:
Art Glitter Ultrafine Opaque 84 Shiney Si
Art Glitter Ultrafine Opaque 4 Berry
Art Glitter Ultrafine Opaque 56 Pumpkin
Art Glitter Ultrafine Opaque 62 Copper Canyon
Art Glitter Ultrafine Opaque 350 Butterscotch
Art Glitter Ultrafine Opaque 347 Golden Orange
Art Glitter Ultrafine Opaque 361 Cat Eyes
Art Glitter Ultrafine Opaque 358 Jungle
Art Glitter Ultrafine Opaque 48 Emerald
Art Glitter Ultrafine Opaque 233 Blue Hawaii
Art Glitter Ultrafine Opaque 32 True Blue
Art Glitter Ultrafine Opaque 30 Royale
Art Glitter Ultrafine Opaque 140 Canadian Blue
Art Glitter Ultrafine Opaque 256 Purple Passion
Art Glitter Designer Dries Clear With Fine Metal Tip
Xyron 510 With Permanent Adhesive
Digital Die Cut Machine (I used the Silhouette)
White Card Stock
Black Card Stock
Adhesive
Gems
You do NOT need to use as many or the same colors that I did.  In fact, a Rainbow Pee Wee Kit might just perfect for you!

DIRECTIONS
I think the actual assembly of the page is pretty self explanatory.  This tutorial is just to tell you how to do the titles.
1)  Use your digital die cut machine to cut your titles from white card stock.  I used the Waltograph Font for the Disney title.  I used the Silhouette to auto trace the logo from World of Color.
2)  Put the title upside down in the Xyron machine.  Rub the clear side briskly and remove it.  The entire top of the title should be covered in sticky adhesive.
3)  Pour the silver glitter over the Disney title and rub in with your fingers a little.
4)  Flick off any excess glitter.
5)  Use the Designer Dries Clear and the fine metal tip to put a little glue in any missing spots and cover with glitter.
6)  For the World of Color logo, you will be creating a rainbow of color.  You will use two to three colors per letter.  Pour a very small stripe of Berry in just the left hand side of the W.
7)  Pour a small stripe of Pumpkin in the center of the W.
8)  Pour a small stripe of Copper Canyon on the right side of the W.
9)  Use your finger to blend the colors, pushing the outer colors in a little and the inner color out, until the letter is completely covered.
10)  Repeat steps 6 through 9, using the colors as they are listed for the rest of the title.  Each color on the right of one letter will also be on the left of the next.
11)  Run the titles right side up through the Xyron again to get adhesive on the back.
12)  For proper positioning, place the card stock that you cut from in the correct position.  Place the letters into the correct spots and then remove that card stock background.

So, here I am, signing off.  Before I do, I would like to invite you to check out my own blog at www.rememberinglifesmoments.blogspot.com.  I would also like to show you the left side of this layout one more time:
For those of you who know her, yes, that IS Kristi--our fearless leader!  So, I will leave you with that picture instead of my own today.  Until next time, Glitter On!

Monday, April 1, 2013

Announcing : Art Glitter Design Team 2013-14

Help us welcome the 2013-14 Design Team!


Design Team Lead/Social Media Director
Kristi Parker Van Doren has been creating since age 12 when her parents gave her a rubber stamp and ink for Christmas. 38 years later she is still creating, designing, writing, teaching and more! Kristi loves to create and has been on several design teams including: Spellbinders, Northwoods, Worldwin Papers, Luminarte, Coronado Island and several others. She served three years as a writer for Scrap & Stamp Magazine, as well as having articles published in books and magazines, most recently in Zentangle 6. Kristi was also honored with being the featured mixed media artist in
Scrap n’ Arts online publication in March of 2013.  Kristi has served on several teams in the last year including USArtQuest, The Robins Nest, Dreamweaver Stencil, and is now our Design Team Lead at  Art Institute Glitter along with the  Connie Crystal  & Holly Berry House Orignials. When Kristi is not creating she is hanging out with her kiddos, friends, cooking or working at one of her other jobs. Check out her blog at www.kristiscreativecafe.blogspot.com 

**********************************************************************************
Clare Buckingham Dempsey has been an avid paper crafter for 14 years, sewn for 33 years and loved all types of crafts since childhood. She is happily married with two boys.  She has a fashion design and art background and still makes sewing patterns and quilts.  She has been a member of the Art Glitter Guest Design Team and The Robin's Nest Design team. She loves digital cutters and designing her own cut files.  She teaches classes at her local scrap booking and paper crafting guild and loves to blog too!   She enjoys making her own scrap book and fashion embellishments with Art Glitter and Art Glitter glue!  You can find Clare at her blog www.cricutcraftyclare.blogspot.com/
**********************************************************************************
 
Georgia Sommers lives in the San Francisco Bay Area with her very supportive husband Michael and has two grown daughters, Ashley and Rachel. Georgia has loved crafting since she was a young girl. Her mother was always coming up with some project for her sisters and her to do. Georgia did major in art but did not want to do the starving artist thing, so she became a dental assistant instead. She started teaching Tole and Decorative art which she taught for about 10 years.  When her youngest daughter was two she was introduced to Stampin UP and here card making career began. Georgia’s favorite materials to work with are; Dreamweaver Stencils, Copic Markers and of course Art Glitter.  She loves glitter, sometimes she feels kind of like the dogs in the movie UP except instead of squirrels,  she is drawn to sparkles. Georgia is lucky to be able to teach in some great stores in California and always seem to carry with her some glitter & bling! www.sommrstamping.blogspot.com
 
 ********************************************************************************** 
Heather A. Hudson lives in Pinckney, Michigan with her two teenage sons, hubby and two kitties.  She is a Registered Nurse, working with ventilator dependent teens.  Heather currently works full time, and designs for Gecko Galz, Really Reasonable Ribbon and Sugar Creek Hollow.  In the past she has designed for Bella Creations (closed now) and Pro 31 Designs.  Heather also was on the Design Team at her local scrapbook store Scraptales.  That is where she met Linda Neff (Art Glitter Design Team Member 2012-13) , and Art Glitter Team Member Laura Drahozal. Heather has been interested in paper crafting since 2010. She enjoys painting, pottery and of course digital images and paper!  Her ambition is to work with more mixed media! www.heatherhudson.blogspot.com
 
 
**********************************************************************************
Laura Drahozal cannot remember a time when she was not creating. Art Glitter is thrilled to have Laura back for a second term of glittering fun. As a former art teacher, she has tried almost every traditional medium. She looks for inspiration all around her and loves to combine various products and techniques to achieve what she had previously thought of as impossible. Laura is currently serving on design teams for Dreamweaver Stencils, Globecraft Memories and Connie Crystal. Laura formerly served as a member of the Twisted Sketches Team and as a Guest Designer for Art Glitter. She loves all things glittery! Check out her blog at www.rememberinglifesmoments.blogspot.com.
 **********************************************************************************
 Lynette Daniel, Owner of Scrap That Moment. Lynette is an accomplished graphic designer and photographer. Lynette’s artwork has been featured in 8 different trade magazines, 7 state publications, 4 published books, 5 local city and county newspapers, and 2 international magazines in Great Britain and Australia. Lynette is known for her scrapbooking projects but brings an exciting artistic style to Art Glitter. On the home front, Lynette is a busy mom with 2 beautiful active teenagers.  When she is not working she is volunteering, teaching classes and giving back to the community. She has been on the Board of Directors for Pop Warner Football & Upward Sports and has coached soccer and cheerleading/drill team for many years. Lynette donates time and money to raise awareness for youth programs in her area. Her goal is to offer children the opportunity to acquire better skills, self-confidence, and even scholarships in whatever they love to do. Lynette enjoys music, traveling and always has a camera around her neck. Follow Lynette on her store website gallery, professional and personal blogs all at www.scrapthatmoment.com and on Facebook.
 **********************************************************************************
Missie Todd’s paper crafting journey began more than a decade ago when she was introduced to scrapbooking.  Over the years her love of crafting has grown. Now it is more of a way of life than a hobby!  She is a proud member of the Art Glitter and Connie Crystal Design teams.  Her crafting resume includes teaching scrapbook classes, leading workshops, independent scrapbook and stamping sales, and customer education and demonstration using Provo Craft products- including the Cricut Expression, Cricut Cake, and Gypsy.  In May 2012 she was a featured artist for Papers and Pixels Magazine.  She has also been featured as a guest designer for Graphic 45!  Missie enjoys traditional and digital scrapbooking, card making, custom t-shirt design, and loves to dabble in other creative outlets like sewing and jewelry making. 
In her life outside her scrapbook room Missie is a wife, mother, and student.  Her boys, Blake age 6 and Ian age 4, enjoy “helping” her craft and making their own creations.  As a family they enjoy travel which always gives Missie a lot to scrapbook.   For the last few years she has been working towards becoming a nurse and is in a full time RN program.  As you can see busy is just a way of life, but Missie says crafting is her sanity and helps to keep her grounded. www.createdbymissie.blogspot.com
 **********************************************************************************
Peg Rounds has been creating since she was a young girl.  She was always interested in art and any type of craft projects she could find.  As she got older, she stopped to go to college and then to raise a family. It wasn’t long before she’d pick it up again.  Today she is still creating as much as she can and enjoying it.  She is always wanting to learn new things in the world of crafting.  Her free time, when not spending it with her family, is used to create her latest works of art.  She has designed for many companies over the years some of which include Altered Pages, The Robin’s Nest, Amazing Mold Putty, Your Next Stamp Guest Designer and Keep In Touch Guest Designer, as well as many others.  She currently designs for Just For Fun Stamps and is an Invited Guest Blogger at USArtQuest.  She is, also, the Card Making and Scrapbooking Contributor for Create For Less.  She’s been published in Scrapbook News and Review and on Scrapbook.com and was a writer and proof reader for Oh Scrap Online Magazine.  Peg also enjoys teaching classes and is  working on setting up  classes online and you tube videos.  Be sure to check out her blog at:  www.pegscraftingcorner.blogspot.com. 
 **********************************************************************************
Tabitha Collins Jones has been creating paper crafting projects since 1996 when her sister showed her a friends album. Tabitha knew that she would be hooked and has been ever since. Tabitha has had a love of paper and glitter since she was in Jr. High school. She loved creating the spirit banners for the teams. When the craze of scrapbooking became all the rage, she had to be a part of it. Tabitha loves to design and has designed for many companies including; Scrap That Moment,Claire's Cottage, Black Paper Society, Apron Strings and several other blog sites and kit clubs. She also served as Lead Design Team Coordinator for Eyelet's Etc. Tabitha has been published in online magazines as well as Canata Magazine and the Joy of Scrapbooking. Tabitha has also been a featured designer for Steema ( Masterpiece Studios) along with Bound+/Detrmined at CHA. When Tabitha is not creating she is spending time with her four children and husband  and loves to bake, cook and crochet. zippity-do-dah-tabitha.blogspot.com 
 **********************************************************************************
A huge "Thank You" to all that applied.  Keep an eye out for some new fun promotions and opportunities in the upcoming year! We look forward to everyone joining us for a fun journey in 2013-14.  Thank you for your continued support and love for all things Art Glitter!


Thursday, March 28, 2013

Swapping Glittery ATC's


Howdy! Linda here to share my glittered ATC with you.

Linda Neff
linda-neff.com
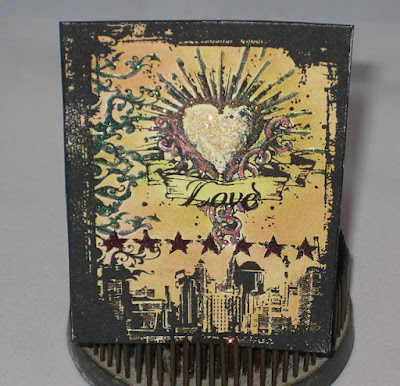
I belong to a very casual stamp club that meets monthly to share ideas and techniques. Our recent demonstrator opted to share varying techniques with us this month for creating ATC's (Artist Trading Cards). We enjoyed the techniques and information so much that we decided to hold an ATC swap at our next meeting in April. This is a sample of my ATC that I might use for the swap.

I started by stamping with Tim Holtz ATC - Urban Tatoo. I don't know what it is about the heart explosion but I just love it! I used a waterproof black ink to stamp my image on heavy-duty white cardstock. Then, using my Designer Dries Clear with Fine Metal Tip I started to outline parts of the stamped image and sprinkled on Art Glitter Cupid #735 Microfine Transparent Glitter. I love the microfine glitters due to their more vintage look rather than lots of sparkle.


When the heart was all glittery I moved on to the other designs. I used a darker pink for the stars from the Monochromatic Pink Mixed Pee Wee Kit.


The curly-cue designs running down the one edge were glittered with Art Glitter Elfin #705 Transparent Microfine Glitter.

 
When I had all the glittering done I added some Crackle Accents to the heart center and sprinkled on a pinch of a pink from the Monochromatic Pink Pee Wee Kit used on the starts. I set it all aside to dry while we fixed and ate dinner (it's nice to have a chore or project to do while waiting for a piece to dry, otherwise I'm usually tempted to rush it along and that's never good)!

When it was dry I simply colored it with a gently coating of Ranger's Distress Inks. One down, 12 more to go!