Showing posts with label designer dries clear adhesive. Show all posts

Saturday, April 19, 2014

White on White with Art Glitter

Supply List
Art Glitter Ultra Fine Glue Tip
Art Glitter Dries Clear Glue
Art Glitter 85 Crystal Ultrafine Transparent
White Card Stock
White Vellum
Cricut Sweehearts Cartridge
Cricut Damask Décor
Cricut CCR software

One of Clare's all time favorite paper crafting color themes is all white!  It's all about simplicity and texture and there is nothing as elegant!

Here are some tips for working with all white:
1)  Create texture:  use multiple medias such as white card stock, white vellum, ribbon, etc.
2)  Make it pop:  use glitter to highlight areas and make them pop!
3)  Add dimension-use more than one layer by cutting more layers or adding embellishments.

For this card Clare wanted to make a wedding card that was all white for her step sister.  She loves the lacy wedding dress cards, so she decided to make my own. She started with Cricuts Sweetheart Cartridge and  used the card image of the bride.  She added an image from the Cricut Damask Decor and welded it.  She thought the bride needed some head dress, so Clare used another Damask Decor image on her head. 
Clare says you can get this lacy look with any digital cutter, just combine a bride image with a lace image and weld.  Below you can see the two images she combined for her card using the Cricut.  Similar images can be made with a Silhouette, or other cutter.
She backed the cut with plain vellum.  Clare then used the Art Glitter Ultra fine glue tip to high light the vellum and the white paper.  She hoped to achieve the look of re-embroidered lace.  Clare loved the way this turned out!  To finish the head dress, Clare tied a simple bow and glued it to get the look of the veil.  Clare decided to stamp the sentiment inside the card to keep the card look clean.
See more of Clare's work at her blog:  cricutcraftyclare.blogspot.com.

Wednesday, April 16, 2014

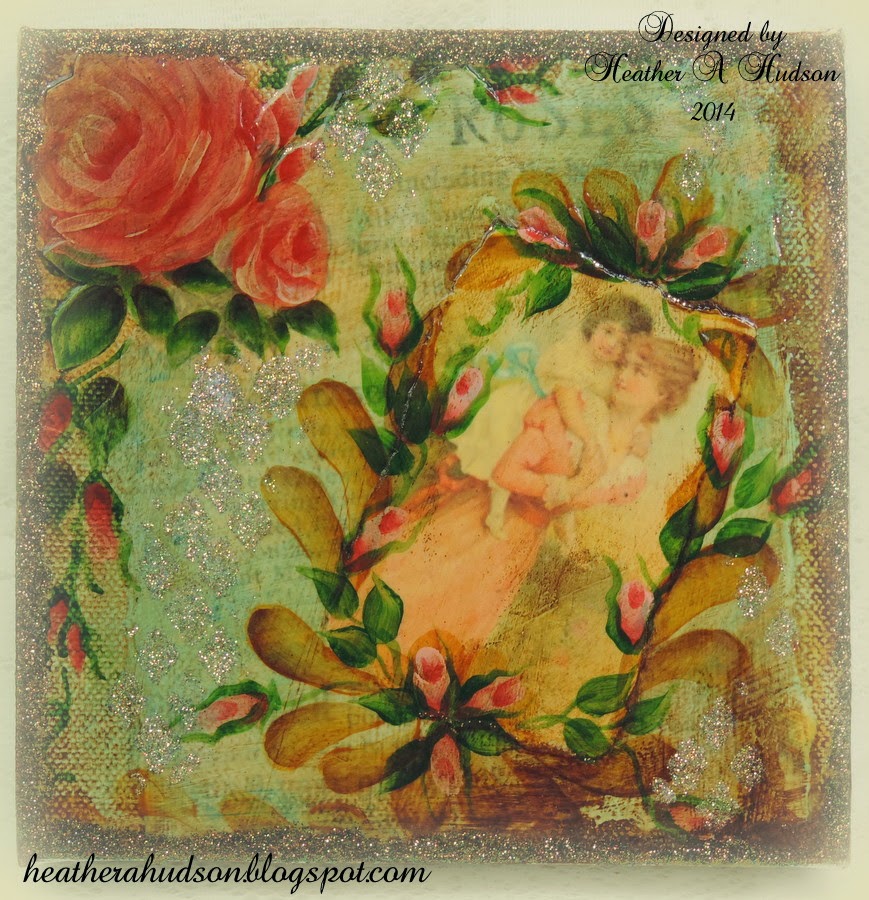
Art Glitter Mother's Day Canvas


Vintage Chic Mother's Day Canvas

Heather decided she would like to share with you a Vintage Vintage Chic Inspired Mother's Day Canvas!! You will need the following:
  • Sweet Mommy image
  • Roses paper image
  • gesso
  • blue gelato
  • scissors
  • paint brushes
  • foam brushes
  • folk art brand paints:  Baby Pink, Lipstick Red, Vintage White, Old Ivy, Classic green, Fresh Foliage, Burnt Umber
  • 6 inch square canvas
  • anitque mod podge
  • Art Glitter Designer dries clear Glue 
  • Art Glitters: #208 Faunaand #165 Autumn
Step One
Heather used Art Glitter Designer Dries Clear glue to adhere her Rose paper to canvas, then applied some gesso.  Next Heather used more Designer glue to add her Sweet Mommy Image.  She ten applied antique mod podge and covered some of the rose paper with a blue gelato (and blended it in to the piece).  She also added some paint to the rose image and leaves.  She added some extra leaves and buds too.
Step Two
Heather painted rosebuds and leaves around her image as well as some brown comma strokes.  She finished painting the rose in the upper left and then covered the whole canvas with mod podge.  Once the mod podge was dry, she added a layer of watered down burnt umber, which you will see below.  She let it set for about 30 Seconds..then wiped it off to give the canvas a vintage look
Step Three
Once the burnt umber paint was dry, Heather used a diamond stencil and old brush to apply designer dries clear glue to different areas of her canvas.  You can see the diamond shaped areas pretty well in the lower left of the image below.  Fauna Glitter was added to the diamond shapes.  Heather used the same brush to more designer dries clear glue to the edges of her canvas, and she then applied Autumn glitter, which is one of her new favorites!!
Heather removed the excess glitter with a soft brush once her glue dried.  She is happy with the over all effect!
Heather hopes you enjoyed her tutorial, and hopes it adds a little Sparkle to your day!

Feel free to stop by and see Heather's other projects and Tutorials using Art Glitter on her blog.
and her 


-- Please visit my blog: My Artistic Adventures :0) Check out my tutorials & Creations on Youtube My Etsy: My Aristic Adventures

Saturday, March 29, 2014

Art Glitter Flowers

Supplies

Art Glitter #92 Bananan Ultrafine Transparent Glitter
Art Glitter #18 Purple Ultrafine Opaque Glitter
Art Glitter #297 Hibiscus Ultrafine Transparent Glitter
Art Glitter Dries Clear Glue
Art Glitter Dries Clear Fabric Glue
Art Glitter Red Gala Glitz
Art Glitter Pink Gala Glitz
Tim Holtz Rosette Die
Tim Holtz Snowflake Rosette Die
Small Water Color Brush
Copic Markers (purple and green)
White card stock
Leaf Punch
Low Temp Hot Glue Gun


At some point in her crafty life, Clare would love to try ribbon embroidery.  She recently found some fabulous French Ombre ribbon flowers on Etsy at a store called Grandmas Flower Garden.    Clare hopes to try this technique some day, but just can't add anymore stashes, to the stashes she already has.   And she loves to save money by making her own with supplies she already has!  So that got her thinking...why can't she try this look with paper and Art Glitter!?
You can see the ribbon flower below.
Clare started by painting the ombre first.  For the Yellow flower and pink flower she used Tombow markers and a small water color brush.  For the purple flower and the leaves she used the Copic markers.  
She cut the rosette shapes after coloring to prevent the color from collecting in the perforation marks.  She then trimmed the ends of the rosettes clipping from the end in 10 folds along a curve.

 She folded the rosettes and then bent them to get the look of the ribbon.  Once Clare had a petal she liked, she hot glued them to a small leaf she punched with a Creative Memories leaf punch.  For each flower she colored and cut 5 rosettes to make petals.  She then glued the five petals onto a circle of card stock and pinched the rosette folds again.  So, Clare glued each petal first, and then glued then to form the flower.

Once the hot glue was dry, Clare used the Art Glitter dries clear adhesive and a matching Art Glitter to edge the ends of the petals.  The yellow flower uses Bananan, the pink Hibiscus, and the Purple is Purple glitter.
For the center of the larger flowers, Clare used a shank button in the center of the flower and covered it with Art Glitter Gala Glitz.  Since one of her buttons was fabric Clare used the Art Glitter Dries Clear fabric glue on that one.  
The Red Gala Glitz is in the center of the yellow flower and the Pink Gala Glitz is in the center of the Pink flower.  In the center of the purple flower, she used a paper flower and a vintage button.  For the smaller purple flower, Clare used the Tim Holtz snowflake rosette die and trimmed off the spikes.

For the leaves, Clare cut the rosette at every fifth fold and trimmed it down to form the leaves.  
To see more of Clare's work, visit her blog Cricutcraftclare.blogspot.com.  

Wednesday, March 19, 2014

Art Glitter & Disney Is Magical

Ultrafine Metal Tip
Noodgers
Art Glitter Ultrafine Opaque 157 Purple Lame'
Printout of object to be glittered
Vellum

DIRECTIONS:
1)  Place print out under the vellum and center.
2)  Put Ultrafine Metal Tip on the Designer Dries Clear Glue.
3)  Squeeze the glue through the tip and onto the area you want to color.  Use the glue sparingly.  You can see the print out through the vellum.
4)  Use Noodger to push glue out of any unwanted area.
5)  Cover with opaque glitter, pour off excess and let dry.
It is as simple as that.

Thanks for stopping by today.  I hope you enjoyed my little tip post.

Wednesday, December 25, 2013

Merry Christmas Card

Merry Christmas!!
Heather's Project is a Christmas Card.  She has also included some other Christmas items for you to enjoy below.
Items used

Heather used a piece of green, red and pink Core'dinations cardstock.  She embossed the pink piece with a spellbinders die and sizzix embossing folder. The Red piece was embossed with a cuttlebug folder.  It measure 4.25" by 5.5".  The green piece measures 9.5" by 6".  Score at 4.75".  She decided not use the green label,  changed her mind :0)..that happens sometimes :0).

Edges were inked with Ranger's Vintage Photo.   Heather sanded the raised area of the red mat and pink scallop circle.She tied some Candycane baker's twine around the red mat.  She used red sticky tape to adhere it to the card base.
Using the fine tip applicator and Art Glitter Designer glue, she followed the raised pattern on the red mat.  She didn't want solid lines, so she lifted here and there.
Using the Art Glitter Designer glue, she adhered the jumbo moss green leaves to the back of her pink piece, she also applied some pop dots to the pink piece and holly die cut.
Using the fine tip applicator and designer glue, she followed around the outside and veins of the die cut leaves.  She also added the glue to the jumbo leaves.
IHeather added Pink Cadillac glitter to the red mat piece and holly berries of the die cut.  The Cavalado glitter was used on all the leaves.  Just Peachy glitter was used on the edges of the white flowers. Heather also added a "Christmas" text box that she created in GIMP.  She added the Just Peachy glitter to the edges of it as well, and applied it to the card using pop dots.
Heather hopes you enjoyed her tutorial today, and she has a couple other Christmas Goodies for you to enjoy!


Christmas Bulb
Art Glitter Designer dries clear Glue & Ultra fine Metal Tip were used to add the dots of glue to the center of my ribbon and  #73 Platinum Art Glitter was applied.  The bulb was fill with #183 Blue Angel Art Glitter.  The bulbs were bought at her local Michael's store.
Here is a look at the back.

The glitter bulb is SUPER EASY PEASY to make!!  She even did a basic tutorial, showing you how to make the basic glitter bulb.  You can find in on her Youtube channel here.  You can watch how she makes the basic bulb on the video below.

A few more tags and Ornaments
You can get all the details on the items she  used on her blog post here.
You can get all the details on the items she used on her blog post here.


 Vintage Mitten Collage sheet Beautified with Glitter to give it a Retro Vintage Feel

You can get all the details on the items she used on her blog post here.
 Feel free to stop by and see Heather's other projects using Art Glitter on her blog.

All of us here at Art Glitter wish you and your Families a Safe and Happy Holiday Season!

Thursday, December 19, 2013

Sleigh Ride

Supplies
Art Glitter 346 Chunky Transparent Winter White Glitter
Art Glitter D63 Nuts Slices
Art Glitter Dries Clear Glue
Floral Picks Michaels
Steel Heart Sled or sled with runners
Scarf
Skates
Ribbon
Basket
Plastic Ornaments Walmart
This year Clare really wanted a touch of nostalgia for her holiday curb appeal and she added some sparkle and shine with Art Glitter.  Clare thinks that Art Glitter is a great way to add sparkle and shine to outdoor decorations that have limited light on a dark winters night!   She started with an old pair of skates, picked up for cheap shopping garage sales over the summer.
To add some sparkle to the skate blades, Clare used Art Glitter D63 Nuts Slices.  Clare thinks the Slices are a perfect way to mimic the way ice forms on the window panes (see image below found here).

 The sled was found at a local craft sale, but you could use an old sled with runners!  Clare then embellished some plain pine and berry floral picks from Michaels.   She used Art Glitter 346 Chunky Transparent Warm White Glitter on the pine cones and the berries.  

To fill in the sled, Clare filled an old basket with shatter proof plastic ornaments, an old scarf and a Christmas garland wrapped around the bottom of the floral picks.  A bow on the front and Clare finished the sled.  A quick and beautiful project.  

Clare loves to use a  project like this is to cover her cords from the view from the street.  

You can find more of Clare's work at her blog Cricutcraftyclare.blogspot.com.