Showing posts with label Clare Buckingham Dempsey. Show all posts

Saturday, May 3, 2014

Art Glitter Mother's Day

Supply List
Art Glitter 86 Angle Dust Ultrafie Transparent Glitter
Art Glitter 114 Leaf Ultrafine Opaque Glitter
Art Glitter 343 Chestnut Ultrafie Opaque Glitter
Art Glitter Guava Art Hexi Tranparent
Art Glitter Sticky Paper
Art Glitter 4 Cacoa Elements
Art Glitter Designer Dries Clear Glue
Art Glitter Ultra Fine Metal Tip
Art Glitter Sticky Tape
Aurora Wings Digital Stamp:  Peony
Heartfelt Creations Rainddrops on Roses Die
Copic Markers
Patterned paper
White Card Stock
Close To My Heart Stamps and ink
Pink card stock
Ribbon
Paper Scorer

One of the things Clare love to embellish with Art Glitter are digital stamps.  If you have never used a digital stamp, they are graphic images; that look like a stamped image, you can print out on your computer.  The printed image is then treated like a stamped image.  Digital stamps are Clare's favorite method for making last minute cards when she has no stamp in the stash to fit the occasion! Clare found these peonies at an Etsy store called Aurora Wings.  She loves the flowers, fairies and angels at this shop.  This digital stamp is called Peony.
Once Clare printed the image out, she colored it with Copic Markers, using the colors shown in the photo below.  She then added Crystal Art Glitter using the Ultra fine Metal tip to add dimension to the peonies. The white glitter really makes it more three dimensional!   Love it!


Clare also used Art Glitter Leaf glitter and the Ultra fine metal tip along the lines in the leaves on the digital image.  
For the lattice die behind the stamped image, Clare cut Art Glitter Stick paper and applied the Art Glitter Cacao Elements.  This is a very chunky product and does not fill in all of the white space, so Clare applied a second layer with Art Glitter Chestnut Ultrafine glitter.  So beautiful and the card smells wonderful!  She added a bit of ribbon and buttons and stamped Happy Mother's day using a Close to My Heart stamp.  
Find more of Clare's work at her  blog:  Cricutcraftyclare.blogspot.com.

Saturday, April 19, 2014

White on White with Art Glitter

Supply List
Art Glitter Ultra Fine Glue Tip
Art Glitter Dries Clear Glue
Art Glitter 85 Crystal Ultrafine Transparent
White Card Stock
White Vellum
Cricut Sweehearts Cartridge
Cricut Damask Décor
Cricut CCR software

One of Clare's all time favorite paper crafting color themes is all white!  It's all about simplicity and texture and there is nothing as elegant!

Here are some tips for working with all white:
1)  Create texture:  use multiple medias such as white card stock, white vellum, ribbon, etc.
2)  Make it pop:  use glitter to highlight areas and make them pop!
3)  Add dimension-use more than one layer by cutting more layers or adding embellishments.

For this card Clare wanted to make a wedding card that was all white for her step sister.  She loves the lacy wedding dress cards, so she decided to make my own. She started with Cricuts Sweetheart Cartridge and  used the card image of the bride.  She added an image from the Cricut Damask Decor and welded it.  She thought the bride needed some head dress, so Clare used another Damask Decor image on her head. 
Clare says you can get this lacy look with any digital cutter, just combine a bride image with a lace image and weld.  Below you can see the two images she combined for her card using the Cricut.  Similar images can be made with a Silhouette, or other cutter.
She backed the cut with plain vellum.  Clare then used the Art Glitter Ultra fine glue tip to high light the vellum and the white paper.  She hoped to achieve the look of re-embroidered lace.  Clare loved the way this turned out!  To finish the head dress, Clare tied a simple bow and glued it to get the look of the veil.  Clare decided to stamp the sentiment inside the card to keep the card look clean.
See more of Clare's work at her blog:  cricutcraftyclare.blogspot.com.

Thursday, April 3, 2014

Art Glitter Accents

Supply List
Art Glitter Green Gala Glitz
Art Glitter Gold Gala Glitz
Art Glitter Dries Clear Glue
Art Glitter Ultra Fine Tip
Art Glitter 79 Ultrafine Opaque Black Glitter
Art Glitter92 Ultrafine Transparent Bananan Glitter
Graphic 45 Curtain Call Collection paper (sheet music)
Crate Paper Random Collection Victorian paper (chevron)
Teresa Collins Stationary Noted (Notebook Owl paper & saying)
Dew Drop The Robin's Nest
Zva Creative (yellow swirl bling)
Forever in Time Gem Swirls (green swirl bling)
Jolee's BBK Silver Mini Flowers (flowers on chevron Strip)
Liquid Glass
Copic Markers (R27, YR18, 100, G24, G94)
Coffee Filters
Sizzix Susan's Garden Poppy Die
Black Card Stock
Yellow Card Stock
Green Card Stock
Red Card Stock
Ball Stylus
Tweezers
Cricut (Boy Die cut)

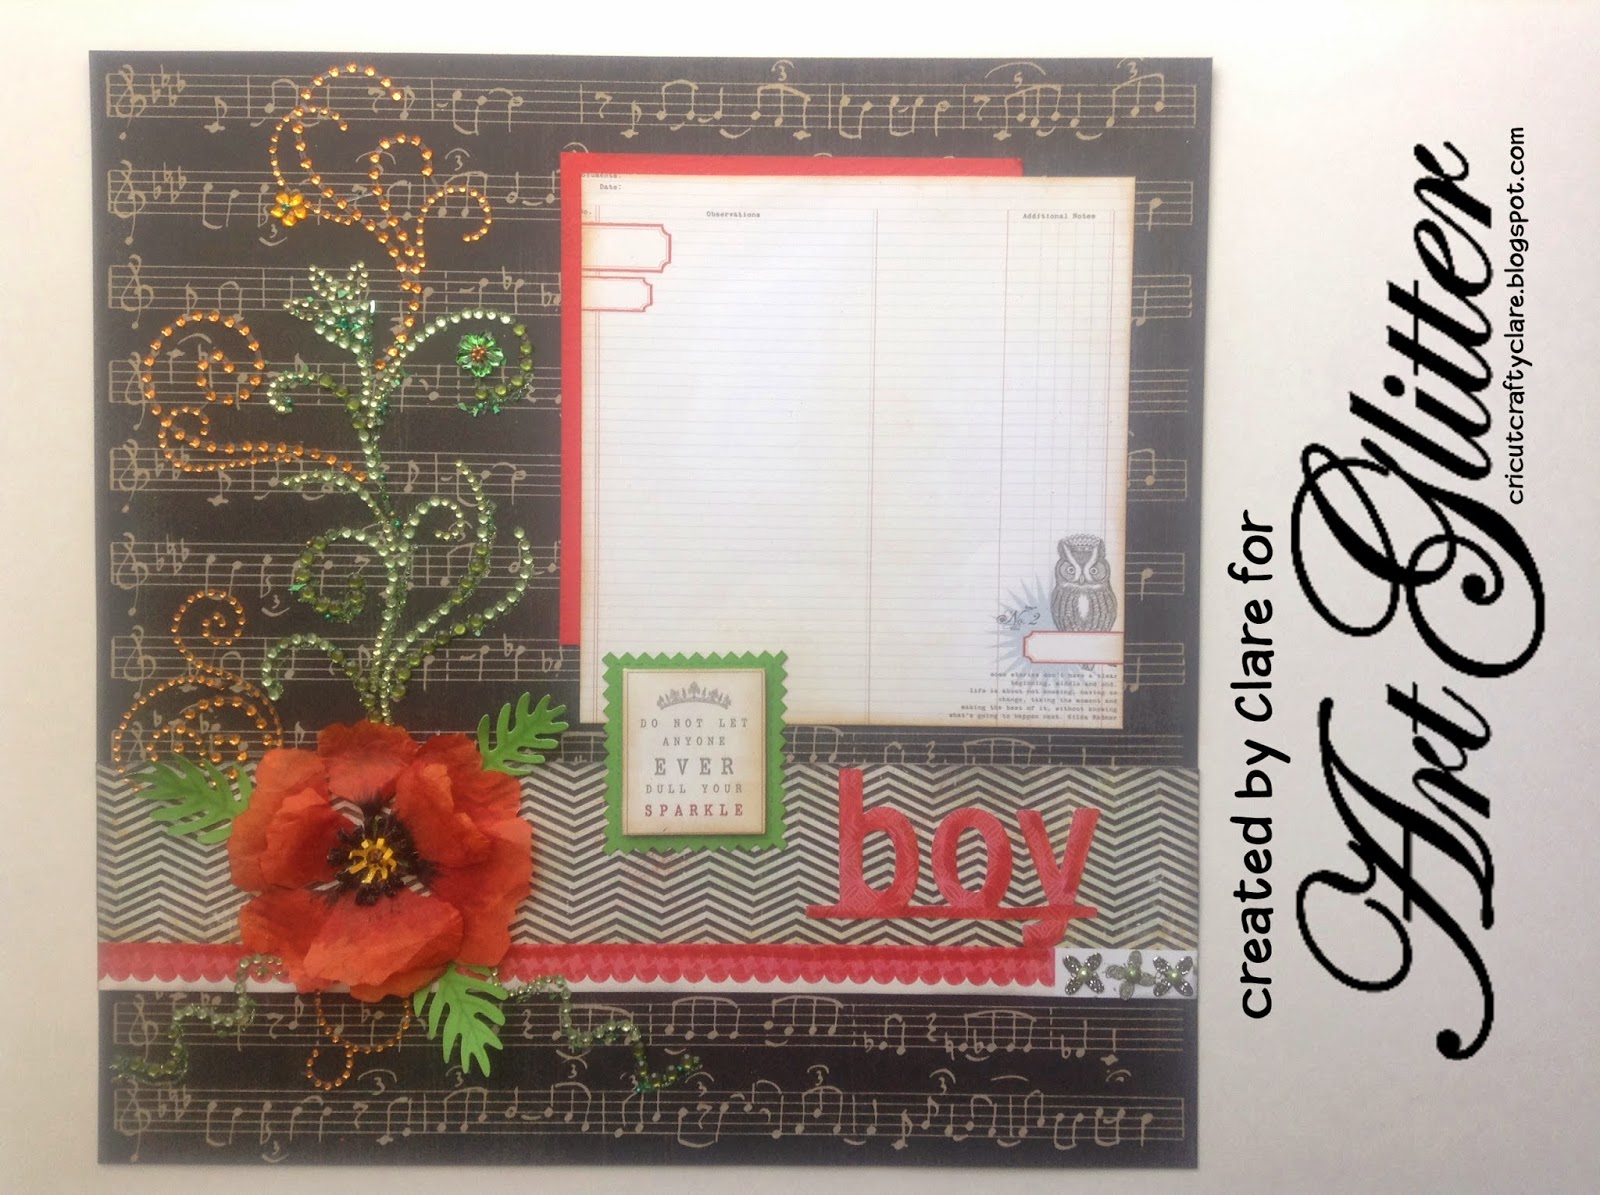
One of Clare's all time favorite flowers is a Poppy.  She has been wanting to make a paper poppy forever, and she finally found a Poppy die she wanted by Sizzix.  She cut three of each petal shape using coffee filters, because she wanted to capture the fragility of the Poppy Petal and make it realistic.  Since she used a die, she cut all three layers in one pass.  She then colored the petals with Copics in YR18 Sanguine, R27 Cardinal Red and 100 Black.  Once the petals were dry, Clare used a ball stylus to shape the petals.  For the center of the poppy, she cut the black and yellow pieces and curled them per the instructions (with a tweezer) that came with the Sizzix Susan's Flower Garden Die and then added Bananan Ultrafine Tranparent glitter using the Art Glitter Ultrafine Glue tip and Art Glitter Dries clear glue.  She used the same method to apply Black Ultrafine Opaque Art glitter to the black center die cut pieces. 
For the very center of the flower she layered a Robin's Nest Dew Drop over the Art Glitter Bananan using the Liquid Glass between the dew drop and the glitter.  This is such a fabulous sparkly look!  On top of the dew drop, Clare used the Art Glitter Ultra Fine tip to add a fine detail of black Art Glitter. 
For the teeny tiny bling flowers on the rhinestone bling, Clare used a few grains from the Art Glitter Gala Glitz, Gold Gala Glitz for the green flower center, and Green Gala Glitz for the yellow flower center.  


She loves that she can't get add such a pretty tiny finishing detail with Art Glitter products!  The Green Gem Swirl was getting lost on the black Graphic 45 patterned paper, so to make it stand out a bit more, Clare used the Art Glitter Ultrafine Glue tip and Green Gala Glitz.  This is a great way to add more weight to an embellishment and sparkle!
Here is another tip Clare loves to use: match your colors perfectly by using your markers!  The boy die cut and the Crate Paper were not exact matches to the orange red of the poppy, so Clare used the same Copics she used in the Poppy to color the die cut and the paper a bit to match and pull the whole page together!

To see more of Clare's work, please visit her blog Cricutcraftyclare.BlogSpot.com.

Saturday, March 29, 2014

Art Glitter Flowers

Supplies

Art Glitter #92 Bananan Ultrafine Transparent Glitter
Art Glitter #18 Purple Ultrafine Opaque Glitter
Art Glitter #297 Hibiscus Ultrafine Transparent Glitter
Art Glitter Dries Clear Glue
Art Glitter Dries Clear Fabric Glue
Art Glitter Red Gala Glitz
Art Glitter Pink Gala Glitz
Tim Holtz Rosette Die
Tim Holtz Snowflake Rosette Die
Small Water Color Brush
Copic Markers (purple and green)
White card stock
Leaf Punch
Low Temp Hot Glue Gun


At some point in her crafty life, Clare would love to try ribbon embroidery.  She recently found some fabulous French Ombre ribbon flowers on Etsy at a store called Grandmas Flower Garden.    Clare hopes to try this technique some day, but just can't add anymore stashes, to the stashes she already has.   And she loves to save money by making her own with supplies she already has!  So that got her thinking...why can't she try this look with paper and Art Glitter!?
You can see the ribbon flower below.
Clare started by painting the ombre first.  For the Yellow flower and pink flower she used Tombow markers and a small water color brush.  For the purple flower and the leaves she used the Copic markers.  
She cut the rosette shapes after coloring to prevent the color from collecting in the perforation marks.  She then trimmed the ends of the rosettes clipping from the end in 10 folds along a curve.

 She folded the rosettes and then bent them to get the look of the ribbon.  Once Clare had a petal she liked, she hot glued them to a small leaf she punched with a Creative Memories leaf punch.  For each flower she colored and cut 5 rosettes to make petals.  She then glued the five petals onto a circle of card stock and pinched the rosette folds again.  So, Clare glued each petal first, and then glued then to form the flower.

Once the hot glue was dry, Clare used the Art Glitter dries clear adhesive and a matching Art Glitter to edge the ends of the petals.  The yellow flower uses Bananan, the pink Hibiscus, and the Purple is Purple glitter.
For the center of the larger flowers, Clare used a shank button in the center of the flower and covered it with Art Glitter Gala Glitz.  Since one of her buttons was fabric Clare used the Art Glitter Dries Clear fabric glue on that one.  
The Red Gala Glitz is in the center of the yellow flower and the Pink Gala Glitz is in the center of the Pink flower.  In the center of the purple flower, she used a paper flower and a vintage button.  For the smaller purple flower, Clare used the Tim Holtz snowflake rosette die and trimmed off the spikes.

For the leaves, Clare cut the rosette at every fifth fold and trimmed it down to form the leaves.  
To see more of Clare's work, visit her blog Cricutcraftclare.blogspot.com.  

Tuesday, March 25, 2014

Art Glitter Welcome

Supplies
Art Glitter 278 Poppy Ultrafine Opaque
White Canvas
12 x 24 inch paper
Dreamweaver Embossing Paste
Foam Brush
Small paint brush
Tape runner
Digital Cutter (Clare used Cameo)
Clear tape


Clare has always wanted a welcome sign for her front entry.  She has been inspired by a fellow Art Glitter Design Team member to use Art Glitter with her Cameo cutting machine in her projects.  She also thinks is perfect project for the glitter newbie!   She started by typing the word welcome using the Brush Script MT font and welding the letters. 
Clare cut the word in paper to use as a stencil.  Using a canvas 28 x 22 inch white canvas she got got at Michaels using a coupon, Clare applied her template using a tape runner. 
She then used a foam brush to apply the Dreamweaver Embossing Paste to the canvas over the stencil openings.  Clare thought the Art Glitter glue would dry too quickly on this project and before she could apply the Art Glitter, so she used an embossing paste.  She also applied the paste on three letters at a time, so that it would not dry before she applied the glitter. She also applied some embossing paste free hand at either end of the word so that the word went off the side of the frame.  After all the glitter was applied and before the paste dried she carefully removed her template.  She allowed it to dry overnight and brushed off excess glitter with a dry paint brush.  Since the canvas held some of the excess glitter after brushing, she also used some clear tape to remove lose glitter not part of the design.  Clare love the simplicity and beauty of this home décor project.  So get out the Art Glitter and give it a try!

You can find more of Clare's work at her blog cricutcraftyclare.BlogSpot.com.

Sunday, March 9, 2014

Art Glitter Baby Booties Pin Cushion

Supply List

Art Glitter 183 Blue Angel Ultrafine Pearlescent Glitter
Art Glitter Dries Clear Adhesive
Art Glitter Ultrafine Glue Tip
Ice Resin 1 oz Syringe
Rue Romantique Small Scroll Oval Oxidized Silver Finish
Ribbon
Swiss Dot Fabric
Re-embroidered lace
Thread
Polyester Stuffing
Ribbon
Mini Pom Pom Trim
Picot Ribbon
Double Stick Tape
Mon Ami Gabby Flower (teal acrylic flower with button center)
Buttons
Zva  Creative rhinestone & pearl
Basic Grey Pattered paper
Queen and Co Flower
Close To My Heart Crochet flower

When Clare's first son was born, he got a pair of baby shoes with his name on one sole and his birth date on the other sole.  They were just too cute for Clare to part with.  So when she saw that they could be made into pin cushions, she knew what to do with them.  She made them into a precious keepsake she can enjoy now and her son might enjoy in the future (or maybe his wife, LOL!).  And since she is forever losing her hand sewing needles in her pin cushion, she thought one shoe could be for pins and the other for needles!

She started by making the jewelry pendant.  She used some Basic Grey paper she has had forever, because she just can't throw out any Basic Grey scraps!  Using the Art Glitter dries clear adhesive and Art Glitter Blue glitter she highlighted portions of the Basic Grey paper and allowed this to dry.  She glued this paper into the pendent.  She added a few tiny rhinestones to the paper and using Ice Resin filled the pendent.  She loved that the Easy Measure package made measuring automatic!  She allowed this to dry overnight.  She loved how adding the resin made the Art Glitter details pop (see photo below) and even added more blue goodness in the pendants!

For the pin cushion, she cut a circle of Swiss dot calico and some re-embroidered lace to fit on top.
She used scraps of lace from her own wedding dress to make the pin cushion have extra sentimental value!  She ran a basting stitch one quarter inch from the edge of the circle and stuffed the circle with some of the polyester stuffing.
She pulled the thread tight and enclosed the stuffing, and tied a knot to hold it in place.
 She then stuffed the toe and heel of each shoe so the calico lace piece would sit on top.
She removed the shoelaces and cut a piece of ribbon 2 inches longer than the shoe lace.
As she threaded the organza ribbon through the holes the ribbon shredded a bit, so the extra length allowed Clare to trim up the ribbons shredded ends later.  To the top back of the shoe Clare added some mini pom pom and picot ribbon.  A bit of vintage inspired trim and fabric are perfect for this project!


She added a few buttons and some flowers to finish the project.  For a vintage inspired project like this, Clare loves digging out the classic trims like crocheted flowers, buttons and more!
To see more of Clare's work you can visit her blog at cricutcraftyclare.BlogSpot.com.


Friday, February 21, 2014

Art Glitter Hair Clip


Supply List
Art Glitter 280 Lime Rind Ultrafine Opaque glitter
Art Glitter 150 Poison Ivy Ultrafine Opaque glitter
Art Glitter 297 Hibiscus Ultrafine Transparent glitter
Art Glitter 304 Petal Pink Ultrafine transparent glitter
Art Glitter Dries Clear Glue
Art Glitter Ultra Fine Tip
Art Glitter Sticky Paper
The Robin's Nest Metallic Red Dew Drops
Darice Barrette
Bridal Ribbon Hobby Lobby
Plastic packaging
Creative Memories Leaf Punch
Hot Glue gun

One of the things Clare loves about Art Glitter is the range of colors!  She knows she can find a color glitter to match any project she is working on!  This will come in handy with wedding season approaching.  Clare used the perfect color Art Glitter to make beautiful barrettes for the flower girl. 
She started by covering a Darcy barrette with ribbon, gluing it in place with a hot glue gun.  Clare likes to use a low temp glue gun to avoid burns!  She then punched some leaves in Art Glitter Sticky paper.  She peeled off the protective layer first.   Clare finds it easy to just dip the leaf in the glitter on the side of the leaf in the light color green. 

Here Clare used 280 Lime Rind Ultrafine Opaque.  She then dipped the same leaf in the darker color green to cover the center of the leaf, this is 150 Poison Ivy. 


Once the leaves were made, she glued them on top of the ribbon on the barrette. 
For the flower, Clare cut a rolled rose using a Sizzix die and some plastic packaging from a embossing folder she bought:  reduce, reuse, recycle!  She has even used the plastic lid to the salad packaging from the grocery store to make flowers!  You can find more photos of the packaging flowers here.   While the rose was still flat, she covered the center of each petal using 297 Hibiscus Ultrafine Transparent glitter and the ultrafine glue tip, and Art Glitter Dries Clear glue. 
She made a second row of color, again using the ultrafine tip and 304 Petal Pink Ultrafine transparent glitter. 

Once these had dried completely, Clare rolled the rose and glued it at the center using a glue gun.  For the flower center she glued a dew drop from The Robin's Nest.  She gently bent the petals once the glue had dried completely.  She then attached the flower to the barrette on top of the leaves.  

To see more of Clare's work you can visit her blog at cricutcraftyclare.blogspot.com.