Saturday, January 12, 2013

All You Need is Love by Carrie

  I'm getting into the Valentine's Day spirit with a little hanging art piece. Here are my "ingredients":
Supplies:
  1. Sheet music - I found this by googling "All You Need is Love sheet music" and I sized it to fit inside the rhinestone border that I picked out
  2. A sheet of black paper
  3. Black rhinestone frame from Want 2 Scrap
  4. "L-O-V-E" printed out in circus font, with some little red triangles for the pennant
  5. #349 - Garnet Red - Ultrafine Opaque Glitter
  6. #79 - Black - Ultrafine Opaque Glitter
  7. #83 Silver- Ultrafine Opaque Glitter
  8. 2 grommets
  9. 12 small rhinestones, in your choice of color
  10. Some thin ribbon, embroidery floss or thin tinsel
  11. Ribbon to hang the sign
And I used Designer dries clear adhesive. I started by cutting around the largest rhinestone frame, which is conveniently clear and easy to cut. This way, I'll have a template that I can trace...
Like so...
Then I traced the outside of that template onto the sheet music, centering the title up above.
Cut the sheet music out and place onto a piece of black paper that you are going to use as your background... Before I glued this down, I glittered the edge of the sheet music piece...
A little glue around the edge, cover in glitter (Love this red glitter and the contrast against the black paper)...
After the red border dried, I put down the black rhinestone Want 2 Scrap frame, then glued the whole thing down to the black paper.
I free handed some fern squiggles around the border and added the silver glitter. I put two grommets on the top of the black paper and lastly, I glittered up the L-O-V-E and put the banners together by free handing the black glitter letters and adding a rhinestone to the bottom of each triangle ...
And now all I need to do is add a ribbon and hang it up...
I decided to hang it inside a wreath that hangs over my mantel...


I sort of went crazy on my Valentine's display this year :) I was bored with just red, pink, black and gray, so I added a pop of Tiffany blue to the equation. Here's to lots of love this year!


To see more projects and art by Carrie, check out her blog Violet Cottage.


Thursday, January 10, 2013

Glittering Candy Jars

Valentine's Day is right around the corner and if you're looking for an easy-peasy craft, I think I have something for you. These are two recycled little jars with lids that I dug out of my recycle bin and ran through the dishwasher. I love using corrugated cardboard so decided to make jar wraps and some more those adorable little hearts to use for this project. I started with a square of corrugated cardboard cut from a plain old box I found in the garage. Cut two strips using a metal-edge ruler and craft knife. Die cut two hearts from the cardboard as well. Art_Glitter_Linda_Neff_Valentine_Candy_Jars_Photo_2 Spritz the strips and hearts with water and let set for a minute or two. This softens the top layer and makes it easier to peel it off, exposing the corrugated board beneath. Do this to all four pieces. Lay them all out on a non-stick craft sheet and haphazardly paint them with gesso - leaving a lot of the cardboard exposed; set aside and let dry (it doesn't take too long). Paint both lids as well. Art_Glitter_Linda_Neff_Valentine_Candy_Jars_photo_1 When dry, lightly spritz the back side and wrap around the jars and secure with a rubberband. This helps to make the stiff board conform to the roundness of the jars. Let this set for a few minutes then remove the rubberbands and take the strips from the jars. Art_Glitter_Linda_Neff_Valentine_Candy_Jars_Photo_4 Pour some Designer Dries Clear onto a palette and use a wide paint brush to randomly brush some glue onto one of the strips. Sprinkle with Tea Rose 11 Ultra Fine Opaque glitter onto the glued areas and tap off excess and return to jar. Use the brush to add more DDC onto some of the open areas on the strip then sprinkle with Antique Silver Fine 611 Vintage Glass Glitter; tap off excess and return to jar. Do this to both strips. Art_Glitter_Linda_Neff_Valentine_Candy_Jars_Photo_3 Brush DDC over the hearts (do one at a time) and sprinkle on Briar Rose 923 Vintage Glass Shards; tap off excess and return to jar. Brush DDC on the lids (one at a time) and sprinkle with the Tea Rose glitter. Set all pieces aside to dry thoroughly. Art_Glitter_Linda_Neff_Valentine_Candy_Jars_Photo_5 In the meantime, print 'Be my Valentine' and 'Be mine' onto white cardstock, trim out and ink edges with Vintage Photo Distress Ink. Now, it's time for assembly. I run a strip of repositionable adhesive down the inside of the glittered strips before wrapping around the jars. Add a few small dabs of DDC to the strips where the hearts will sit (where the two end meet) and a few dots on the back of the hearts and press into place; hold for a few seconds for glue to set then carefully wrap with the rubberband to hold it in place till thoroughly dry. When dry, remove the rubberbands and fill with some delicious Valentine candies - then save your diet and give it away! Valentine Glitter Candy Jars If you like this project, hop on over to my blog and take a look at a cute little Valentine gift box I made in under two hours!
Linda_Neff_mini_mug_shot 

Tuesday, January 8, 2013

Celebrate In Style With Art Glitter

Well, the New Year is in full swing, and the parties are still going! Today I wanted to share with you something that will help you decorate and dress up your New Year's parties. (and you can put away those wine tags, that you never remember where you put them)

Art Glitter
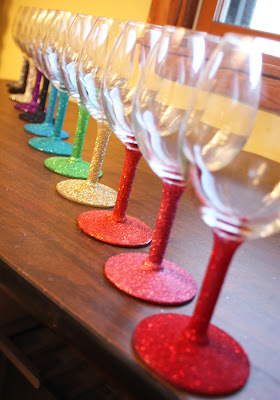
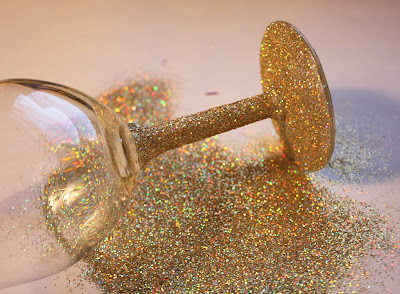
Glittered Stem Wine Glasses!

Products used:
A set of wine glasses. A pack of 12 is what I got. 


Paintbrush
Clear Acrylic Spray Paint

I completed the entire set in less than an hour, minus the finish spray, so it was super simple to do.

1. Take a glass. Paint Designer Dries Clear Adhesive on the the base and stem of the glass. A thin coat should work just fine, be sure to coat every part you want covered with the adhesive. 


2. Sprinkle on one of your glitter choices. (Shown in #335 SunRay)

Art Glitter

3. Shake off glitter, and let dry.


 4. Repeat until all of your glasses and glitter colors are used!


After they are all dry, coat the base and stem ONLY with the clear acrylic spray paint (you might have to tape them off). This will make them able to be hand washed and prevent sweaty hands from getting glitter on them! :)


You could do this to any type of stemmed glassware: Martini glasses, Margarita, Champagne flutes, you name it. The colors are completely up to you as well. Can you imagine all the glasses in different blues? silvers? pinks and purples? Themed for each holiday? I love things with endless possibilities!


 Now be sure stop by my blog, one.heart.scrapper. for some more glitter inspiration today!

Cherie

http://oneheartscrapper.blogspot.com

Saturday, January 5, 2013

Decorations with Glitter!

Happy New Year All!!  I have a very festive New Year's decoration to share today.

For this project I used:  Clear Scraps' Scallop Square page, Double sided tape, Clear Scraps' 6x6 Numbers Stencil, Art Glitter Ultrafine Opaque Glitters:  Pink Diamond, Sunrise, Old Gold, Celery & Black.

I began by centering a sheet of double stick tape - cut 5 1/2" square - on to the acrylic page.  (Don't forget to remove the protective coating from the acrylic - I did that the first time thru)  Remove the protective plastic from the tape.

I soaped the back of the stencil to keep it from sticking too hard to the tape and then placed it over the exposed tape.

I covered the entire surface of the tape with black glitter.

Then I brushed off the excess.  Try to get as much of the excess glitter off as possible so it doesn't fall back into the exposed areas when you remove the stencil.

Then I removed the stencil.  

I began at the lower corner with Pink Diamond Glitter.  I covered a portion of the exposed tape and the shook off the excess.

Then I did the same thing with the Sunrise on the next section.

I repeated this process with Old Gold and Celery glitters.  It looks like a mess here, but that is because the glitter has clung to the exposed acrylic.  It cleans up well with a soft brush.  

Then I added some glue dots and covered with glitter and finished with some sparkly letters.

Happy 2013 Everyone!!

KC
 

Friday, December 28, 2012

Gift Bags for All Year Round

These are little gift bags I made to share some homemade peanut brittle with some friends and co-workers during the Christmas holiday. The word on the ornaments can be changed up to fit any occasion or theme for any time of the year.

I started my making the heart ornaments from corrugated cardboard cut on my Vagabond using the Sizzix Hearts, Primitive die. I love this die and use it quite often in many of my projects. There are three size hearts on the die so it works perfectly as an ornament, scrapbook page element or a decoration on a card. I distress the hearts by spritzing with water and letting it soak for a minute or two to soften the paper covering. I chew up the edges with an Exacto, scissor blades or edge distresser and peel back some of the covering, exposing the corrugated layer beneath. I then paint it briskly with Gesso and set it aside to dry. When the gesso-ed hearts are dry I put them through my Xyron Creatopia face-down. This puts a layer of adhesive on the front. I peel off the Xyron backing and sprinkle with Art Glitter Microfine Transparent Winter White glitter. Tap off the excess and set aside while finishing the rest. When they're all glittered cut a 5-inch to 6-inch strip of cream or white tulle and tie a knot in the middle. Use Designer Dries Clear adhesive to attach the tulle to the center of the heart and clamp with a clip clothes pin till the glue is set. Xyron_Linda_Neff_Ornament_2012_clothespins While the glue is setting up, cut and ink the edges of words or phrases that have been printed on white cardstock. Gather a few vintage buttons, bells, pearl gems or any other little embellish you wish to add. Once the hearts are decorated you'll want to pierce two tiny holes in the top and attach a thin white wire for hanging. Xyron_Linda_Neff_Ornament_2012_Photo_3 The gift bags were purchased at Michael's Arts & Crafts. There are 16 bags in the package for about $3. I love the natural craft color of the bags but wanted to dress them up a bit with a lacy strip. I used the faux lace technique from the Art Glitter blog. It's easy and does the trick. I used a 2-inch wide strip of double-sided tape and cut it to fit the width of the bag. It's taped to the front side of the bag and the top protector peeled back. Art_Glitter_Linda_Neff_Faux_Lace_bag3
  I lined up a strip of Lace Pattern and gently pressed it in place over the tape. Art_Glitter_Linda_Neff_Faux_Lace_bag I sprinkled one color of glitter over the tape with the lace pressed in place (Boysenberry Microfine Transparent) and gently rubbed it in with my fingers. Tap and brush the excess off then gently peel off the lace revealing a beautiful pattern but still open with some sticky areas. Then I sprinkled my second color (Sand Ultrafine Opague) over the partially-covered tape and gently rub the second color into the tape; use a glitter brush to remove any glitter that is not stuck down. And, you end up with these beautiful glittery gift bags! Art_Glitter_Linda_Neff_Faux_Lace_bag4

linda-neff.com

Tuesday, December 25, 2012

Merry Christmas From Art Glitter


Merry Christmas! 

Today may be filled with tradition, family, love, and hopefully some glitter too! 

My project for you today is a nice tree tablescape. That can still stay on the table after Christmas too!


I wanted to make a glitter Christmas Tree setting, but I wanted it to be non traditional. I decided to go with teals, pinks, purples, and greens.


Here is how I made it happen.

Products Used:
#184 T-Bird Ultrafine Pearlescent
#D29 Confection Dazzlers
#353 Provence Ultrafine Opaque
#356 Grape Nector Ultrafine Opaque
Designer Dries Clear
Designer Dries White (optional)
Small Faux Tree (I chose a white one)
Styrofoam Cones
Paintbrush

I decorated the white tree first. I started by adding Designer Dries Clear to the bottom branches of the tree. I just squirted it on in any random fashion. Mostly making sure to get some glue on every branch.


I then sprinkled on glitter to the branches. Shook it off, and then moved up the tree to add more colors until I got the desired look.


Once I finished the tree, I moved onto the cone trees.

I coated the entire tree with Designer Dries Clear. I purchased the refill, and just dipped my entire paintbrush into the container, and brushed onto the Styrofoam cone.


I then poured glitter all over the tree until it was completely coated. I let it completely dry. Then starting at the top (I used Designer Dries Clear, because I didn't have Designer Dries White - and I wanted the dries white look so I took the picture while still wet, but you could do whatever you would like to get the look you want) I squirted the adhesive so that it trickled down the side of the cone. Then I added Dazzlers to appear as crystallized snow.


As you can see on the table I made a little mess. It did not take long to clean up, and I reused all the glitter. I saved as much as I could putting back into each container after I used each color. But for all the extra that ended up in other places I collected at the end and made my own color by putting it in an old glitter container.

 
I know I will be able to use it for something! I love how all the colors go very well together too! Well I hope you enjoyed seeing the fun trees today, and I hope you are all having a wonderful holiday season. Mele Kalikimaka! Stop by my blog, one.heart.scrapper. for another glittery Holiday project!


Cherie