Showing posts with label chunky hologram glitter. Show all posts

Tuesday, April 23, 2013

Light It Up with Art Glitter

Today is my last post on the Art Glitter blog. I have had such a great time designing for Art Glitter. I have learned so much about their products, and have become slightly obsessive with all of it. This position has helped me grow as a person, and I have truly loved every minute of it. I want to Thank the entire Art Glitter staff for all of the support, inspiration, and glittery goodness over the past year. It has been a fun, rewarding experience.

My life is always an adventure, and since we are here in Hawaii, I am going to be living more of the Hawaiian way... a slower pace, relaxing, and I want to see as much as I can while we are here, so my time will be more limited. I promise I will not stop crafting or using glitter. Glitter will ALWAYS be a part of me.

For my last project, I wanted to do something fun, a little recycled, and glittery (duh, isn't that what this is all about)!

I made party lights, perfect for spring and summer!


Products used:
Art Glitter: Ultrafine Opaque in #355 Sunrise, #44 Kelly, #233 Blue Hawaii, Chunky Opaque Hologram in #124 Jet Eye.
Designer Dries Clear Adhesive
Christmas Lights or Party Lights
Egg Cartons. At least as many "eggs" as you have lights. My strand had 25 lights, so I used three dozen egg cartons.
Spray Paint - I went with white (if you want to alter the egg carton colors)
Paint brush
knife to cut, I used a pocket knife since that is what I could find. (gotta love moving).

I started with the egg cartons. I used the paper ones, since I was planning on spray painting them. Spray painting on the Styrofoam ones do not work as well since spray paint eats at the Styrofoam. So I cut them apart and laid them out on a piece of cardboard outside.


I then sprayed them with spray paint. This is tricky since they kind of blow around because they are so light weight. But I did a couple coats. The cartons really soak up the spray, but I wanted them to be a little lighter color.


After they dried overnight, it was humid in Hawaii so it took a little longer, I began to add the glitter. I knew that I wanted to alternate between the three glitters I chose so I did at least 8 of each color.


I painted Designer Dries Clear Adhesive around the edges of the egg carton, and then dunked them into the glitter to cover them.


Now after those dried, I needed to add the lights. I took my knife, and cut an "x" in the bottom of each "flower". 

 
Then inserted the party lights. I had pretty large lights so I had to make a bigger "x" but do it based on the size of your lights. You want it so the light goes in, but won't slip off.  If need be, you could adhere the light to the base of your flower so it doesn't move with hot glue.


I still wanted to add more glitter at this point, probably because there are so many beautiful Art Glitter colors. I have been wanting to use the Chunky Opaque Hologram Glitter, because it is my favorite. So I busted out my Jet Eye. It may be true love, since I love its super bling. I painted the tip of the light with Designer Dries Clear Adhesive, and just dipped it into the container.


 The next step was to hang them up! Here are a bunch of amazing pictures of the final project.


i


Thank you all for your kind feedback over the year. This was a fun project and a great way to welcome Spring, and all those Back Yard Barbeques coming up! Now please stop by my blog oneheartscrapper, for another glitter project. I will also be sharing a story on why glitter is so important to me.

Have a wonderfully glittery year, and good luck to the New Design Team!! I can't wait to see what they have created!!

Saturday, December 8, 2012

Glitter Themed Tote Bag

I started out with a plain canvas tote bag and used the following glitter colors and glues:
Here's how it turned out!


I did the design freehand... which isn't that difficult to do with the simplicity of the flowers I created. I started with the glittered flowers, then decided to paint on the white poinsettias and little white flowers and then added the green leaves using acrylic paint. And just kept on adding rhinestones, more rhinestones and more glitter. I love this Helmar Gemstone Glue... it really holds those little rhinestones on VERY well. And they bend and move with ease. I'm really impressed with this product! So much so (and was having so much fun) that I set out to do another bag packed with crystals... that Helmar glue held up perfectly!! I did this all freehand, too.


For the above, here are the glitter colors I used: Imagine what you could do to any ol' boring canvas bag!


Tuesday, October 9, 2012

Calling All Cell Phones - For a Make Over

I always see those super cute sparkly cases for ipod, cell phones, e-readers, you name it, and I always want one, but I can never find it in the color I want, or the sparkle I want.

So I took matters into my own hands.

I recently got a new ipod (hand me down), and it came with a simple black rubber case on it.

I have been saving my Art Glitter Dazzlers Dance Floor for a special occasion. This was the perfect occasion.

Here is what the case started out looking like.

Here is the list of products used.

- Art Glitter D2 Dance Floor Funky Dazzlers
- Art Glitter Designer Dries Clear
- Ranger Inkssentials Glossy Accents
- paintbrush
- ipod case


I know that glitter and electronics may not be the best to mix together, so please be careful when doing any glitter and glue near electronics.

I first started by applying the Designer Dries Clear Adhesive to the back of my case. I started with an outline, and then ended up filling in the entire space I wanted to cover. I did use a thick coat, only because the funky dazzlers have some larger chunks of fun pieces like moons, slices, and circles, along with some fine glitter.


I then poured on the glitter. You can either shake off the excess or leave it until the case is dry.  If the glue is too thick it will run.


Once it was completely dry I took a dry paintbrush and brushed off excess glitter on the case that was not adhered to the Designer Dries Clear Adhesive.

I then took my Glossy Accents and covered the glitter and the rest of the case.


I let it dry overnight.

I flipped it over, and made a thin layer of adhesive around the front edge of the case. Sprinkle on glitter, let it dry, and added Glossy Accents again. (I used Glossy Accents to seal the glitter in with a super high gloss look)


When it was all dry, I popped in my ipod and have my own personal case!


You can use any color of glitter you want to use, and make it your own. The best thing about the color I chose is that it is SUPER holographic looking! Tons of colors bounce off of it from the light, and the shapes add a fun flair to it. You could also use some of the ultrafine opaque hologram colors, or microfine opaque. Even using and ultrafine opaque, or transparent colors would work too! The combinations are endless!

I hope you enjoyed this fun project that you could use to personalize almost anything you own.

Be sure to stop by my blog for more glittery fun!


Sunday, December 4, 2011

Ornament Favors by Cassandra Midkiff


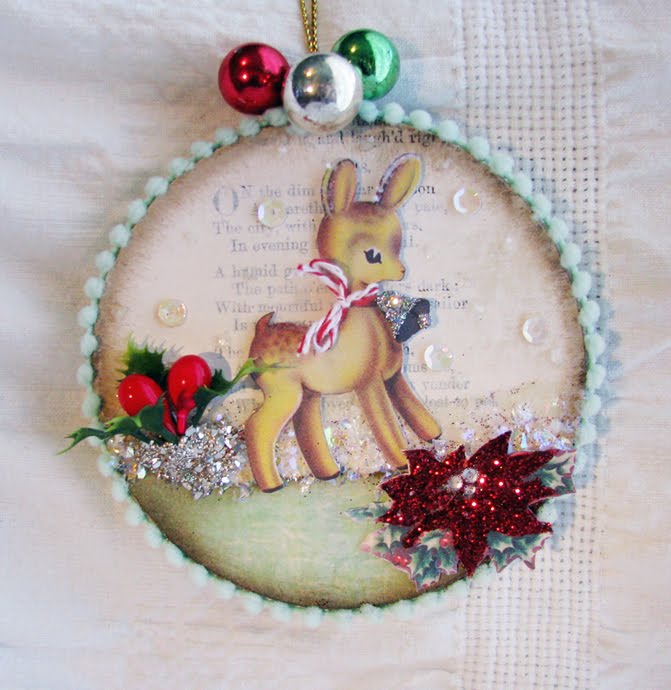
Every year around this time I try to think of little tokens of appreciation for my family that show them I care but are not too expensive. This year I’ve come up with tag/ornaments.  On one side they have the too/from and on the other a beautifully decorated little piece ready to hang on their tree.


I found these inexpensive papermache ornaments at my local craft store for $.99. I covered the ornament with my Designer Dries Clear adhesive and put a vintage sheet of poetry paper on top. After cutting off the excess paper I dry brushed some white acrylic paint on top so the words show through lightly. Next I tore some green scrapbook paper to act as my ground and glued it into place; I took the same paper and glued it to the back of my ornament as well adding my to and from in pen. Taking my brown ink pad I gently went around the edges of the ornament to give it an aged look. I then took some pom-pom trim and glued it around the edge of my ornament, you can also paint this area if it is easier for you.


With my background in place I put down more Designer Adhesive along the top of my green “ground” and using my small spoon shook some Faux Snow on top. When that was dry I went back and put another line of glue and sprinkled Confection Dazzlers on top.


While it was drying I cut out my deer and poinsettia pictures. I glued some illustration board to the back of both to give my piece some dimension. I tied a little red and white thread around my deer’s neck and then using the designer adhesive outlined the deer’s bell and sprinkled Ultrafine Opaque Hologram Glitter #136 Chromosphere on top. I also outlined his ears and the top of his back and put some more Confection Dazzlers to make it look as though he had been snowed on.


I always like to use vintage items on my pieces when I can and recently found some vintage millinery stamen and some plastic holly berry leaves. I combined the two and glued it to my ornament. Once it was dry I put down more adhesive and sprinkled it with Gala Glitz in Silver my personal favorite.


I added glue to my poinsettia and sprinkled it with Chunky Opaque Hologram Glitter #332 Red Rocket. I added some sequins and a few drops and sprinkles of Confection Dazzlers to act as my snow. Then I glued everything into place. Once that was finished I added some vintage mercury bulbs to the top of the ornament.


Now it is ready to attach to your gift! A truly sweet little keepsake for someone you care about.  I’ve included the deer image for your crafting projects.

Friday, November 4, 2011

Glitter-Backed Mini Mosaic by Lori Mendenhall

I love making mosaics, but they take a long time to complete – and I don’t like grouting.  So to get around my impatience I make mini-mosaics.  But instead of traditional glass/tile and grout I go for the mixed media look incorporating glass, metal, pearls, and glitter. So cute, fun, and quick!


Here’s how to put together one of these sparkly mini mosaics:

1. Start with a pendant blank (bezel). I like to purchase these from Etsy.  Coat the entire bezel with clear-drying glue such as Art Glitter’s Designer Dries Clear Adhesive. Then fill the whole area with glitter and shake out the excess. In this piece I used Art Glitter Chunky Opaque Hologram, Comet, #251.  Let dry.


2. This glitter is extremely sparkly so I chose muted materials to balance it out. I lined the edges with tiny glass tiles. To make it more interesting I added some pearls. In the center I used a copper charm – don’t forget to snip off the ring. My final touch was a couple of wire spirals. I didn’t want to leave too much glitter showing because it might be overpowering. Had I used a less intense glitter I might have left more exposed. The artist gets to decide what is “right” – I love that, don’t you?

3. Once you pick your elements and are happy with their placement, glue them down. Let dry thoroughly. This is very important because any remaining moisture can ruin your resin and therefore your whole piece.

3. Fill your bezel with resin. I use casting resin. The kind you buy at the craft store is fine, just be sure to buy the epoxy resin and not the polyester kind. Let cure overnight until hard, and three days for a full cure.

Note, I received product in exchange for the write-up of this project.

Tuesday, August 2, 2011

Glittering Butterfly Bag by Laura Drahozal


One of my very first memories is of a trip to the beach with my mother and father. I can't remember where it was--just some lake here in Michigan. I do remember playing on the sand at the edge of the water as the waves licked my toes. I also remember my beautiful mother packing everything we needed in a large straw bag with bright colored straw flowers appliqued all over it. I was fascinated by those applique flowers. I often picked at their edges, despite my mother asking me not to. It was that memory that came to me when I saw this cute little straw bag in the Target Hot Spot. Although it was too small to fit all of my family beach needs, it was cute, alterable, and only $2.50--so it was mine!

When I got it home, I had to decide what to put on it. It was a simple decision, really. I have had a thing for butterflies for several years now, and they show off the glitter so beautifully. I am also on the Dreamweaver Stencil design team, and was aware of their gorgeous butterfly stencils, so I decided to use them.

Here is what I did: First, I used my Copic Multiliner to trace around my butterfly stencils on Claudine Helmuth White Sticky Backed Canvas. The Copic liner made a light black line. In retrospect, I would have used the Faber Castell Pitt Pen in black. I obtained one of these highly pigmented ink pens at CHA and they make a darker mark on the canvas. They are also waterproof, which I initially thought the Copics were.


Anyway, once the stencils were traced, I colored between the lines to make the black parts of the butterflies. I then had the joy of coloring them. I used the Designer Dries Clear Fabric Glue (canvas is fabric, after all) and the Ultrafine Metal Tip for the glue. I worked outside in extreme heat, which, while I don't recommend it, did help the glue dry quickly between layers. I also rotated the butterflies as I worked on them, doing all the inside colors, then the second color, etcetera, until all the butterflies were done. I used Ultrafine, Microfine (in transparent and opaque), and chunky in these butterflies, as I liked all the contrasts. I also used Hologram Glitter in each butterfly to up the glitter impact.


When I was finished glittering all of the butterflies, I let them dry (which, as I mentioned before, did not take long due to the extreme heat). I then preheated my oven to 300 degrees, and when it beeped, I turned it off and inserted the butterflies on a foiled cookie sheet. I let them "bake" for 30 minutes to set the glitter. It was perfectly fine, and did not even effect the adhesive on the back of the canvas. Once I removed the butterflies and let them cool, I arranged them on the straw bag. When they were just right, I peeled off the backing, and pressed them firmly where they belonged. Then, the hardest part--I used heavy duty black thread and a curved upholstery needle to tack them all to the straw backing. I made this decision because I know that the Sticky Backed Canvas was not intended for use on straw, but it did seen to stick very well.


When the stitching was done, I used my Faber Castell Pitt Pen to color in the lighter areas of black. After that, I had a cute little beach bag like the one stuck in my memory, but updated, fun and glittery. I won't be taking it to the beach any time soon, but there is a stamp show in August..........

SUPPLIES:
a small straw tote bag
Claudine Hellmuth White Sticky Backed canvas
Copic Multiliner (or Faber Castel Pitt) in black
Fabric Dries Clear Adhesive with ultrafine metal tip
Uphostery Needles
Heavy Duty Thread


ALL BUTTERFLIES
85 Crystal Ultrafine Transparent
79 Black Ultrafine Opaque

BLUE
328 Cairo Chunky Opaque Hologram
504 Blue Diadem Microfine Opaque
140 Canadian Blue Ultrafine Opaque
62 Copper Canyon Ultrafine Opaque
Dreamweaver LJ 916

GREEN
94 Key Lime Ultrafine Transparent
128 Quark Ultrafine Opaque Hologram
62 Copper Canyon Ultrafine Opaque
48 Emerald Ultrafine Opaque
Dreamweaver LM 121

PURPLE
15 Fuschia Ultrafine Opaque
256 Purple Passion Ultrafine Opaque
Dreamweaver LM 255

ORANGE
336 Alien Ultrafine Opaque Hologram
501 Monarch Microfine Opaque
179 Tang Ultrafine Pearlescent
62 Copper Canyon Ultrafine Opaque
Dreamweaver LM 257

RED
D 51 October Dazzlers
332 Red Rocket Chunky Opaque Hologram
DreamweaverLS 57