Thursday, November 18, 2010

Glittery Cupcake Photo Box by Diane Gonzalez

Today, I got to photograph a pretty box that I just finished yesterday.

It may not be the best photo in the world, but I love this project! I had so much fun with it.

You can see the crackle finish. The flowers I got from my swap partner. The cupcake is hand sculpted, and on top, there is a lovely coating of Art Institute Ultrafine Opaque Glitter in the shade of Twilight.

There’s a better shot of the crackle finish. This little box? It’s by Plaid Crafts, and you can get it anywhere that you purchase their products.

Pretty cool, right? I really like it. Oh, and this little item is for sale, if you’re interested.

The Craftaholic

Thursday, November 11, 2010

Glitter Spoon Turkey by Fawnda Norman

For my next Art Glitter project, I am moving on to a Thanksgiving theme!

The Glitter Spoon Turkey!

Here is what you will need:

9 Plate Joining Biscuits (Found at Home Depot or the like) - They are wooden discs

An old spoon (thrift store)

Paint

Hot Glue

Art Glitter Ultrafine Opaque: Brown #58, Copper Harbor #231, Cranberry #119
Art Glitter Ultrafine Transparent: Halo #230

Directions:

1. Paint your Biscuits brown on both sides and allow to FULLY dry


2. Spread Art Glitter Dries Clear Adhesive over the front side of the biscuits and sprinkle your Art Glitter on to it.

I used : Halo #230, Copper Harbor # 231, and Brown #58


3. Once the glitter has dried completely you can arrange the biscuits into a turkey feather pattern. Hot Glue to keep them together.


4. Hot Glue your spoon to the feathers


5. Paint a turkey face on the spoon.


6. Use a Sharpie marker to add details.


7. Add the Gobbler by making the gobbler shape out of Art Glitter Dries Clear Adhesive...

...And Adding Cranberry #119 Art Glitter.


It makes a really cute addition to a fall arrangement!


Tuesday, November 9, 2010

Bunches of Bling Buttons by Christine Lehto


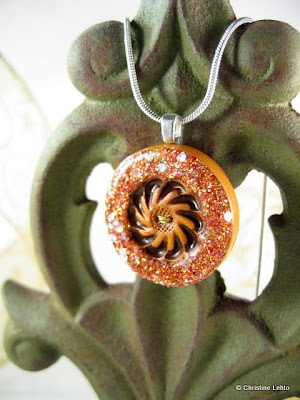
I love buttons as much as I love glitter, so why not combine the two for a “cute-as- a-button sparkly” project? Store bought buttons are great, but to add to my collection, I opted to make some of my own buttons using polymer clay. And of course I decided to embellish my buttons with some wonderful Art Glitter colors. I also decided to add a glittery surface to a couple of store bought buttons to show that you can transform an ugly store bought button into something pretty. One example of a rather “blah” looking button was this gold and cream colored button. It came in a bagged assortment of buttons and I honestly thought I’d never use this particular button for embellishing any of my projects. Instead of embellishing with this button, I embellished the button itself. After I added some glitter, I altered the gold color on the button with some alcohol ink. I like how the button turned out after some glitter and alcohol ink alterations. It didn’t take a lot of effort to get some pleasing results. I used the Designer Dries Clear Adhesive, #519 Reed and #58 Brown on the store bought “blah” button. How do you think it looks?


I used the same type of materials for my polymer clay buttons. First, I added the glitter with the Dries Clear Adhesive. Then I applied some glossy accents over the glitter. Next I decided to see how the alcohol inks would look over the glossy covered glitter. On one button I had used #84 Shiney Si Ultrafine Opaque glitter covered with glossy accents and used a mix of blue and butterscotch colored alcohol ink as a last layer. This created a new and interesting color effect over the glitter. The button is shown in the following photo.


And of course I could not forget to add some of my favorite colored glitter to a few of my buttons. What color is that? It’s the #D1 Dazzlers Crazy Corn color. As I mentioned in a previous article, it’s hard not to add it to all my pieces because I love how sparkly it is and how there’s a variation of large pieces of glitter along with smaller pieces. Again, I used the Designer Dries Clear Adhesive for adding glitter to the polymer clay buttons. And I covered the Dazzlers Crazy Corn with the glossy accents to highlight the super sparkliness of this gorgeous glitter color. Look at it sparkle in the next couple of photos!


Can you count how many buttons I used Crazy Corn on?


After decorating the buttons, I made some of them into rings and some as pendants.


Supplies used for my buttons: #84 Shiney Si Ultrafine Opaque, #58 Brown Ultrafine Opaque, #D1 Dazzlers Crazy Corn, #519 Reed Microfine Opaque, #65 Old Gold Ultrafine Opaque, #184 T-Bird Ultrafine Pearlescent, Designer Dries Clear Adhesive, Ultrafine Metal Tip, Glossy Accents, alcohol inks, antique gel medium, thread, jewelry findings-ring bases & bails.

Thursday, November 4, 2010

Art Glitter Guest Designer Call

Yes, if you have 6 projects to glitterfly and designed by you, WE WANT YOU!
I'm afraid I've put myself in a bit of a bind and am looking for 3 designers to start in December, however we are looking to fill all of our 2011 positions so please apply!

All the details are here in this link: http://www.artglitter.com/guestdesignercalls.htm

And just think, you can work with me! The Spider Witch!


Or should I say the GLITTER Spider Witch. I used Ultrafine Hologram #136 Chromosphere and our Fabric Dries Clear for the webbing, it looks fabulous! Of course all my spiders have been glitterfied! Hope you all had a wonderful Halloween as we did. We had over 1800 Trick or Treaters!

Be sure to send me your application/photos and help us Spread the Sparkle!

Friday, October 29, 2010

Fantasy Fiber Earrings by Diana Gonzalez

Today I made these beautiful earrings with Fantasy Fiber, by Art Glitter.


These are so super simple to make.

You’ll need an iron, Art Glitter Fantasy Fiber, hoops, and of course, earring backs.

All you do, is make the fiber, by laying it out on a piece of cardstock, and ironing it.

Then, you get your hoop, and gently fold it over the hoop, and iron it together. The ironing will work as a “glue”. That’s it! Poke a small hole to put the earring back, and that is it.

Now…want a little more shine to your earrings? I took different shade of Fantasy Fiber (Briarwood), and put it on top of the earring, laying flat, sandwiched between two pieces of fabric, ironed it, burned the edges a bit, and this is what I got:

What a difference, eh?

So, what do you think? You like them?

The Craftaholic

Tuesday, October 26, 2010

Glittered Butterfly Art by Fawnda Norman


We are expecting a baby girl VERY soon! So I need to get a move on with decorating her room!

For my next glitter project I am going to show you how to make A SUPER cute and easy piece of art! I have always love butterflies and that is the theme of the nursery.


Here is what you will need:

Blank Canvas

Paint

Vinyl Stickers

Art Glitter (#95 Summer Sea and #230 Halo)


Here is how I made it:

1. I painted the canvas the back ground color(s) that I wanted.

I wanted it to look the morning sky turning from purple to blue. I started out with Dark purple at the bottom and added white to fade up to reach a little below the middle. Then, at the top I started with the teal blue and added white to fade down. I kept the paint thick so that I could blend the colors on the canvas. Once I got to the middle I painted up with the purple and down with the blue and over lapped to blend. Again, I kept the paint thick to help blend the colors.

You could keep it really simple and just do one color too! :)

Let your paint dry


Place your vinyl stickers on your canvas when your paint is fully dry. You can move them around a bit to get the right placement.


Now to add the glitter. I worked in small sections to add the glitter.

I added the glue, then sprinkled with glitter and tapped off the excess.


I used two colors of glitter on my mine you can use as much glitter as you want!

(I used Art Glitter #95 Summer Sea and #230 Halo)


Allow time for the glue to dry and shake off the excess glitter, even though you tapped off most of it the still will be a little more to tap off.


Hang it up and enjoy!


Super easy and super cute

Friday, October 22, 2010

Hearts of Glitter by Christine Lehto


As I work on various projects, my mind often wanders, searching for new items to add a glittery surface to. A few months ago, I bought a package of these little plastic heart boxes from the dollar store. At the time, I did not exactly know what I would do with the boxes, but I knew they’d come in handy at some point. One day I saw those boxes sitting in my plastic storage bin and they caught my attention screaming, “We want to be glitter-fied!” Needless to say, I decided to try to give them the glitter treatment.


I gathered up the following glitter supplies:
• Assortment of Art Glitter colors: Ultrafine Opaque #30 Royale, #291 Fire Engine, #65 Old Gold, #44 Kelly, #84 Shiny Si and #58 Brown. Ultrafine Pearlescent #184 T-Bird, Microfine Opaque #519 Reed, Microfine Transparent #704 Blue Bell and Dazzlers #D1 Crazy Corn
Designer Dries Clear Adhesive
• #8 Flat paintbrush
• Medium grit sandpaper
• Aluminum tray filled with uncooked rice (Yes, it does serve a very useful purpose in the process)
• 3 plastic heart boxes
Steps to make a glittery heart box:
1) Sand the surface of the boxes with medium grit sandpaper
2) Determine how you want your heart box to be decorated. I decided to make mine with hearts within hearts on the cover of the box. First, I made a heart shape in the center of the box cover using the Designer Dries Clear Adhesive and then sprinkled my first color of glitter.
3) After the center heart dried, I applied an outline of adhesive around it and sprinkled it with glitter. Then I waited for outline to dry.
4) Once the glitter dried for each of my outlines, I used a #8 flat paintbrush to apply adhesive to the outside edges of the box cover. At this point, I removed the cover from the base, so I would not accidentally glue the box closed. I applied glue & glitter to the edges in two steps. First, I applied the adhesive to one half of the outside edge of the box. (note: be careful to spread out the glue in a thin layer using a paintbrush, otherwise the glue will dry unevenly) Then I added glitter to the surface of the brushed on adhesive. Next, I carefully placed my box into the tray filled with rice. This helps to prop up the piece and helps it to dry without getting too messy. After the first half of the edge is dry, I repeated this same process for the second half.
5) For the sides on the base of the box, I repeated the two-step process and used the tray of rice to prop up the box base. Finally, I added adhesive with a brush to the outside bottom of the box base and set it down flat to dry.
6) Once both the cover and the base were glitter-fied, I placed the covers back onto the bases to see if there were any spots I needed to touch up. For any touch up spots, I applied glitter to the “bare” spots using the paintbrush. After filling in the bare spots, the box is ready to use or to give away as a gift. It’s a perfect box to give some jewelry in.


Note: Initially I forgot to sand my first heart box and I encountered spots where the glue would not stay covered on the surface of the box. For my next box, I lightly sanded the surface and this did not happen as often. However, on occasion it still happened. I was able to go back later and fill in the empty spots and then the glue stayed put, so next time I may sand a little longer to see if this would be eliminated. If not, at least I can go back and fill in those spots after the first glittering is dried.


Note from Art Glitter: If sanding doesn't work, or if it is an item you don't want to sand, clean it with rubbing alcohol first and paint on a thin coat of Designer Dries Clear, let dry completely. Then paint/draw on glue as desired and glitter. Thanks Christine!