Thursday, May 10, 2012

Glittered Shabby Chic Tag by Linda Neff


 It’s Linda here, sharing with you my excitement for being selected to be on this talented Art Glitter Design Team and how I made this sparkly Glittered Shabby Chic Tag.

Supplies:
Detail paint brush & water bucket
Manila Tag
A2 Musical Flourish, Cuttlebug embossing folder
Primitive Hearts die, Sizzix
Corrugated cardboard scrap
Distress Inks in Tattered Rose & Stormy Sky, Ranger
Vagabond, Sizzix
Typed sentiment
Scrap ribbons & tulle from my stash
White card stock

To begin with, this Glittered Shabby Chic Tag is a little out of my comfort zone. I am all about earth tones and browns when it comes to color but this is one of the elements I really think I will enjoy about being on this team. It will push me to use products in a different way than I normally would and I’ll admit, I rather fell in love with the softness of this Glittered Shabby Chic Tag when it was finished and I hope you will too. Give it a try! 

I started by embossing my tag first then realized it would work better if I inked it first. So, as usual for me, I started over. I used Stormy Sky and Tattered Rose with an ink applicator to ink a new tag then ran it through my Vagabond in the A2 Musical Flourish embossing folder. Much better!

I cut three flowers from white card stock using the Flowers, 3-D die then inked them with the same two Distress colors and assembled following directions that came with the die; then I set them aside to dry.


Okay, now the real fun begins! I love detail work – I find it to be so very relaxing. To begin, I squirt out about a dime size amount of Designer Dries Clear (DDC) onto a non-stick palette (a scrap of plastic packaging works great). I ‘painted’ the DDC on top of the embossed swirls with the detail brush then sprinkled with the Crystal Ultrafine Transparent glitter. I tap off access and continue until all the embossed areas have been covered in glitter. Mind you, a small area is all that can be worked at a time – about the size of 50 cent piece. Because the DDG is painted on in such small amounts it will skin over quickly and dry. This technique requires slow and steady work – patience – but is so worth it.
To finish the flowers (they should be dry and set by now), I painted some DDG on the flower edges and dipped them in the jar of Crystal Ultrafine Transparent glitter. I squirted a small speck of DDG into the flower center and pushed in a scrap of white tulle with tweezers; adhered some flower stamens on top of tulle and repeated for all three flowers.

I cut two primitive hearts from corrugated cardboard either with the Sizzix die and painted them with a heavy coat of Pearl Adirondack Paint Dabber. I then sprinkled a heavy coat of Crystal Ultrafine Transparent glitter; gently tapped off access and set aside to dry.

I cut apart my sentiment, which was printed out on white card stock, and inked the edges slightly with Tattered Rose Distress Ink. I then added dimensional adhesive to the back of them.

 Assembly: I added some random strips of tissue tape inked with Tattered Rose Distress Ink to the bottom half of my tag. Using DDG, glued one of the primitive hearts to the lower half – centered – and placed a heavy book on top till set. 

I tied a scrap of tulle into a soft knot and glued it under the large flower, then glued the remaining flowers across the tag, with one being on top of the heart. I added the sentiments to create balance and added ribbon and scraps of tulle to the tag topper. This Glittered Shabby Chic Tag could easily be tied to a wedding, Mother’s Day or special friend’s gift package! What are your thoughts?


Posted by Linda Neff, http://linda-neff.com

Tuesday, May 8, 2012

Glitter Jar with Cheri Goyer


I always love taking things that I have sitting around and making them beautiful and turning them into something usable again. That is exactly what I have to share with you today.  I am going to take you through how to take an old candle jar and turn it into a beautiful use for storage.


To create this beauty, here is what I started with the following:
An empty candle jar (lid optional)
Designer Dries Clear Adhesive
Ultrafine Transparent Glitter in #85, Crystal
Fantasy Fiber in Snowflake
Parchment Paper
Iron
Painter’s tape
Start by taping off a ring at the bottom of the candle jar, and the top of the jar. Then apply the Designer Dries Clear Adhesive with a paintbrush to the untaped areas and sprinkle on Ultrafine Transparent Glitter. 


After the adhesive has dried, peel off the painter’s tape. On top of a piece of parchment paper, lay out Fantasy Fiber long enough to stretch around the length of the candle jar. 
Then lay another piece of parchment paper on top of it. With an iron set on medium or polyester setting, heat the parchment paper where the fiber is for about3-5 seconds. When you lift the top sheet of parchment paper, the fibers should have adhered to each other and have a nice glossy finish, and will not separate from each other.  

Place a line of Designer Dries Clear Adhesive around the bottom of the top ring of glitter. Wrap the Fantasy Fiber around the middle of candle, gluing it in place. Let it completely dry, then trim the fantasy fiber around the jar and add any extra embellishments to your liking.  


I filled it with some candy, but it could be used for anything from holding craft supplies, to collecting loose change.  I hope you enjoyed my project. Be sure to stop over at my blog, http://oneheartscrapper.blogspot.com to see other  projects I have !

Friday, May 4, 2012

Fairy In Bottle by KC

This is a great project by KC Eddy, one of our NEW Design Team Members!

Supplies used:

Bottle
Bottle Cutter (see Diamond Tech Crafts)
White Polymer Clay
Eye Pin
#183 Blue Angel Ultrafine Pearlescent, #157 Purple Lame Ultrafine Opaque, #85 Crystal Ultrafine Transparent, #269 Horizon Ultrafine Transparent
Designer Dries Clear Adhesive
3D Embossit
Fantasy Film - Sunkissed
Fantasy Fiber - Bellflower


I have a thing for bottles....I like to melt them in my kiln and I have been known to buy wine because I like the color or shape of the bottle. So when my husband saw a very nice blue bottle of a particular adult beverage, he thought 'I bet my wife would like that bottle'. (sure, that's what he was thinking... ;) Unfortunately, this bottle design does not work well for melting, so I wanted to find another way to reuse it. I had seen "Fairies in a Jar" on the Internet and decided to make my own version....Fairy in a bottle.

The first step was to cut the bottle. I have an old fashioned bottle cutter. There are new ones on the market - I'm not sure if they are easier or not, but if you go to diamondtechcrafts.com, they have lots of information on cutting bottles. Once the bottle was cut and sanded it was time for the fun part.
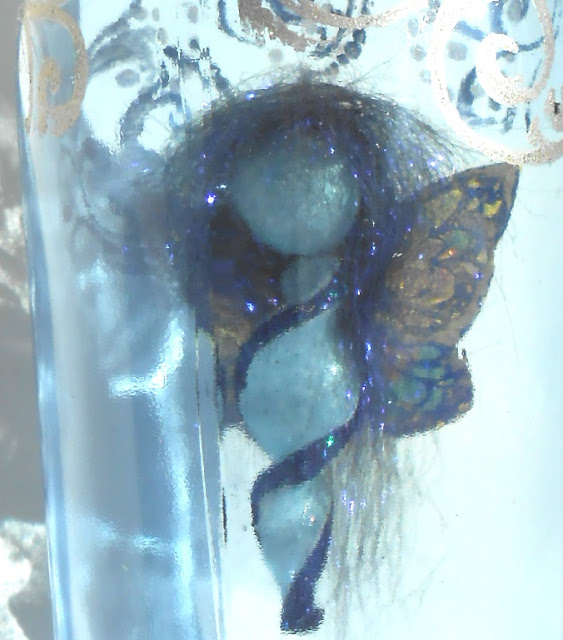
First the fairy: The fairy's body and head are made from white polymer clay. Roll the clay through a pasta maker on the thickest setting and then trim it to be about 3" square. Cut the square in half and place an eye pin in the center of one piece of clay, so that the eye is about 1/4" from the top edge and the shaft extends up beyond the clay. Place the second piece on top so that they sandwich the eye pin - pressing slightly to adhere the two pieces.


Coat the clay in Art Glitter Blue Angel Ultrafine Pearlescent. Cut a long teardrop shape in the clay and cover the newly exposed sides in Art Glitter Purple Lame Ultrafine Opaque. Then gently twist the teardrop into a spiral - the Fairy's body. Use some of the excess clay to roll a ball for the head - coat it in Blue Angel glitter and put it on the pin. Spin the head a little bit at this point so that it is lose on the pin - you'll want to be able to slide it off the pin after baking. Bake the head and body according to clay manufacturer's instructions.
After baking, I didn't feel that there was enough glitter - I wanted the purple to really pop - so I ran a little Designer Dries Clear Adhesive down the edges of the spiral and coated them with more of the Purple Lame glitter.

Art Glitter Bellflower Fantasy Fiber was used to create the hair. Set a clump of it on a Teflon sheet and cover with another Teflon sheet and then iron just in the center to bond the fibers. Glue to the top of her head then put the head back on the pin. Pull the "hair" back to form a lose, low ponytail and glue in place using more Designer Dries Clear Adhesive. I just wanted the fiber to create the look of hair and a sparkling aura, so lose and messy is fine. Trim the pin and round it to form a loop at the top of her head that will be used to dangle her in the bottle.


The wings were made with Sunkissed Fantasy Film from Art Glitter and then glittered with Blue Angel UF Pearlescent, Purple Lame UF Opaque, Crystal UF Transparent, Horizon UF Transparent. There are links to great YouTube videos on the Art Glitter website for working with Fantasy Film and Glittering butterfly wings. (The links are at the end of this post.)  After the wings are dry, bend them slightly and then glue them in place with more Designer Dries Clear Adhesive.

The bottle was decorated using Stazon Silver Ink and a flourish stamp. When I stamp on rounded glass, I like to use clear stamps without an acrylic block. After inking the stamp, I carefully place it on the bottle - holding it in place with one hand, while I tap it to go around curves with the other hand. The nice thing about stamping on glass, is that you can remove it if it looks bad. But don't stress too much about getting perfect stamped images as it is a background and you don't notice it as much once you apply the glitter. Paint Designer Dries Clear Adhesive on the neck of the bottle and then sprinkle Crystal glitter onto that.  Begin a free-form dotted scroll pattern by making dots of 3D Embossit on the bottle. After each small section, stop to coat the dots with Crystal Glitter. You want to be putting the glitter on while the glue is still white and looks wet. Then make a simple dot pattern at the bottom with little trios of dots going around the bottom of the bottle - again using the Emboss it and sprinkling with Crystal glitter. Once this is dry, use a soft brush to brush off the excess glitter.


Dangle the fairy inside the bottle by poking a hole in the bottle cap. Tie clear beading wire to the loop at the top of the fairy's head and then bring the end of that that wire up thru the top of the bottle. HINT: tie a bead or something to the wire so you can drop it down the neck of the bottle from inside the bottle. Once you have the thread coming out the top of the bottle, you can remove the bead, thread the cord thru the hole in the bottle cap and then put the bottle cap on the bottle. Tie a crystal at the top to hold the thread in place and send the excess thread back thru the hole in the bottle cap.

NOTE: If you don't have a bottle cutter but wanted to try this project, you could do this in a jar, or make your fairy small enough that you can put her in the bottle from the top. Since the wings are Fantasy Film, they could be wrapped around the fairy to drop her into the bottle and they would fluff back out once they had room to unwrap. (Make sure you have her tied onto the bead wire and don't let go, because once she's in there I don't think you'd be able to get her out!)

Helpful Links:

How to make a Fantasy Film Dragon Fly: http://artglitter.com/retail/rfantasyfilmdragonfly.html

KC Eddy

Saturday, April 28, 2012

Birds Of A Feather Sparkle Together by Sherri Reehil-Welser


With the fun popularity of feathers these days the kids and I decided to create fun some feather earrings and feathers for the hair for this Art Glitter project. We began with different colors and sizes of feathers, wrapping 24 gauge colored wire with seed beads around the top of the feathers. This will then be a place to attach the jump ring and fish hook ear wires for the pierced earrings. For creating the feathers for the hair, we did the same thing but attached the feather to the wire with a small rubber band to then be wrapped in the hair.


It was fun using Art Glitter for these feathers as the sparkle is amazing and it is the perfect touch for these fun and funky earrings. And of course the girls felt that the more “sparkle” the prettier the feather design!! Some just dipped the tip of the feather by first lightly brushing Art Glitter Designer Dries Clear Adhesive at the tip of the feather (or wherever you would like some awesome sparkle!) and then either sprinkle Art Glitter over the feather for a light sparkle or dip it for more of a vibrant effect! To finish these beauties up attach a small jump ring and fish hook ear wire to the wire wrapped area at the top of the feather and voila…. beautiful, sparkly colorful earrings in no time! The girls loved this project and wanted to wear them even before they were dry!!! Hope you all have a wonderful experience creating these easy and fun feather earrings and hair adornments!


Here we used 2 corresponding feathers on each side to give a fun effect!


~Another group of double feathered earrings~


Wednesday, April 25, 2012

Dressed Form...Love by Connie K

I am loving all the mixed media pieces I have been seeing lately...you can check them out on pinterest if you haven’t seen them. Such a great place for inspiration.

I thought I would combine my love for all things found, with this new to me medium...so here is my take on it. They are fun to make...

I took mine off the canvas and altered a paper mache dress form I had in my stash*, add to that a found silver candle stick from the thrift and a wooden finial from my junk drawer!


So gather your supplies...

Art Glitter: Ultrafine Transparent Martini #89
Art Glitter: Ultrafine Transparent Lipstick #88
Art Glitter: Fine Vintage Glass Glitter Ultramarine #604
Art Glitter: Ultrafine Transparent Mellow Yellow #158
Designers Dries Clear Adhesive

Paper mache dress form
Pattern tissue paper vintage
Multi matte medium.Ranger
Craft paint in the following colors: Cadimium Red/Americana, White/Americana, Bahama Blue/Americana, Yellow Green/Americana
Look at me blue / folk-art
Script rubber stamp
Archival ink black
Assorted stencils for texture including
Punchinella, fiberglass screening, netting
Rubons various...pink paisley, KaiserKraft, Melissa Francis
Faber Castell big brush pitt pens: scarlet red, nougat, cobalt blue, yellow
Pink paisley birds/butterflies
Small Prima flowers
Chipboard
Black pen for doodling


Lets get started...

My dress form had a base on it...I cut it off. Next adhere random strips of pattern tissue to the dress form with multi matte medium. Let dry thoroughly.

Next apply, paint in a random pattern using the bahama blue, green and blue. After you apply the paint wipe some of it with a wet wipe ...if you see the pattern tissue, it’s all good.


Once the base coat is dry you can start using your stencils to create texture and a random background. I applied the darkest colors last. Stamp the script stamp in a few random spots.

Adhere the two birds to the lower left side of the dress with matte medium. Shade the birds using a pitt big brush pen, once dry doodle around each bird with a fine point black pen. Add lipstick glitter to the red bird and blue bird with designer dries clear adhesive.


The butterflies were added to the back and glittered with mellow yellow and lipstick art glitter.

Cut two tiny leaf shapes from chipboard. Paint with yellow green paint. Once dry, shade with the green pitt pen & adhere to the dress form. Add two small prima flowers as shown on the sample. Add lipstick glitter to the red flower and vintage glass glitter in ultramarine to the blue flower. Martini glitter was used on the leaves.


Cut a small heart from the chipboard and paint with red paint, adhere to dress form as shown. Doodle around heart...using designer dries clear adhesive highlight the heart with the lipstick glitter...love that name of this glitter!

Add rubons as shown...seal with matte medium when complete.


Finally, I painted the wooden finial with red paint...and then stenciled some small patterns in white over top. Glue to the top of the dress form with a glue gun. Then adhere the dress form to the silver candlestick. Embellish with a bow made from the rayon seam binding...

 I hope you have fun with this...it is a no rules kinda of project where anything goes. It lets you think outside of the box. I’ve done many of these on canvas and have loved the results also.


*I have a huge stash...you never know what will show up in there.

Sunday, April 22, 2012

Fun Times by Emma McDonald

I love going to second hand stores for 2 reasons: First, I love the thrill of searching for hidden treasures amongst all the abandoned junk. Secondly, you can’t beat the prices. On many occasions I let the “stuff” speak for itself. For example, I was walking up and down the aisles at Goodwill and suddenly I see an old tart pan for 50 cents. I quickly grabbed it, thinking someone else would see its immense potential for greatness, but when I looked around, no one really cared. I proudly placed it in my cart and as I did, I saw it transform -into a Kitschy CLOCK!


Materials used

Art Glitter: SHABBY CHIC Pee Wee Kit
Designer Dries Clear Adhesive
Ultrafine Metal Tip
Noodgers
old metal tart pan
power drill
quartz clock movement kit (for 6mm/ 1/4 inch surfaces)
buttons
scrapbook paper/ printed design
circle cutter / pencil compass
scissor
paintbrushes
decoupage glue: matte
piece of paper


Since we are turning this tart pan into a clock you will need to drill a hole into the center. My husband, kindly helped me with this task. Then use a circle cutter or a pencil compass to create an 8 inch circle out of scrapbook paper and decoupage it onto the pan. Next, cut out your design and decoupage it on top. I found a cute 50’s design in a scrapbook paper pad that had the saying already on it. You can also search, download, and print free retro images on-line to use as well.


Now place the Ultrafine Metal Tip to the end of the Designers Dries Clear adhesive and fill in the images you want to glitter.


Working with one color at a time, sprinkle the SHABBY CHIC kit glitter over the wet glue. Turn the tart pan over onto a piece of paper that is creased down the middle and lightly tap the back of the pan to remove excess glitter onto the paper. Pick up the paper, slightly folding it and transfer the unused glitter back to its container. This is an easy trick that I picked up from my 3rd grade teacher. Thanks Mrs. White!


Use the Noodgers to straighten the edges of the glued and glittered images. After everything has dried, use a soft dry paint brush to remove any excess glitter.


Follow directions on packaging to assemble the clock to the pan. Finally, use Designers Dries Clear again to glue the buttons instead of numbers onto the clock. Let it dry, set the time, and hang it where ever you need a reminder to be child- like and have FUN!!!!

Friday, April 20, 2012

Home is Where the Heart is... by Connie K.

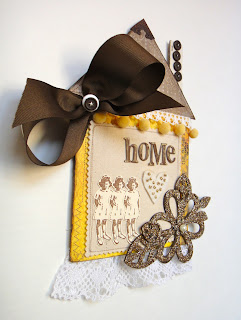
This little house shaped banner is for a sweet  friend of mine who recently bought her first house...she was so excited! I thought is would be so cute to send to her instead of a card congratulating her!

For those of you who have read my blog..you know I am a little obsessed with anything house shaped ..so this project is not a big surprise!


Most of the items I used here I had on hand...so use what you have to make it yours...

supplies to gather:

chipboard medium weight
heidi swapp chipboard letters
pattern tissue
authentique paper blissful  euphoria
authentique paper blissful foundations
button card (chimney)
1.5 wide brown grograin ribbon 3/4 yd.
random button ivory
1/2 lace trim 8 inches
yellow ball fringe 8 inches
1.5 inch gathered lace 8 inches
tim holtz idealogy metal corner hardware
french vanilla card stock bazzill basics paper
coffee archival ink
rubber stamp..Janet Klein
scrap of natural quilt batting
scrap of canvas  6”X6”
gold seed beads 2 doz
ivory thread coats and clark
chipboard floral piece from my stash...
craft paint raw umber
art glitter opaque ultrafine glitter #264 ash
designer dries clear adhesive
sewing machine..baby lock
khaki thread coats and clark
xyron tape runner


lets get started..

cut a house shape out of chipboard...
my dimensions are 6” wide and 10” tall...
cover the roof portion of the house with authentique euphoria paper and the lower portion with authentique foundations.
I used a xyron tape runner to adhere to chipboard.
Along the right hand side of the house I adhered some pattern tissue with multi matte medium. Top stitch around, all the edges with khaki thread..using a variety of straight stitches and zig zag.

Cut canvas and quilt batting with pinking shears, to 4.75" X 5" top stitch together close to the edges..set to the side for now.

Using the raw umber craft paint, dry brush all of the edges to distress. Once the paint is dry adhere the wide white ruffled lace to the lower edge. Adhere the yellow ball fringe to the top of the house, wrap to the back. Cover upper edge of ball fringe with narrow white lace adhering to the backside also.

Take a narrow button card and adhere to the right side of the house...this will be your chimney. Adhere large bow made with grograin ribbon to the left side of house and adorn with ivory button. On the top of roof add an idealogy metal corner and pinch it together.

Stamp the little girl image using coffee archival ink on the french vanilla card stock three times and cut out...adhere to the lower left hand section of the canvas using designer dries clear adhesive...
adhere the word home to the upper portion of the canvas. I used upper and lower case letters. I randomly cut a heart from the quilt batting and stitched  on tiny gold seed beads, adhere to canvas as shown on photo.


Now you can adhere the canvas piece to the front of your house.
Paint the large floral chipboard piece with raw umber craft paint..once dry, brush on designer dries clear adhesive and sprinkle with ultrafine opaque glitter #264 ash.
Once this has dried, adhere to the front of the canvas as shown.

I finished the back with a remaining piece of the paper from the front.