Sunday, February 10, 2013

A Rose By Any Other Name...is a Glitter Tattoo

You may have seen glitter tattoos advertised on TV, but did you know that Art Glitter now has Body Glue and Tattoo stencils?  Now you can use all the wonderful colors of Art Glitter Ultra Fine glitter to create your own glittering body art!!  Here is a quick tutorial on creating a glittering tattoo.  It's so easy, I did it on my own hand!!

You will need:  Art Glitter Body Glue, Tattoo Stencil, Ultra-fine Glitter (I used #299 - Celery, #48 -  Emerald, #324 - Country Red, and #355 - Sunrise)  A couple of paint brushes, and a soft make-up brush.

Remove the white backing from the stencil and place it on clean, dry skin.  Remove the clear protective coating and make sure that the black stencil is firmly in place with no gaps or buckles.

Drop a few drops of Body Glue inside the stencil and spread with paint brush.  You just need a thin coat.  The thicker you put it on, the longer it will take to dry.

While the paint is still wet, remove the stencil.  Wait for the glue to dry before you start to glitter.  The glue is dry when it turns clear.

Dip a small clean, dry paint brush into Emerald Green and brush lightly onto the broad end of the leaves.  Clean the brush by rubbing on a towel or cloth. - Don't wet it.  Dip the brush into your second color - the celery green - and brush the tips of the leaves.

Repeat this process for the rose, using the Country Red for the inside of the rose petals, and Sunrise to highlight the outer petals.

Use a make-up brush to brush the excess glitter away.

The tattoo will last 7 - 10 days with proper care.  Visit the Art Glitter site for more information about care and removal of the tattoos!

Happy Glittering!!!

KC


Saturday, February 9, 2013

Design Team Call 2013-14 Team


Art Glitter Design Team Call:

 
Beginning: February 11, 2013

Ending: March 22, 2013
 

New team members will be announced:  April 1, 2013 (no Fooling!)
 

Term from May 1, 2013 through April 30, 2014

(First projects will be due April 29, 2013)


Do you love all things that sparkle and glitter?  If so you may want to apply for the Art Glitter Design Team!


Here is what we would require from you: 

1)     A Blog: Sneak peeks for your posts that will be featured on the ART GLITTER blog at least twice per month. (your dates will be assigned) These posts must be live and on time. Since your posts are due to Kristi on specific dates you can schedule the sneak peek at the same time.**

2)     Link: Your blog to social network sites such as Facebook, Twitter, Pinterest, etc.

3)     Galleries: If you are a paper/mixed media artist your work can be placed in online galleries such as Split Coast Stampers, Two Peas in a Bucket, Paper Craft Planet or others.

4)     Challenges: Any challenge posted along with cross promotions. (These will usually work alongside of your normal posts.)

5)    Submit for Publication: At least 3 times per year you will submit to online/print publications.  These would be projects NOT used on the Art Glitter Blog.

6)    Audition Pieces: Your samples can be cards, scrap pages, nail art, body art and dimensional items. We want crafters to see all the multiple ways Art Glitter products can be incorporated into their projects. Your samples will need to demonstrate a variety of techniques and products as well. Patterned papers, stamps, stencils and embellishments from other companies can be added, but the Art Glitter products MUST be the focus. A list of supplies and tutorial need to be included with each audition piece.

7)     New Products: You will be required to sign a form promising not to share any new product info before release.

8)     Facebook:   Facebook Account is how we communicate news and information to the entire team at once.

9)     NOTE: You are free to belong to two other design teams as long as they are not direct competitors of Art Glitter.  Please advise Kristi of the teams you are currently participating.

** Actual blog posts will need to be submitted in HTML format.  This will be explained to you further if you are picked to be on the team.  Don’t worry, it is easy!
 

Here is what you can expect from us:

 1)     Product: We will provide you with a beginning kit with various types of glitter and other products. ($50-$75 in Retail Value)

2)     Additional Supplies: You will receive 3 additional shipments from Art Glitter at $50 in retail value.  Some you may have choices, other times, depending on challenges and cross promotions you my receive what is best for those needs. (August/November/February.)

3)     Facebook: You will be welcomed into Art Glitter Designer Page on Facebook.

4)     Discount: You will have a wholesale discount of 50% for purchase of other Art Glitter product for your use. If you are interested in teaching locally, there are other ways that the company will be willing to help you so that your classes are profitable for all.

5)     Publication: Another reward opportunity will be available to you for being published in any of the main industry magazines such as Paper Crafts, Just Cards, Scrap & Stamps Arts, Stamper’s Sampler, and Nail Magazine etc. We understand that whether you are published is up to the editors. Please email a copy of your submitted design to Kristi.  You will be provided with a list of Magazines and guidelines. Some publications pay for published work.  Art Glitter will also compensate you with your choice of $25 payment or $50 in product.  We take great pride in our Design Team Members, so any opportunity that we can help to promote you and your creativity will be made a priority. We will do our best to keep you updated on what publications are looking for.  Keep in mind; most publications are working months in advance so a Christmas issue may have their call for submissions as early as March or April.


This is what we need from you by March 15, 2013: 

1)     Samples: at least two cards, a dimensional item or several nail art samples.  Photos of your samples need to be emailed along with tutorials. This is important as your projects will be posted on the Art Glitter Blog, and your pictures need to be crisp, clean, clear, and well lit. Pay attention to spelling, grammar, and punctuation. We don’t expect you to be an English teacher, but these items affect how others perceive you and Art Glitter as well.

2)     Bio & Photo Of You:  A couple of paragraphs describing you…why you paper-craft or do nail art. How long have you been creating. Why do you want to be part of the Art Glitter Team? Why would you be a good addition to the team?
 

You will want to rely on US and we will want to rely on YOU. If you have any questions, please feel free to email Kristi at artglitterkristi@yahoo.com
 

Please email  your samples by March 22, 2013, to: 

Kristi Parker Van Doren
DT Lead – Art Glitter


Rainbow "Luck" St. Patrick's Day banner with tons of glitter!


Here's what you'll need:
  1. Lots of card stock to cut out the pennant triangle shapes, the circles, the letters and a couple of shamrocks
  2. A few yards of green ribbon
  3. Glue gun
  4. #7 - Red Rose - Ultrafine Opaque Glitter
  5. #349 - Garnet Red - Ultrafine Opaque Glitter
  6. #56 - Pumpkin Orange - - Ultrafine Opaque Glitter
  7. #350 - Butterscotch - Ultrafine Opaque Glitter
  8. #361 - Cat Eyes Yellow - Ultrafine Opaque Glitter
  9. #280 - Lime Rind Green - Ultrafine Opaque Glitter
  10. #109 - Cavalado Green - Ultrafine Opaque Glitter
  11. #234 - Turquoise Blue/Green - Ultrafine Opaque Glitter
  12. #113 - Sky Blue - Ultrafine Opaque Glitter
  13. #270 - Chesapeake Blue - Ultrafine Transparent Glitter
  14. #24 - Royal Wink Blue - Ultrafine Opaque Glitter
  15. #13 - Plum Pink (Purple) - Ultrafine Opaque Glitter
  16. #71 - White Gold - Ultrafine Opaque Glitter
  17. #79 - Black - Ultrafine Opaque Glitter
And I used 3D Embossit Art Glitter Adhesive to give the areas I glittered a little bit of a lift. First, I glittered all the letters, gold round areas and each pennant. I did a gradient of color on each pennant. For example, for the green, I started on the left with a hint of the yellow, then went into the lighter green, into the darker green and then ended on the right with just a touch of blue... like so:
So, here are all the elements glittered and waiting to dry and be assembled:
Here's a dry run before I glue them all down, just to see what the placement will look like:
And a side view... so glittery!
I glued down the middle pennant in the middle of the ribbon, and then glued out from there:
Here are all the pennants glued down:
And here it is all assembled and hanging from my dresser:

And I know this is lucky because a little rainbow prism showed up in this shot!


To see more projects and art by Carrie, check out her blog Violet Cottage.


Thursday, February 7, 2013

Fun with Double Glitter Lace Technique

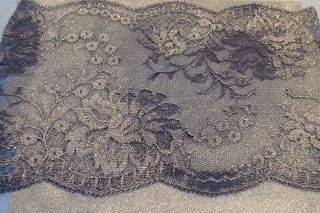
I was playing with my Art Glitter and first I thought I would do the double glitter with my stencil. But then I had this pretty piece of lace ad had to do a double glitter lace technique with #508 Silver Moon Microfine Opaque and# 80 Galaxy Ultrafine Opaque Glitter.

I then trimmed it out and placed it on the card front then added the fun Mica Flakes.  I used Designer Dries Clear Glue for applying the flakes and double sided tape for the double glitter technique. I then added the stencil to the card front using the Pearlescent Embossing Paste and NEWER LG 743 Stylized dahlia
LG 743 Stylized dahlia


So this is how it went....
lay lace on double stick tape and press down firmly

Sprinkle with first color of glitter

Shake of Excess

Remove Lace

One color of glitter only

Second color added

oooooooooo aaaaaaaaahhhhhhhhhhhhhhhh

Add the Mica

This is with the stencil added!


Hope you enjoyed. Happy Creating
Kristi

Cute Flower Fairy

Hope everyone is having a grand day today.  With Valentine's Day steadily approaching I thought it would be fun to create a quick and easy project that can be modified for other holiday events throughout the year by just changing the paper or embellishments used.


I used a new image which was just recently released from Penny Black Stamps.


Personally, since I have boys I think this will be a great invitation for a Valentine's Day Tea Brunch or perhaps for Mother's Day, but the possibilities are endless.
 
I colored the image with Copic Markers, the paper I used was a Metallic (Shimmer) Cardstock, I used the Spellbinders Dahlia Die Cut & the Grand Calibur Butterflies. I used the Die-namics Large Rolled Rose Die for the the cute flower that I glued to the butterfly.
 
For adhesive I used Art Glitter's Designer Dries Clear.  This is the only glue that I will use as it works on everything.  It is also acid free, non-toxic, permanent, and waterbased so if you have images you want to keep around for a while and not have to worry about this is definitely the glue you should be using.   I have also used this glue on my boys' broken action figures this is my go to glue. Also you will want the metal tip with the stainless steel pin. Tip: do not use a sewing pin with the the glue the stainless steel pins provided do not rust, but the sewing pins will.


Finally, to add that needed sparkle and complete the look, I used Art Glitter's Ultrafine Transparent in Hot Kiss. 


 Well, let me tell you from experience you definitely want to use Art Glitter not only is it worth it because the quality of the glitter is superior to anything on the markif your local store does not carry Art Glitter your can order online at www.ArtGlitter.com!
 
FYI, Art Glitter has a glitter to match every Copic marker color on the market. So if you have favorite Copic colors send us an email or keep an eye on our web page.  The color chart will be posted very soon.


Pamela


Monday, February 4, 2013

Glitter Mask

  Have you ever seen those decorated masks that could be wall art as well as something to wear?  They are easy enough to make, with a little Art Glitter.  Let me tell you how......
MATERIALS:
Art Glitter Designer Dries Clear Adhesive with Fine Metal Tip
Microfine 514 Bavarian Forest
Microfine 506 Purple Morpho
Dazzlers D48 Gold Celebrity
Ultrafine Opaque 69 Light Gold
Ultrafine Opaque Hologram 128 Quark
Premade "Primed"  Mask
Colored Feathers

DIRECTIONS:
1)  Outline area you would like green with Designer Dries Clear Glue and fill in part.  Use your finger or a small brush to smooth glue around the entire area.
2)  Pour green microfine glitter over the glue.
3)  Put glue around the rest of the mask and use your finger or a brush to smooth glue around the entire area.
4)  Pour purple microfine glitter over the area.
5)  Use glue and glitter to touch up any spots you may have missed.  Let dry for a few minutes.
6)  Pour a small amount of the Gold Celebrity Dazzlers out on a sheet of paper. 
7)  Pick through Dazzlers for the shapes you would like on your mask.  I chose the large and small squares and opted to position them on the border between the green and purple.
8)  Put small dots of glue where you want the Dazzler shapes and adhere.  I used an Art Glitter Stainless Steel Pin to pick up and position the shapes.
9)  Use the Designer Dries Clear with the fine tip to create shapes to add gold to. Work in small sections. The fine tip is absolutely essential for this.
10)  Pour light gold glitter over the top as you finish each section. Let dry.

11)  Use the Designer Dries Clear to make dots for "gems".  Cover with Hologram Quark.  Let dry.

12)  Use Designer Dries Clear to adhere the feathers behind the top of the mask.  Let dry.
Keep in mind that you can change the look or color of the mask for different decor or events.  I found this project to be easy and satisfying.  I hope you enjoyed it.  Thanks for looking, and glitter on!
Laura

Saturday, February 2, 2013

Art Glitter - Snowflake Candle

Hi!  It's KC!  With a quick and simple way to dress up a plain pillar candle with Art Glitter.  Normally I would have step by step photos of the process, but this project is so simple, you won't even need them!  Don't you love when a project looks complicated and is much easier than it looks!

What you will need is:  
A tall pillar candle (mine came from the dollar store), a piece of brown paper bag - cut 2" x 9 1/4", piece of colored cardstock - cut 2 1/2" x 9 1/4" (mine is a denim blue shade), sheet of double stick tape or sticky paper - cut 1 1/2" x 9 1/4", Martha Steward snowflake punch - or other decorative punch that punches 1" designs.  Decorative edge scissors, Art Glitter Ultrafine Glitter - #183 - Blue Angel (or color that coordinates with your cardstock), Art Glitter Designer Dries Clear Adhesive. (DDCA)


Step 1.  Punch a continuous pattern in the paper bag strip. Trim the long edge with decorative scissors or paper shapers.

Step 2.  Peal the protective coating off the double stick tape and center the tape on the piece of cardstock.  Press firmly and then remove the tape backing.

Step 3.  Place the patterned paper bag strip over the exposed tape.

Step 4.  Cover the exposed tape with glitter.  Shake the excess off onto a clean piece of cardstock or paper and return to the glitter jar.

Step 5.  Use DDCA to glue the ends of the paper band around the candle.

Optional - I also punched some additional snowflakes from the paper bag and used DDCA to attach them in a random pattern to the candle.  They almost look like they are embedded in the wax.

Now - wasn't that easy?!! Remember this  is used for decrative purposes.  This is why you would use and inexpensive candle. Any time you have added materials to a candle they can catch on fire!!!  But it sure will sparkle and make a lovely display piece!

Visit my blog for more fun and do-able glittering craft ideas!

Glitter makes it all better!