Thursday, June 20, 2013

Lady Liberty

 
All you can say is "Wow, God Bless America!" when you check out Art Glitter Designer, Lynette Daniel's awesome scrapbook page!  The secret is using soft vintage tones on the bottom layer so the top layer of Art Glitter lights up like fireworks. Here is the supplies Lynette used below:

Lynette chose an off white colored cardstock from WorldWin Papers as her background. The cardstock looked too modern and needed a vintage touch, so she dampened a sponge and used Distress Ink pads to soften. Then lightly blended 3 shades to match the Pride collection from Authentique perfectly. Next Lynette carefully drew "America" onto the cardstock. 
The all American collage starts coming together by building layers. Lynette cut a Cricut "firework" looking frame and purposely used a distressed paint brush to swipe on the adhesive and used classic #1 True Red Ultrafine Opaque Glitter and kept the ends "free" to softly curl.
Simple country buttons and flat wood stars were embellished with Art Glitter #85 Crystal and #732 Porpoise. Last but not least, here is what "Lynette" is known for~ using the Art Glitter Designer Adhesive over her handwritten titles and designs. #732 Porpoise Microfine Transparent Glitter has almost a worn denim (blue-grey) undertone that naturally compliments the Authentique Pride papers.
As you can see Lady Liberty is almost finished below, but freedom isn't free, so Lynette added the sub title "God Bless" last.  

Lynette Daniel, Retail Store Owner, Graphic Designer, Published Scrapbooker & Photographer
 
Remember, for the entire month of June any order you place at http://artglitter.com/ of $25 or more you can use the coupon code of AQ20 for a 20% discount! You can also be entered in a prize drawing at the end of the month by commenting on this blog all month long! One comment per person per post! Also, every Wednesday for the month of June Authentique Paper will be featuring Art Glitter on there blog with a prize package offered also.  Check them out at http://blog.authentiquepaper.com/

Tuesday, June 18, 2013

Fourth of July Party Décor


Supplies:
Art Glitter Ultra Fine Transparent # 85 Crystal
Art Glitter Ultra Fine Opaque # 83 Silver
Art Glitter Ultrafine Opaque # 291 Fire Engine
Art Glitter Microfine # 504 Diadem
Art Glitter Dazzler # D49 Silver Fox
Art Glitter Designer Dries Clear Adhesive
Art Glitter Ultrafine Metal Tip
Art Glitter Fantasy Fiber Cotton Cloud
Art Glitter Transparency Black Ink Pad
Authentique Pride "Amend"
Authentique Pride "Independence"
Authentique Pride "Assemble"
Authentique Pride "Dignity"
Authentique Pride 12x12 Detail Stickers
Toilet paper rolls
Toothpicks


 Wow ! What a fun project this was. I had a grand time putting this all together and what a great way to celebrate the 4th of July. anyone could put this together in no time for a great celebration.


 Step 1 choose several toilet paper rolls and ink the tops and bottoms with Art Glitter Black Ink
 Next cover with your choice of Authentique Paper and glitter away some of the details on the paper.


 Then pick out the stickers that you want to use and embellish with lots of sparkly Art Glitter. I also drew out stars and then glittered them as well.

 Next cut out a few circles and give them a poke with a toothpick and pull Fantasy Fiber through the holes color your toothpicks black using the Art Glitter Black ink pad and push up through the hole as well to make it look like a candle wick add onto the top of your covered rolls and add your stars.

Then cut out squares to make a small banner and select the stickers you would like to use
punch holes for twine and glitter edges.
 
Finally trace and cut circle large enough to fit your cake plate and place down for your display
of cupcakes and firecrackers. Then decorate away and enjoy this beautiful and festive center piece for your celebration.


Remember, for the entire month of June any order you place at http://artglitter.com/ of $25 or more you can use the coupon code of AQ20 for a 20% discount! You can also be entered in a prize drawing at the end of the month by commenting on this blog all month long! One comment per person per post!
 

Sunday, June 16, 2013

Days To Remember


Supplies

Step One
Heather started out with three sheets of 12 by 12 coordinating sheets of cardstock.  They were scored at  6 inches and folded in half.  Then each sheet was cut into 3, 4 inch pieces.  You will need 7 folded pieces for a book.
Step Two
Next she cut out 16, 3.75" by 5.75" pieces of the Authentique Summer Collection paper.
Step Three
Heather applied sticky tape to the back of 6 of the folded cardstock pieces.  All pieces were put together, to form a book.  The edge that doesn't have any tape will be at the top of the book (this will leave an opening for tags).
Step Four
Once all your pages are put together, your book will look like the photo below.
Step Five
Heather distressed the edges of the Authentique papers with a pair of scissors, then inked all the edges with Ranger's Vintage Photo Distress ink.  She also inked the edges of the cardstock book.   On her cover piece she added a little cut in the upper right, and curled the edges in.  Using Art Glitter Designer glue, she glued the Authentique papers to the cardstock base.
Step 6
Next she cut a piece of the Authentique paper to measure  4" by 2".  She scored at 3/4" flipped the piece and scored again at 3/4" to create a book binding.  Distressed the edges with scissors, then applied Ranger's Vintage Photo Distress ink to the edges.  Heather used her Crop-O-Dile to punch two holes in the center of the binding.  Please refer to photo below for placement.
Step 7
Next she cut out 6 pieces of the cardstock measuring 4" by 5".  Each of these were inked with Ranger's Vintage Photo as well.  She used the left over bits of the Authentique paper to create 12 labels measuring 1.5" by .5".  Inked the edges and using a Sharpie Marker added the names of the Months.  Then using the Designer glue she adhered them to the cardstock bases.  Notice that February, April, June, August, October and December are not pictured, they are on the backs.  Please refer to photo below for placement.
Step 8
 Heather added May arts leaf trim across the top of each of the 6 sheets (front and backs) adhering it with Designer glue, then outlined each month's label.  Please refer to photo below for placement.
Step 9
Peacock, Blue Angel, Lichen and Pink Cadillac, glitters were used on the sheets.  Please refer to photo below for placement of glitter.
Step 10
 Pink seam binding was laced through the binding and tied into a shabby chic bow.  
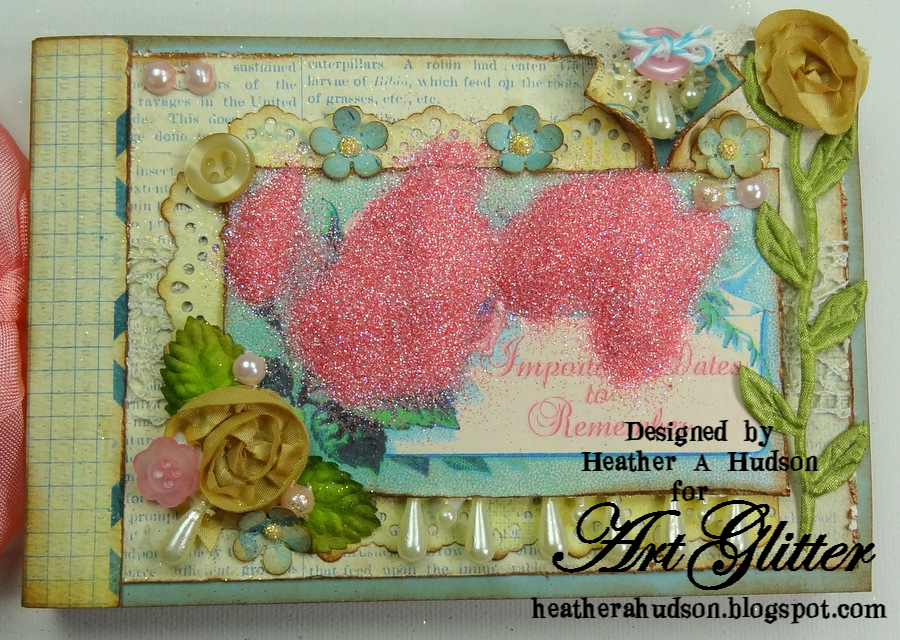
Heather used a Fiskar's flower and Martha Stewart lace punch and scraps of the Authentique papers to help embellish the cover.  Edges of the pieces were inked with Ranger's Vintage photo.  Using the Ultra fine metal tip Heather applied glue to the center of the punched Authentique flowers.  The "Important Dates to Remember" sentiment was added in GIMP (free online program) to a free image Heather found at the Graphic Fairy.  Ribbon roses, May Arts leaves, buttons, pearls and lace were also used to embellish the cover.
Step 11
Mustard Glitter was added to the flower centers.
Step 12
 Excess glitter was removed then Designer dries clear glue was added to the rose, butterfly wings and rose buds using the ultra fine tip applicator.
 Step 13
Cadillac Pink Glitter was applied.  This is the technique Heather uses through out her project.
Step 14
Designer Dries clear glue was applied to the cover and Cavalado glitter was applied to leaves, Teal Gala glitz applied to the outer edges, lichen to the lace punch pieces, image banner and binding, Dreams glitter to the butterfly, Water color glitter to the image edges, Dusty blue to butterfly,
Step 15
Art Glitter was added to the Authentique papers that were used as the backgrounds of each page.  The book is a gift, and the recipient will add their own photos.
Broken lines using the Ultra Fine Tip and Designer dries Clear glue and Mustard, Peacock and Lichen Glitters were applied.
Hexagon shapes of the Authentique paper were outlined with Ultra Fine Tip applicator and Designer dries clear glue.  Peacock, Mustard and Lichen Glitters were applied.
Mustard Glitter was added to the hexagons and Dusty Blue Glitter was added to the filigrees and leaves.
 Peacock Glitter was applied to the Authentique paper below.
Heather used the Ultra Fine Tip Applicator to free hand some leaves and scrolls on the the Authentique paper below.  Lichen glitter was applied.


Dots of glue were added to the Authentique paper.  Mustard and Dusty blue Glitters were applied.
Heather used the same techniques and Glitters on the duplicate pages of her book.
Here are some close up photos of Heather's Cover.
Upper right.
Close up of bottom.
One final shot of the Cover.
Thank you for stopping by and hope you enjoyed Heather's Tutorial  using Art Glitter and Authentique Papers!
Feel free to stop by and see Heather's other projects using Art Glitter on her blog.
heatherahudson.blogspot.com


Remember, for the entire month of June any order you place at http://artglitter.com/ of $25 or more you can use the coupon code of AQ20 for a 20% discount! You can also be entered in a prize drawing at the end of the month by commenting on this blog all month long! One comment per person per post!