Saturday, April 19, 2014

White on White with Art Glitter

Supply List
Art Glitter Ultra Fine Glue Tip
Art Glitter Dries Clear Glue
Art Glitter 85 Crystal Ultrafine Transparent
White Card Stock
White Vellum
Cricut Sweehearts Cartridge
Cricut Damask Décor
Cricut CCR software

One of Clare's all time favorite paper crafting color themes is all white!  It's all about simplicity and texture and there is nothing as elegant!

Here are some tips for working with all white:
1)  Create texture:  use multiple medias such as white card stock, white vellum, ribbon, etc.
2)  Make it pop:  use glitter to highlight areas and make them pop!
3)  Add dimension-use more than one layer by cutting more layers or adding embellishments.

For this card Clare wanted to make a wedding card that was all white for her step sister.  She loves the lacy wedding dress cards, so she decided to make my own. She started with Cricuts Sweetheart Cartridge and  used the card image of the bride.  She added an image from the Cricut Damask Decor and welded it.  She thought the bride needed some head dress, so Clare used another Damask Decor image on her head. 
Clare says you can get this lacy look with any digital cutter, just combine a bride image with a lace image and weld.  Below you can see the two images she combined for her card using the Cricut.  Similar images can be made with a Silhouette, or other cutter.
She backed the cut with plain vellum.  Clare then used the Art Glitter Ultra fine glue tip to high light the vellum and the white paper.  She hoped to achieve the look of re-embroidered lace.  Clare loved the way this turned out!  To finish the head dress, Clare tied a simple bow and glued it to get the look of the veil.  Clare decided to stamp the sentiment inside the card to keep the card look clean.
See more of Clare's work at her blog:  cricutcraftyclare.blogspot.com.

Wednesday, April 16, 2014

Art Glitter Mother's Day Canvas


Vintage Chic Mother's Day Canvas

Heather decided she would like to share with you a Vintage Vintage Chic Inspired Mother's Day Canvas!! You will need the following:
  • Sweet Mommy image
  • Roses paper image
  • gesso
  • blue gelato
  • scissors
  • paint brushes
  • foam brushes
  • folk art brand paints:  Baby Pink, Lipstick Red, Vintage White, Old Ivy, Classic green, Fresh Foliage, Burnt Umber
  • 6 inch square canvas
  • anitque mod podge
  • Art Glitter Designer dries clear Glue 
  • Art Glitters: #208 Faunaand #165 Autumn
Step One
Heather used Art Glitter Designer Dries Clear glue to adhere her Rose paper to canvas, then applied some gesso.  Next Heather used more Designer glue to add her Sweet Mommy Image.  She ten applied antique mod podge and covered some of the rose paper with a blue gelato (and blended it in to the piece).  She also added some paint to the rose image and leaves.  She added some extra leaves and buds too.
Step Two
Heather painted rosebuds and leaves around her image as well as some brown comma strokes.  She finished painting the rose in the upper left and then covered the whole canvas with mod podge.  Once the mod podge was dry, she added a layer of watered down burnt umber, which you will see below.  She let it set for about 30 Seconds..then wiped it off to give the canvas a vintage look
Step Three
Once the burnt umber paint was dry, Heather used a diamond stencil and old brush to apply designer dries clear glue to different areas of her canvas.  You can see the diamond shaped areas pretty well in the lower left of the image below.  Fauna Glitter was added to the diamond shapes.  Heather used the same brush to more designer dries clear glue to the edges of her canvas, and she then applied Autumn glitter, which is one of her new favorites!!
Heather removed the excess glitter with a soft brush once her glue dried.  She is happy with the over all effect!
Heather hopes you enjoyed her tutorial, and hopes it adds a little Sparkle to your day!

Feel free to stop by and see Heather's other projects and Tutorials using Art Glitter on her blog.
and her 


-- Please visit my blog: My Artistic Adventures :0) Check out my tutorials & Creations on Youtube My Etsy: My Aristic Adventures

Thursday, April 3, 2014

Art Glitter Accents

Supply List
Art Glitter Green Gala Glitz
Art Glitter Gold Gala Glitz
Art Glitter Dries Clear Glue
Art Glitter Ultra Fine Tip
Art Glitter 79 Ultrafine Opaque Black Glitter
Art Glitter92 Ultrafine Transparent Bananan Glitter
Graphic 45 Curtain Call Collection paper (sheet music)
Crate Paper Random Collection Victorian paper (chevron)
Teresa Collins Stationary Noted (Notebook Owl paper & saying)
Dew Drop The Robin's Nest
Zva Creative (yellow swirl bling)
Forever in Time Gem Swirls (green swirl bling)
Jolee's BBK Silver Mini Flowers (flowers on chevron Strip)
Liquid Glass
Copic Markers (R27, YR18, 100, G24, G94)
Coffee Filters
Sizzix Susan's Garden Poppy Die
Black Card Stock
Yellow Card Stock
Green Card Stock
Red Card Stock
Ball Stylus
Tweezers
Cricut (Boy Die cut)

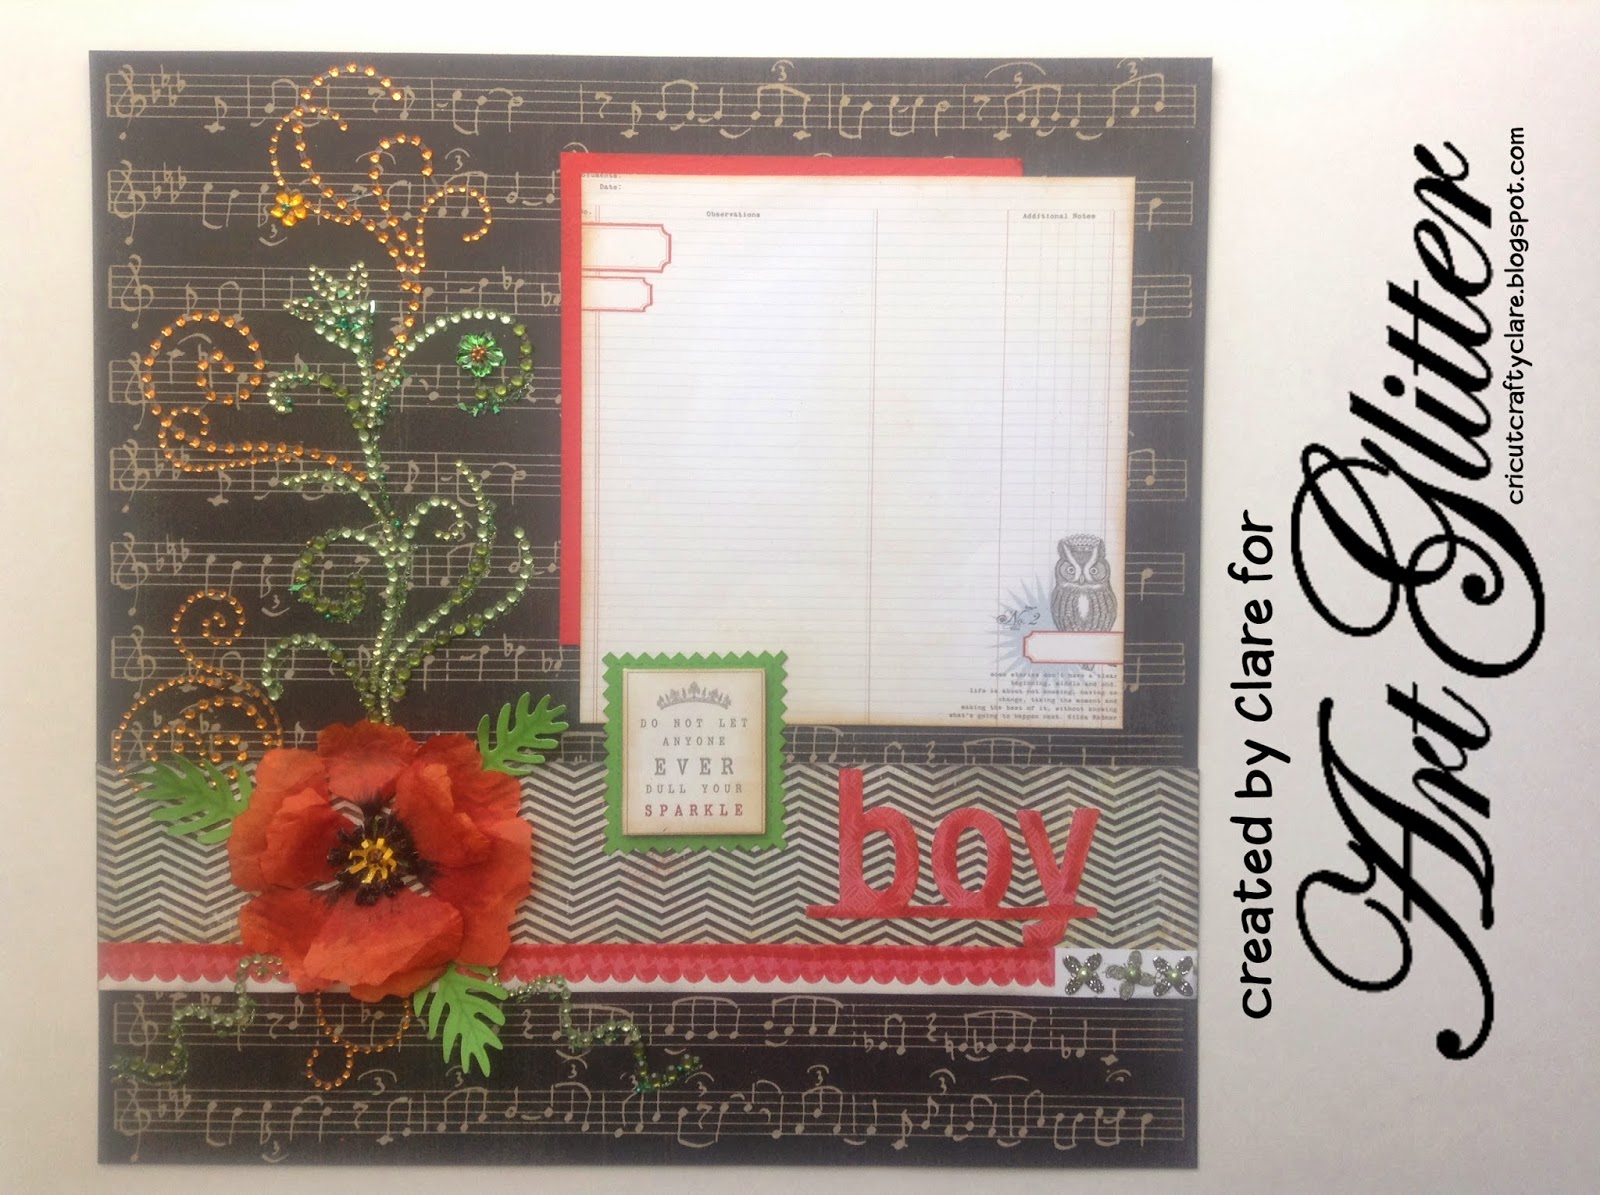
One of Clare's all time favorite flowers is a Poppy.  She has been wanting to make a paper poppy forever, and she finally found a Poppy die she wanted by Sizzix.  She cut three of each petal shape using coffee filters, because she wanted to capture the fragility of the Poppy Petal and make it realistic.  Since she used a die, she cut all three layers in one pass.  She then colored the petals with Copics in YR18 Sanguine, R27 Cardinal Red and 100 Black.  Once the petals were dry, Clare used a ball stylus to shape the petals.  For the center of the poppy, she cut the black and yellow pieces and curled them per the instructions (with a tweezer) that came with the Sizzix Susan's Flower Garden Die and then added Bananan Ultrafine Tranparent glitter using the Art Glitter Ultrafine Glue tip and Art Glitter Dries clear glue.  She used the same method to apply Black Ultrafine Opaque Art glitter to the black center die cut pieces. 
For the very center of the flower she layered a Robin's Nest Dew Drop over the Art Glitter Bananan using the Liquid Glass between the dew drop and the glitter.  This is such a fabulous sparkly look!  On top of the dew drop, Clare used the Art Glitter Ultra Fine tip to add a fine detail of black Art Glitter. 
For the teeny tiny bling flowers on the rhinestone bling, Clare used a few grains from the Art Glitter Gala Glitz, Gold Gala Glitz for the green flower center, and Green Gala Glitz for the yellow flower center.  


She loves that she can't get add such a pretty tiny finishing detail with Art Glitter products!  The Green Gem Swirl was getting lost on the black Graphic 45 patterned paper, so to make it stand out a bit more, Clare used the Art Glitter Ultrafine Glue tip and Green Gala Glitz.  This is a great way to add more weight to an embellishment and sparkle!
Here is another tip Clare loves to use: match your colors perfectly by using your markers!  The boy die cut and the Crate Paper were not exact matches to the orange red of the poppy, so Clare used the same Copics she used in the Poppy to color the die cut and the paper a bit to match and pull the whole page together!

To see more of Clare's work, please visit her blog Cricutcraftyclare.BlogSpot.com.