Hi all, wanted to share a video taken at the Craft & Hobby Association Winter 2011 show going on now in Los Angeles, California.
Joe Rotella of Create & Craft caught Barbara Trombley at our booth on Saturday and recorded this short interview.
You can see all the wonderful colors there! She's having a great time. We'll share more later with our new glitter colors and more dazzlers!
Thank you Joe, to see Joe's post on Create N Craft follow the link!

Monday, January 31, 2011
Monday, January 24, 2011
Banner Love by Connie K.
Banners seem to be everywhere these days...and I love making them...they are fun and easy to put together and so festive...they seem to shout celebration!
I put together this Valentine Banner to hang on my mantle for the next few weeks...I finally took down the Christmas stuff...I always wish it would magically just disappear...

I always try to re-purpose left over elements from other projects when I make banners...it is a good way to use small pieces of fabric or paper in your stash...I used fabric scraps from an apron project, some felt and a hand full of buttons. Use what you have! Paper would be fine...
The heart shapes are from a Maya Road mini album that I disassembled...I glued the fabric directly on these using a glue stick...once they dried I trimmed around the edges. I did all five pieces in different fabrics...I then top-stitched around the edges on all pieces, going around each one 3 or four times...I really love how stitching looks on this. It does not have to be perfect! *I use a long stitch and a heavy duty needle for stitching on chipboard...so, test out what works best with your machine...
Next...embellishing the hearts!
Here is what I did..but anything goes here...

#1 heart has a small pocket ( for a little love note) trimmed up with ribbon & mini ball fringe...& a glittered heart and butterfly glittered with ART GLITTER #164 Chrysalis Ultrafine Transparent using the ART GLITTER Designer Dries Clear Adhesive.

#2 heart is layers of scalloped circles & hearts with a button sewn in the center.

#3 heart is layered with hearts in fabric & a button sewn in the center.

#4 heart is layered with scalloped circles a button and piece of lace glued to the background.

# 5 chipboard word love, glittered with ART GLITTER #164 Chrysalis Ultrafine Transparent using the ART GLITTER Designer Dries Clear Adhesive.

I attached all pieces to the top of the banner using ric-rac and ribbons...sewn on with buttons.
I then die cut some flowers using two colors of felt and buttoned them over the buttons on the banner...it is about 4 feet long and each little heart banner is placed about 8.5 inches apart. In between the heart pieces I added some more die cuts, flowers, hearts and buttons...and glittered a few pieces up again using the ART GLITTER #164 Chrysalis and the ART GLITTER Designer Dries Clear Adhesive. Finally I used one of my favorite Martha's punches and added a few butterflies ...... tah dah you have yourself some banner love!

Monday, January 17, 2011
The Love Shack by Connie K.

A little love goes a long way...this is such a fun project to make...it is my paper version of a classic..the gingerbread house!
This is a tiny paper mache house 5X4 inches...and covered with some cute new paper from making memories...so gather up your supplies...and you can make a love shack for your favorite valentine too!
You’ll need the following items...
Designer Dries Clear Adhesive
ART GLITTER IN THE FOLLOWING COLORS:
Martini #89 Ultrafine Transparent
Fire Engine #241 Ultrafine Opaque
paper mache house...from Hobby Lobby
I used these two paper patterns:
floral ledger je t’adore.....roof & gables
french words je t’adore ......house
maya road chipboard hearts & mini scroll
vintage dove cake decoration
numbers ..clock parts (thrift store)
front door..stamped image
banner..lettters from the girls paperie
red ribbon..bazzill
off white craft paint..
assorted buttons
ivory crochet thread
Let’s get started...paint the entire house with off white craft paint and let dry...
While drying,you can glitter the 3 hearts and mini scroll with Red Ultrafine Glitter using the Designer Dries Clear adhesive. Now cover the house with the making memories french words...I covered all the openings.
The roof is covered with floral ledger and the reverse side which looks like sheet music...all of these papers are double sided...so you will only need two sheets of paper...enough to make two little love shacks!
Once the house is all papered...adhere assorted buttons along the roof line on the front of the house...I used red and white. I like to use a low heat glue gun for this.

The two smaller glittered hearts can be adhered to the sides of the house with foam tape for some dimension. I stamped the door image on ivory paper using red ink and adhered it to the front with foam tape also.
For the banner piece using letter stickers from the girls paperie & adhered them to crochet thread to create the banner...glue under the roofline with hot glue.

The ribbon tied around the entire house is secured at the back with a little dab of adhesive and also under the bow.
The final heart...which is larger gets adhered to the back of the chimney...hot glue works best for this...the little dove is adhered to the right of the chimney.
Now the fun part...I thinned down the Art Glitter Designer Dries Clear adhesive and brushed it on the roof with a small brush...and then sprinkled liberally with Art Glitter in Martini, as well as the base the house is sitting on...I love how it sparkle.

Along the roof line, I put down a thick line of adhesive and glittered over that...because the Designer Dries Clear is dimensional..it looks like snow when dried...
I hope you’ll make a little love shack for someone you love!
Tuesday, January 11, 2011
Earrings Fixed with Art Glitter by Emily M. Miller
Ever loose a bead from one of your beloved earrings or necklaces? I do all the time! (Maybe I should rethink about where I buy my jewelry!) Sometimes I can find another bead to fit. But this time I couldn’t find the perfect bead, so I used glitter!

I decided to use Art Glitter Microfine Opaque #518 Oak. It was a great color match and I really LOVE the Microfine cut. It is half the size of our Ultrafine line, giving it a velvety look that is luscious!
Pretty simple, I applied some Designer Dries Clear adhesive into the center of the bead finding with the Ultrafine Metal Tip attached to the adhesive spout. Thank goodness for that tip! It would have been very difficult otherwise.

As you can see in this really terrible photo I was liberal with my glue amount. Then just spoon on the glitter and let dry!
Once it dries the glue will recede a little into the finding. Depending on how large of an area you are working with will determine if you need to reapply glue and glitter again. Or you may like the recessed look; the outcome is up to you.

It took me a couple more applications to get the curved surface on top I was looking for. And then when it was starting to dry but not quite dry, I bumped it! Well, smooshed is more the term, making it crinkle a bit. Instead of crying, I decided to embrace my mistake and I delicately smooshed the other one for a prefect pair! I actually like the effect, it matches the design, don’t you think so too?

I'm wearing them today, it's like getting a new pair of earrings. I love fixing things with Art Glitter! Enjoy!!
Friday, January 7, 2011
Boxes of Boxes Birthday Present from Connie K.
Can you keep a secret?????
This is my third project for art glitter..but it is two fold...it is also a birthday gift for my girlfriend Polly...so shhhhh....don’t tell...her birthday is a few weeks away!

A few months ago I attended a workshop with Tim Holz...it was fabulous...of course...inky, eclectic, funky over the top fun...we made a curious curio cabinet...I knew immediately that I would want to make more of these...My head was spinning with the possibilities!
Polly loves all things vintage and birdies...so I had to include those two elements in her gift...I just know she is going to love it...
I used the the idea-ology configurations..if you haven’t seen them...well, they are basically boxes of boxes...so clever. I covered them with paper from 7 gypsies conservatory line.
The feet on the box are also from idea-ology...I love these..they are just so fun...actually I think they are kinda sexy....like little stilettos!

I also included a little glass knob on the top...
These are the supplies I used...you could change it up easily with what you may have at home...
ART GLITTER Designer Dries Clear Adhesive
ART GLITTER in the following colors:
Vintage Glass Glitter #611 Antique Silver
Ultrafine Opaque #32 True Blue
Ultrafine Transparent #158 Mellow Yellow
Ultrafine Transparent #89 Martini
configurations...ideaology
foundations..(metal feet)...idea-ology
paper..7 gypsies..conservatory 8X8 variety pack
tissue tape....idea-ology
reindeer moss
ribbon..may arts
vintage spools
vintage light bulb
vintage blocks
big button
birdcage charm...found this at Joann’s
eggs..were in my stash
small glass bottle/with bird seeds
large bird..Michaels in the clearance section last summer..(29 cents)
twigs..cut from a big bundle I bought@IKEA last year for crafting
trinket pin...... idea-ology
time piece..... idea-ology
black craft paint
matte medium

You will want to arrange the boxes to your liking...I covered the inside...backside, two sides & bottom...then taped the edges with the tissue tape. No need to cover the top inside it won’t show. I used a variety of paper and mixed it up a bit. The larger box with the bird has a few layered pieces that I adhered with with some foam tape. The feather in the upper right hand corner was cut from paper and adhered to a small wood block for some additional dimension...remember it is all about layering...
The bird was glittered with ART GLITTER Mellow Yellow, Martini & True Blue using Designer Dries Clear Adhesive...she is setting in a nest made from reindeer moss. The eggs in the box in the center row were altered using alcohol inks...the color I used was pool... included in this box a small bottle with bird seed. Vintage children's blocks are used in the center with Polly’s intials...she is going to love this! And then next to that is the vintage spools...I just picked out a couple that had thread that would coordinate with the colors..

In the lower left hand corner is the glittered birdcage..I used ART GLITTER Vintage Glass Glitter #611 Antique Silver...I can not get enough of this...I use it on everything.
Love the texture it give the birdcage...I suspended this with a tiny little eye-screw and jump ring...
The next little box has a little battery operated tea light...I cover with more of the tissue tap and then inked it up...you will love how this looks...

And finally a big ole vintage button...

You can see the possibilites are only limited by your imagination..
The outside of the box was cover with more paper and tissue tape then distressed with black craft paint...once dry, I sealed it with matte medium. Attach the feet with a glue gun and added the bow to the knob.
I hope you enjoyed seeing Polly’s birthday gift...and remember to keep it s a secret for a few more days...
Saturday, January 1, 2011
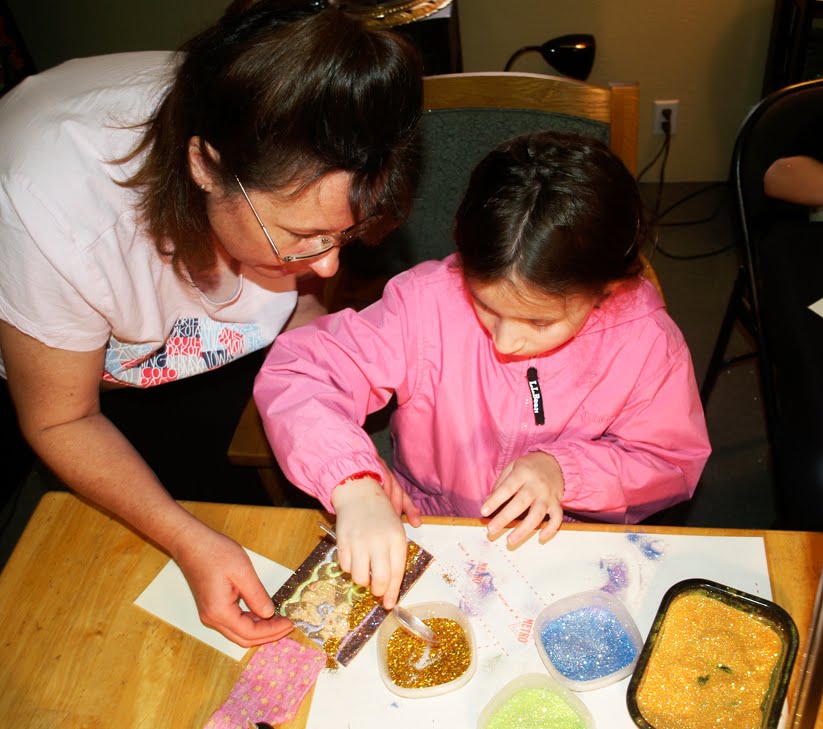
Glitter Lace Card Class for Kids at Art Glitter
Just wanted to share with you these great photos from a Glitter Lace Card Class for Kids held at Art Glitter this past week. This is a great lace pattern we found with puppies on it. You can see what a fun project this is for children, they loved it!
 Materials:
Art Glitter Ultrafine Opaque Glitter: #173 Ripe Plum
Art Glitter Ultrafine Transparent Glitter: #91 Orange Crush, #197 Flax, #141 Magnolia, #270 Chesapeake, #94 Key Lime, #284 French Lilac
Art Glitter Dazzlers: Hexis #D13 Spanish Gold
Art Glitter Designer Dries Clear with metal tip attached
Art Glitter Sticky Paper
Polyester Lace Swatch
Card Stock
We started with a simple two-color lace card, just like the one Barbara Trombley demonstrates here:
We used Ripe Plum for the background and Orange Crush for the lighter forefront.

Then the children were instructed to go for it for the rest of the colors and boy did they!

Adding details with Designer Dries Clear adhesive gave the cards a three-dimensional look that really makes the card special.

They also added some details with Dazzlers. They really liked the Dazzlers!

Keller here is a master of color, what an excellent card! Who said glitter was for girls only!
Sadly, this is all we have left of this doggy lace pattern. If you find some more let us know! When looking for lace, make sure it is polyester, cotton will not come off the sticky paper – it is really sticky!
Hope this inspires you to try this project with your children/grandchildren. They really excel at it!
 Materials:
Art Glitter Ultrafine Opaque Glitter: #173 Ripe Plum
Art Glitter Ultrafine Transparent Glitter: #91 Orange Crush, #197 Flax, #141 Magnolia, #270 Chesapeake, #94 Key Lime, #284 French Lilac
Art Glitter Dazzlers: Hexis #D13 Spanish Gold
Art Glitter Designer Dries Clear with metal tip attached
Art Glitter Sticky Paper
Polyester Lace Swatch
Card Stock
We started with a simple two-color lace card, just like the one Barbara Trombley demonstrates here:
We used Ripe Plum for the background and Orange Crush for the lighter forefront.

Then the children were instructed to go for it for the rest of the colors and boy did they!

Adding details with Designer Dries Clear adhesive gave the cards a three-dimensional look that really makes the card special.
They also added some details with Dazzlers. They really liked the Dazzlers!

Keller here is a master of color, what an excellent card! Who said glitter was for girls only!
Sadly, this is all we have left of this doggy lace pattern. If you find some more let us know! When looking for lace, make sure it is polyester, cotton will not come off the sticky paper – it is really sticky!
Hope this inspires you to try this project with your children/grandchildren. They really excel at it!
Subscribe to:
Posts (Atom)