Monday, September 30, 2013

Stunning Wedding Page


This month Art Glitter is teaming up with Dreamweaver Stencils.   Art Glitter is offering 20% off retail for $25 purchase is good with the code DW20 at their online store.  

Supply List

Art Glitter 343 Chestnut Ultrafine Opaque Glitter
Art Glitter 110 Taupe Ultrafine Opaque Glitter
Art Glitter 56 Pumpkin Ultrafine Opaque Glitter
Art Glitter 92 Bananan Ultrafine Tranparent Glitter
Art Glitter 280 Lime Rind Ultrafine Opaque Glitter
Art Glitter 79 Black Ultrafine Opaque Glitter
Art Glitter 85 Crystal ULltrafine Transparent Glitter
Art Glitter Designer Dries Clear Glue
Dreamweaver Metallic Gold Embossing Paste (leaves)
Dreamweaver LG 616 Leaf Texture Stencil
Dreamweaver Palette Knife
Dreamweaver LM2010 Paste Spreader
Dreamweaver Homemade Hawaiian Soap
Dreamweaver Stencils-  "Autumn"-LM 295
Dreamweaver Double-sided Mounting Paper
Dreamweaver Metallic Fix 11 Ivy Garden
Dreamweaver Metallic Fix  02 Amber Glow
Dreamweaver Metallic Fix 15  Kimono Red
Basic Grey Take Note Journaling Card with Transparencies
Basic Grey Origins Authentic paper
Basic Grey Origins Revitalize paper
Cricut George Basic Shapes Cartridge
Cricut Art Nouveau Cartridge
Cricut CTMH Artist Cartridge
Cricut Craft Room Software
Flower bling
Yellow Card Stock
Black Card Stock
White Card Stock
Brown Card Stock

Clare Dempsey made this fabulous page to celebrate a niece's wedding using Art Glitter and Dreamweaver products to capture the beauty of Autumn!  Clare started by using the Dreamweaver Leaf Texture template with Dreamweaver Embossing paste.  To get the ombre look she mixed the Gold embossing past with the Amber Glow Metallic Fix and spread it over roughly half of the leaf stencil. She then mixed the Gold embossing paste with the Kimono Red Metallic fix and spread this over the half of the stencil not yet filled.  Once the stencil was filled she sprinkled the Ivy Garden powder ONLY on the right half of the stencil (Clare says to be sure to do this while paste is still wet!) and allowed this to dry overnight.  In the morning, Clare used a Swiffer cloth to buff off the excess green metallic paste.  Clare then trimmed the card stock and cut the piece in half to make a border strip.  By slipping the border strip under the circular die cut, no one can see that Clare had some missing leaves on the border strip and that it has a seam!


Clare created the oak leaf and acorn circle die cut using the Cricut Craft Room software to weld a circle from George, Basic Shapes and Art Nouveau.  She hand cut the white mat. Clare used the Dreamweaver template and some ink with a sponge dauber.

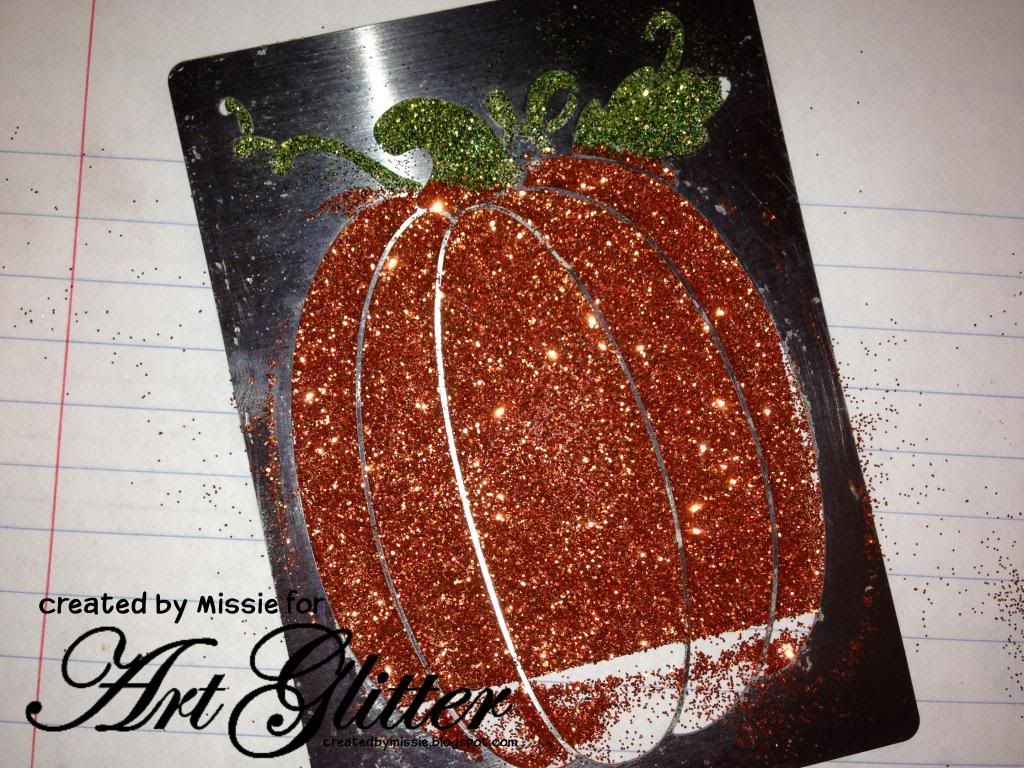
For the Autumn title Clare used the Dreamweaver double sided mounting paper and cut the frame with the Cricut.  To make the application of the Art Glitter neat and accurate, Clare set the blade depth to a 3 and cut ONLY the inside line of the ribbon frame.  She then set the blade depth back to a 6 and cut the outside layer of the frame all the way through the double sided mounting tape.  Clare carefully pealed up the outside top layer ONLY and applied the Art Glitter with a fine tipped dry brush (see photo below).  Maybe it is the painter in Clare, but she likes the control a brush gives her when applying the glitter.  She says to use a dry brush and to clean the brush off between colors on some scrap fabric. See how Clare also soaped up the back of the Dreamweaver template and taped it in place before removing the center portion? 

 Clare flipped down the template and painted the word Autumn in Art Glitter.  She carefully cleaned off excess glitter on the template, her hands and her work station and then flipped up the template to apply the white glitter.  For the bottom portion of the title "Wedding", Clare cut the title using the Dreamweaver double sided mounting paper, a heavy duty blade, and the Cricut CTMH Artiste Cartridge.  She used the dry paint brush technique for applying the different colors again.  She then matted it on white paper and hand cut the offset white area.  


You can find more of Clare'e work at her blog:  Cricutcraftyclare.blogspot.com. 


Thursday, September 26, 2013

Double Glitter Tree

Decorating for the Holidays
 
 
Before we all know it the holidays will be here.  Now is the time to start thinking about gifts which means you will, also, need gift bags.  It also means time to start getting out those decorations.  This unique project using the fabulous stencils from Dreamweaver and the gorgeous glitter from Art Glitter can double as a bag and decoration for the holiday season.


IN SEPTEMBER USE PROMO CODE DW20 FOR 20% OFF THE RETAIL PRICES WITH A $25 PURCHASE.  For 20% off your stencils go to Stencil with Style and use the code SWS20!
 
 
Supplies Used:

     From Art Glitter:


     From Dreamweaver:
  •  Double Sided Mounting Paper: 
  •  Leafless Tree Stencil:          
  • Dreamweaver Brush: 
Also needed:  Gift Bag with Handles, 1 Piece of Dark Blue Card Stock, Your favorite doily or circle punch

Peg chose to use the double glitter technique which can be found on YouTube being done by Lynell Harlow from Dreamweaver Stencils to create this gift bag/winter decoration.  It is a very easy technique that adds a wonderful background to any stenciled project. 
 She placed the stencil on the double sided mounting paper as shown in the video and trimmed it to size.  Then, she used some of the Crystal glitter to give the tree a snowy affect around the top.  She added the Nutmeg around the base of the tree and some of the top of the tree to define it. She placed the Garnet glitter into the areas for the cardinals on the stencils.  After that, she removed the stencil as shown in the video and lightly sprinkled some of the Crystal glitter around the bottom of the adhesive sheet to represent snow on the ground.  Then, she used the Varsity Blue glitter to fill in the rest to represent the sky.  When Peg used the brush to remove the excess glitter, she also allowed the blue to come off in areas and sprinkled some of the Crystal glitter in those areas to create more of a winter sky look. 

Peg added some of the Garnet glitter around the edges of her doily using the Designer Dries Clear Glue to help it stand out, too. 
 
This sparkly decorated bag can be used to give a special gift this holiday season to someone you know.  Add a battery operated light and use it to decorate your home or to welcome friends that come to your door.  This wonderful little bag can be used after the holidays to celebrate the winter season so there's no reason to have to put away with all of the other decorations! 


Sunday, September 22, 2013

Pumpkin Carving Time


IN SEPTEMBER USE PROMO CODE DW20 FOR 20% OFF THE RETAIL PRICES WITH A $25 PURCHASE! 


Art Glitter Ultra Fine Transparent # 165 Autumn
Art Glitter Ultra Fine Opaque # 56 Pumpkin
Art Glitter Ultrafine Opaque # 263 Bright Gold
Art Glitter Vintage Glass # 624 Chocolatta
 
Dream Weaver Stencils
Pattern paper
Eyelets
Stamps
Copic
Mist
 
Step 1: I choose a back ground pattern paper and used a stamp
to decorate the back.
Step 2: I used the double sided sticky paper and added my stencil
then used Art Glitter to fill it in.
 
 
Then I added the F/X around the rest of the sticky paper for a great shine
 
I colored in the stamped image with Copic markers and added the pattern paper
and the stenciled image.
 
Finally I added a title some mist, eyelets and tags.
I just love the shine of the F/X.
 
My Blog:zippity-do-dah-tabitha.blogspot.com

Friday, September 20, 2013

Vintage Autumn

 
 Halloween Paper Tag with Frame
featuring 
"Dream Weaver"  & "Art Glitter"
Ingredients

This month we are happy to be teaming up with Dreamweaver!

To celebrate, Art Glitter is having a 20% off retail sale of any $25 purchase.  Just use code DW20 at Check out!

Badge.jpg

Directions
Step 1
Heather started out by using the Cream Window Card and an extra piece of matching cardstock.  She traced the window opening on to the piece of cardstock lightly with a pencil.  She cut this out and used Ranger's Vintage photo distress ink to fill in the Bare Trees Dreamweaver Stencil and then inked the edges with Walnut Stain.

Step 2
Heather used a ruler to measure over to 3 & 1/4 inches from the fold of the Cream Window card and cut the excess card stock off.  She then cut the Cream Window card down the fold.  Now she has two pieces, and a left over cardstock piece which she will use later.  Next she adhered foam tabs to the back of her oval piece, and placed it on the tag.  That sounds easy right?  You want to make sure you line your tag up with your window piece, because the tag will be sliding into the base, and the oval piece on tag will be elevated through the window base piece.  This will make more since when you see the next few steps.
Step 3
Heather placed her oval window piece on top of the solid piece of the card base.  She again traced the oval lightly with a pencil onto the back piece.  She then used the Bare Trees stencil and applied Rang'er Vintage Photo with a sponge applicator.  She did this to the front of the oval window piece as well.  She placed foam tabs on the back side of her oval window piece.  These foam tabs were placed carefully so that the tag will slide in and stop at a point, so that the oval on the tag...matches up with the oval window.  Notice that the tabs running up the sides have been cut in half so they are skinnier.  This enables Heather's tag to fit inside (once pieces are put together).
Step 4
Heather lined up her front oval window piece with the back piece and pressed down on the edges and bottom so that the foam tabs would adhere nicely to the bottom layer.  She also slid in her tag so that the oval on tag is visible in the oval window of the top piece.  You will notice below that the Bare Tree stencil was used on the oval, and is horizontal to the Trees on the outside oval window.  Heather inked all the edges with Walnut Stain, and trimmed any excess cardstock with a craft knife.  Here finished piece is 3 & 1/8 inches wide.  She left the length of the card as is. 
Next she applied the sticky tape, and covered it with the Brown Polka dot Grosgrain ribbon. 
Step 5
Heather used the DreamWeaver Autumn Stencil, and placed it on the extra piece of trimmed off cardstock.  She Centered the stencil vertically, then used scotch tape to tape it in place.  Then she used Vintage Photo Distress ink to fill in some of the letters.
Step 6
Next she applied Fired Brick Distress ink in the same manner.  Touching the foam applicator in different areas.  This will give the "Autumn" word the feeling of "leaves changing colors in Autumn."
Step 7
Heather did the same thing with Peeled Paint distress ink.  When she was finished, she carefully removed the tape and trimmed the edges of her cardstock.  Next she inked the edges with Walnut stain.
Step 8
Heather used some scraps of Brown Crochet lace and designer dries clear glue to add the crochet lace to her tag.  It fits easily under the oval piece which is elevated with foam tabs.  Heather likes to cut small pieces and attach them from the sides.  No reason to waste any trims by hiding them under a piece :0).  She used the red sticky tape to adhere her "Autumn" Sentiment to the oval.
Step 9
Now you can see where Heather added the polka dot ribbon.  She then used Walnut stain and the Crows stencil to stencil some crows to scraps of the cardstock.  She then cut the crows out, and flipped a couple (then used the walnut stain to color them too).  She also cut out her adorable Vintage Witch image and inked the edges with Vintage Photo.  The witch and crows were placed on the front of card with foam tabs.  Please refer to photo for placement.  She used her Crop-o-dile to punch a hole in her tag.
Step 10
Heather used the Designer dries clear glue without the fine tip applicator to apply larger dots of glue around the edges of the card front.  Then sprinkled on the Camel Glitter.
Step 11
While that was drying, she used the Bare Trees stencil again and placed it on the tag so it would look as though the tree's branches were coming in from the sides.  She then used the Fine tip applicator and the Designer dries clear glue to add glue to the negative space of the stenciled bare trees.  She did this to the front of the card base as well.  Lion's Mane Glitter was added to these areas.  Heather also covered each of the "Crows" with glue and applied Black Glitter.  The crows on the tag, are flat, not elevated.  She wanted them to look as if they were roosting in the trees.    She tied off the top of the tag with black seam binding.  A tiny button with brown sugar baker's twine was added for dimension.  Please refer to photo for placement.
Step 12
Here is Heather's finished tag below.
Step 13
Here is a close up of the tag.  Heather loves how the crow looks like it is sitting in the tree, the branches and crow are nice and sparkly.  A little of the Lion's Mane landed on the crows...but Heather liked it, and did it to the rest of the crows too.  Happy Accidents!
Step 14
Looks like this little crow is reading the "Autumn" sentiment.  Heather loves the natural coloring look of the letters.
Here is another look at the finished piece.
Close ups
Heather used the fine tip applicator and designer dries clear glue to add glue to the hat and boots as well as polka dots on the dress.  Black Glitter was applied to the hat and boots, and Butterscotch glitter was added to the polka dots.  What a great look, the Crow perched on the sweet little Witch's hand.  
Close up of the lower right front.  LOVE the two crows!!
This would make a wonderful Autumn gift.  First it is given as a card....then the tag can be pulled out and used as a bookmark.....and the card becomes a Frame, that you could add magnets to the back and hang on the refrigerator.  Just add your adorable photo! 
Heather just loves it when she can take a basic card and turn it into a gift in itself!  The Oval Window cards make it super easy!  

Thank you for stopping by and hope you enjoyed Heather's Tutorial using
Art Glitter and the fabulous "Dream Weaver" products!
Heather hopes you can see just how versatile the Dreamweaver Stencils are and how artsy feel they add to your creations....and how Just the right amount of glitter can really add dimension and sparkle to your creations!!   In other words..."Kick your creations up a notch!"

Feel free to stop by and see Heather's other projects using Art Glitter on her blog.
heatherahudson.blogspot.com

--

Wednesday, September 18, 2013

Perfect Pumpkin

Pumpkin Perfect with Art Glitter
 
Supplies: 
Art Glitter #300 Camel
Art Glitter # 85 Crystal
Art Glitter #56 Pumpkin
Art Glitter #349 Garnet
Art Glitter #301 Amazon 
Dream Weaver stencils (pumpkin and fall leaves)
Black Card stock
White Card stock
Halloween Stamp and Black Ink
Double sided adhesive
 
 
Before beginning to work with the stencils apply soap to the back of the stencil.  Dream Weaver recommends using an all natural soap as they are softer.  If you do not have an all natural soap you can use a regular bar soap, just be sure to wipe off any excess flakes before using the stencil. 
 
Apply double sided adhesive to your card stock then place the stencil directly onto the tape.  The soap will allow for the stencil to be removed later.  Then begin carefully applying glitter.  For the stem and leaves of the pumpkin use Amazon green glitter.
 
Then apply the pumpkin glitter. 


Carefully remove the stencil and apply crystal glitter to the remaining exposed adhesive.  I used the same process to create the leaf boarder as well- just using a rainbow of colors (Camel, Pumpkin, Amazon, Crystal and Garnet).
 
 
Layer The glitter pumpkin onto black card stock then apply to the front of an A2 card along with the leaf boarder.  One simple stamp and the card is complete. 
 
This month we are happy to be teaming up with Dreamweaver!
To celebrate, Art Glitter is having a 20% off retail sale of any $25 purchase. Just use code DW20 at Check out!


Thanks for stopping by to see my creations.
Missie Todd
createdbymissie.blogspot.com