Thursday, January 30, 2014

Valentine LOVE


Supplies
Art Glitter Dries Clear Glue
Art Glitter Ultrafine Tip
Art Glitter 332 Red Rocket Chunky Opaque Hologram Glitter
Art Glitter Small Transparency
Snap 'n Peal
Heartfelt Creations Timeless Amour Custom Die
Lattice Lace Envelope Wrap Silhouette

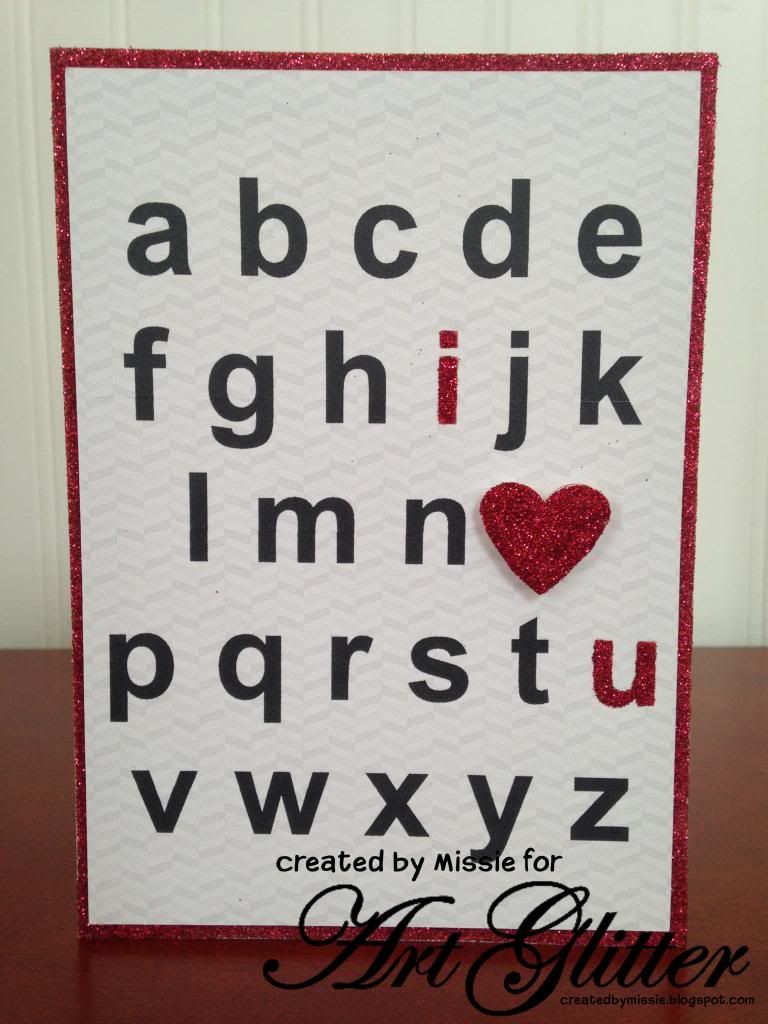
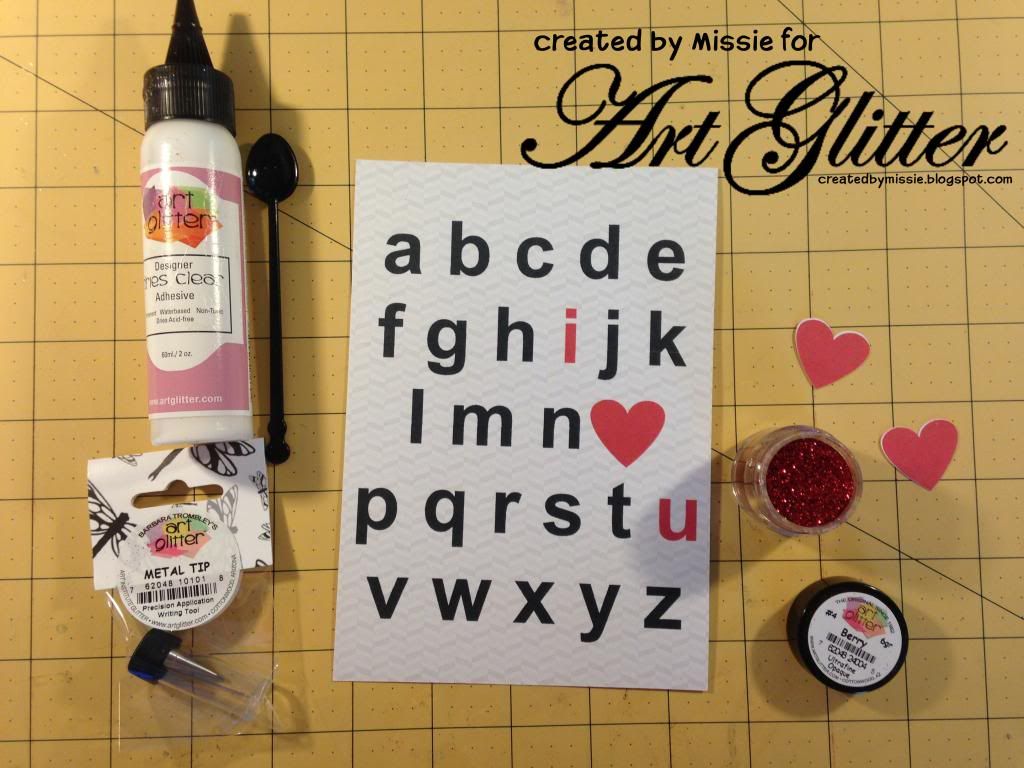
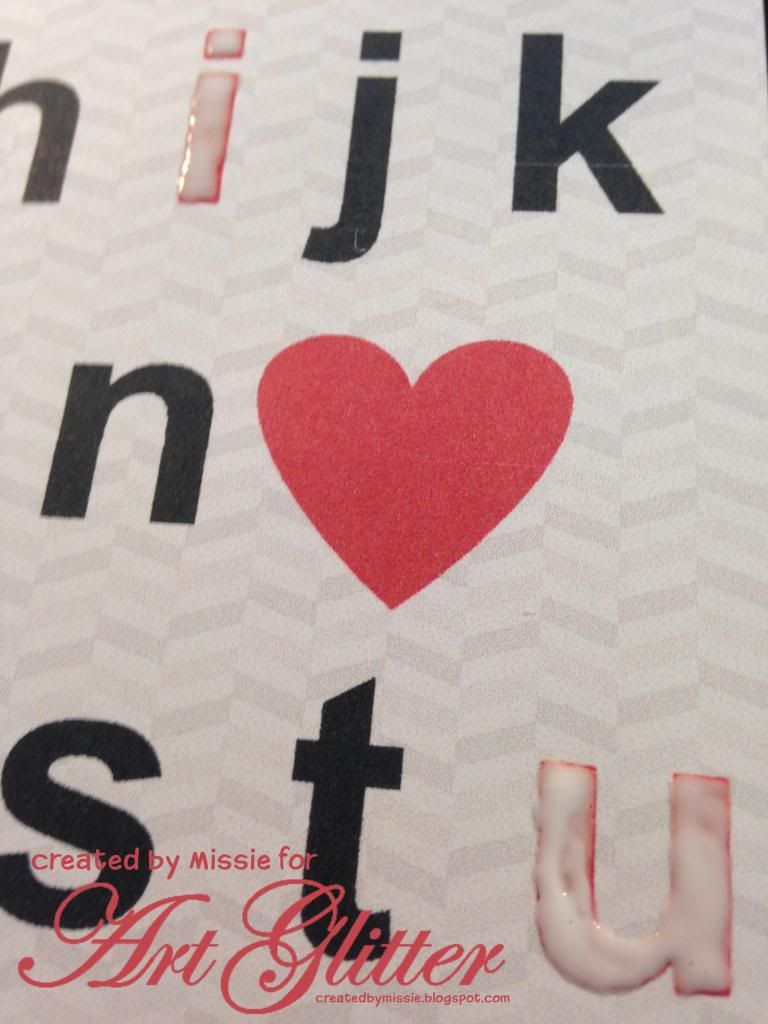
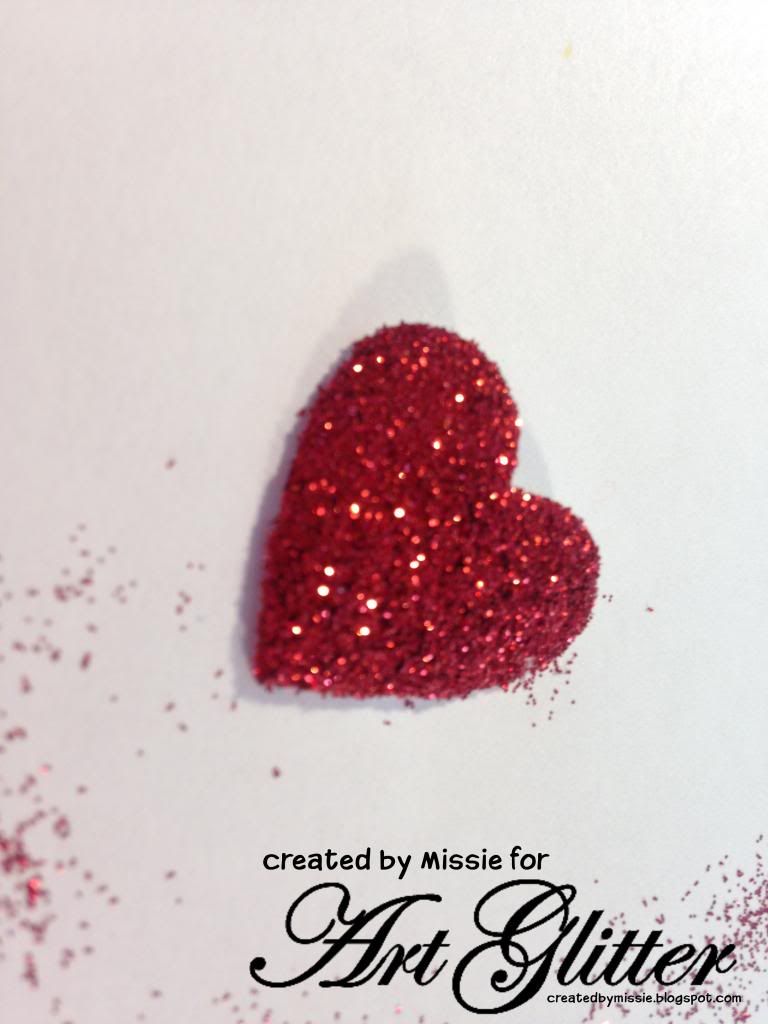
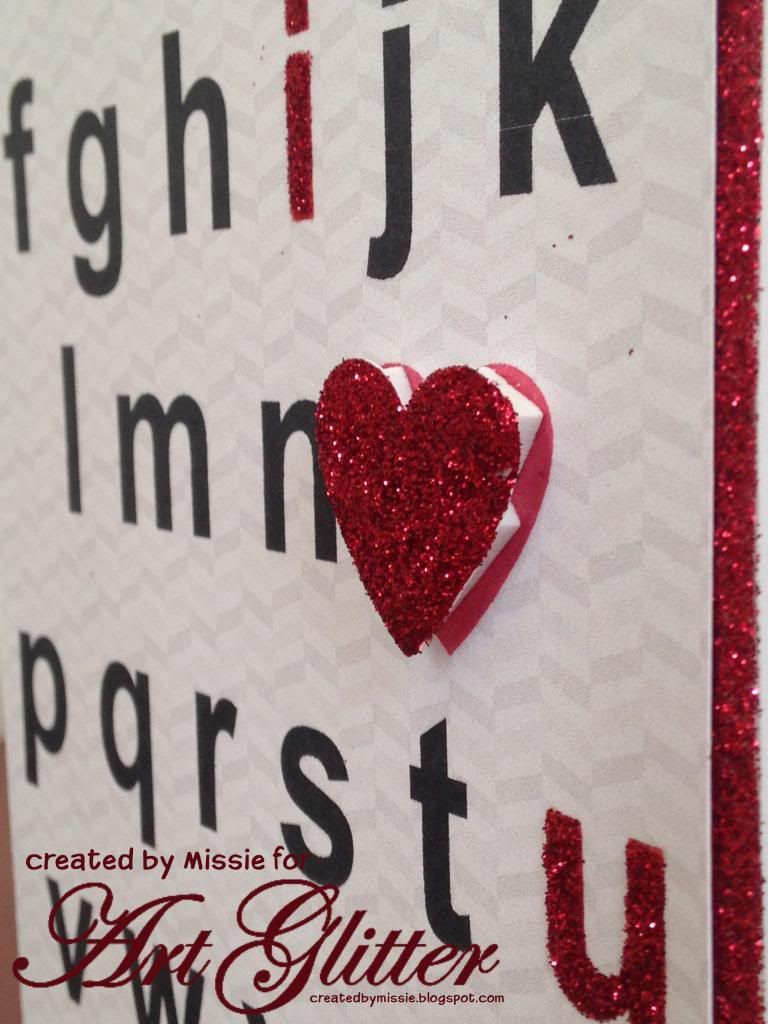
This Valentine's Day, Clare wanted to make an envelope as pretty as the card.  So, she found an envelope wrap at the Silhouette store that coordinated with a Heartfelt Creations die and cut it in red card stock.  She highlighted heart shapes in the pattern by adding Art Glitter Dries Clear Glue using the Ultra fine tip and Art Glitter (see photo above).
For the card, Clare cut the Heartfelt Creations Timeless Amour Custom die in the Snap 'n Peal.  She pulled off the protective layer and adhered it to the Art Glitter Small Transparency (photo above).  She removed the second protective layer and added Art Glitter Red Rocket Chunky Opaque Hologram Glitter.  She used Momenta stickers for the word LOVE.
She tied the envelope wrapper closed, much like she would tie a ribbon around a present.  She tied one side first, threading from top to bottom.  Threaded the ribbon up to the top for the opposite sides and then tied a bow.  Such a simple elegant card and envelope!
You can find more work by Clare Dempsey at her blog:  Cricutcraftyclare

Tuesday, January 28, 2014

I "Heart" You

Supplies:
4.75*6.75 printed alphabet with a heart replacing the "O"
5*7 white cardstock card base
Art Glitter #4 Berry Glitter
Art Glitter dries clear adhesive
Double sided tape

I created this printed alphabet using the Silhouette studio software, but this could be easily created using a word program and hand cutting if you do not have a Cameo.  The hearts were also printed and cut from silhouette studio, but a punch could be substituted. 

Use Art Glitter dries clear adhesive on the I and U and then apply Berry Glitter.  For the heart I glittered a separate cut out then layered it on with foam adhesive to add dimension.


Apply 1/2 inch wide double sided tape to the edges of the card base then apply Berry glitter to the card base. Then layer the printed alphabet and popped up heart to the card base!


The finished product is an easy to recreate, yet very lovely card for someone in your life.  This could be used for valentines day or other occasions such as anniversaries. 


Missie Todd
createdbymissie.blogspot.com


Sunday, January 26, 2014

Vintage Winter Wonderland


     Faux embossing can be easily achieved by using the same colors of paper and then it can be stepped up by adding a little shine using glitter.  Peg created this winter scene by covering a piece of card stock in glitter and then layered snowflakes over the top to give the embossed effect.  This technique can be used to add extra touches to your projects and is one of Peg's favorite techniques.


Supplies Needed:
    From Art Glitter-
      White Satin Glitter~
      Silver Moon Glitter~ ;
      Xyron Machine~
      Designer Dries Clear Adhesive~
     Ultrafine  Metal Tip~  
Other Supplies Needed:
     White Card Stock, Card Stock Color of Your Choice, Water Color Paints (or markers or colored pencils of your choice), Stencil (The one used here is from Sin City Stamps), snowflake punch and or die   
     Peg began by coloring in the image she was using and then adding glitter to some of the areas to add some winter glisten to it.
     Next, she placed a piece of 7" x 5" white card stock through a Xyron.       
     After removing the backing sheet, she lightly sprinkled white satin glitter over the entire sheet.  She punched enough snowflakes to cover all four of the edges of the card around the picture and then add Designer Dries Clear Adhesive to the backs of the snowflakes with a paint brush.  She adhered them down to the card base making sure some of them slightly hung over the edges.

      She went around and trimmed up the edges of the snowflakes that over hung.  She placed the image onto the piece of colored card stock for layering and then adhered it to the card.
     Add a simple faux embossed look and shine to any creation by choosing the same colors to use and then adding a little glitter.  It's easy to do and will make any project stand out.  Have fun creating them for any season!

http://www.pegscraftingcorner.blogspot.com/

Friday, January 10, 2014

Think Spring!


Heather decided she would like to share with you a bit of spring!!  Yes it is still snowing and freezing cold in Michigan, and Heather is already eager for spring!!  So if you live in her neck of the woods or are lucky enough to live somewhere that you don't know the meaning of "snirt"  (the yucky mix of slushy snow and dirt), hopefully you will enjoy this easy to make darling little posey, that you can add to your cards, fridge or jars to give them a little sparkle.
You will need the following:

Here is a look at the supplies!
Here is Heather's step by step tutorial so you can create some Posies of your own.  Feel free to choose your own colors!  These are great, because no matter what you favorite colors are...you can use them!!  
Step 1
Heather used scrap pieces of corrugated cardboard from some left over Christmas delivery boxes.
If you are not much into drawing, you can trace a circle on the cardboard, then slightly offset it to create the simple three petals.  You could even just trace a smaller circle for the center, that would work too!!  Think of the leaves as drawing a fat letter "V" or "U."  Have two that slightly overlap.
Step 2
Super easy Posy!  
Step 3
Step 4
Step 5
 Step 6
Steps 7 & 8
Steps 9 & 10
Step 11
The great thing about corrugated cardboard is the layers, and you can just slide your hanger into one of the grooves!
Step 12
Heather loves the artsy look of the edges, since they are are corrugated and not solid!
Step 13
Here is a close up of one, so you can see how it looks on the sides.
Here is a picture of all three.
If you are wondering what Heather did to the backs?  She just painted them, and left them as is.  If you were going to hang it where you would see the back, then she recommends glittering the back as well.
Heather hopes you enjoyed her tutorial, and hopes it adds a little Sparkle to your day!

Here is a special 
New Year Tussie Mussie

Ingredients
 and Platinum Art glitter 
Heather outlined the edges of her tussie mussie, focal and rose petals with Designer dries clear glue.  She then applied the Platinum Glitter.  It really makes the the tussie mussie feel
New Year's Eve Sparkly!
Here are a few close ups
Another view
Another
If you would like, you can see more photos and Heather's Tutorial on her blog post here.

How about a Pink Heart Shaped Cone /Tussie mussie for Valentine's Day??
Heather used the Art Glitter Designer dries clear Glue & Ultra fine Metal Tip to apply dots of glue around the focal edge and then added #287 Arbor Glitter.  
Heather also added the  #287 Arbor Glitter to her text boxes below.  She used the glue to add dots to her raised heart and applied #267 Cheeky Pink Art Glitter.  She outline the heart shaped cone base with glue and used #160 Rose Gold.  
These glitters give her heart cone a soft vintage romantic feel!

One last extra project that Heather would like to share.
Vintage Christmas Tag.
Isn't it Sparkly!!
Here is a close up of the poinsettia.
Heather used #162 Just Peachy, and #142 Coral Reef on the poinsettia petals.  #295 Ensalada was used on the leaves!  
Here is a look of the back of the tag.
 
You can see the rest of the details on Heather's Blog Post here.

Heather hopes that you have a Sparkly New Year!!
Feel free to stop by and see Heather's other projects and Tutorials using Art Glitter on her blog.
and her 


Wednesday, January 8, 2014

Dashing Through The Snow


Supplies:
Assorted Scrapbook Paper
Die Cut title, reindeer, and snowflakes- these are from MissKateCuttables.com
Art Glitter Crystal Glitter  #85

Starting out the new year by getting organized? This year it is my hope to begin using the "project life" style of scrapbooking for at least some of my photos. While I don't plan to give up traditional scrapbooking, I'm finally ready to give this a try. I have over 3000 photos living in my iPhone and I want to do a better job of getting the photos of my kids into albums.  This layout is my very first attempt at a project life layout and I have to say- I am quite pleased.


Begin by cutting patterned scrapbook paper into 3x4 and 4x6 inch pieces.  For this layout one sheet of scrapbook paper was used for the entire background.


Using the SVG cut files "Dashing through the Snow" from misskatecuttables.com make snowflakes, a title and reindeer for the layout.


Add double sided adhesive to the snowflakes (this was done using a xyron sticker maker) then add Art Glitter Crystal Glitter to the snowflakes. 


Add the die cut pieces to the journal cards to begin assembling the layout.

You can use the Silhouette Cameo's print and cut feature to add names and dates to a snowflake shape to be used as a journaling card.

Here are some close ups of the finished layout.


Thanks for stopping by to see my creations.
Missie Todd
createdbymissie.blogspot.com