Showing posts with label double sided sticky tape. Show all posts

Thursday, February 13, 2014

Glitter Banners For Your Pages


Glitzy banners are in. So are other things in the scrappy industry. If it Glitzy is Glamorous.
It is all the rave so i thought I would give it a go and make my own banners.


Supplies:

Art Glitter Ultrafine Transparent # 360 Pretty Pink
Art Glitter Ultrafine Pearlescent # 181 Mint Chiffon
Art Glitter Ultrafine Transparent # 93 Lemone
Art Glitter Dries Clear Adhesive


 I started by cutting a banner from the sticky tape


Next I added my glamorous glitter and then repeated again.
I also had a few wooden arrows that I decided needed to have a little
sprinkle of glitter as well.

Here is a little close up.

I think it turned out fabulous!


My Blog: zippity-do-dah-tabitha.blogspot.com


Tuesday, October 22, 2013

Squirreling Around

 
Ingredients

This month we are happy to be teaming up with Northwoods!

To celebrate, Art Glitter is having a 20% off retail sale of any $25 purchase.  Just use code NW20 at Check out!


Directions
Step 1
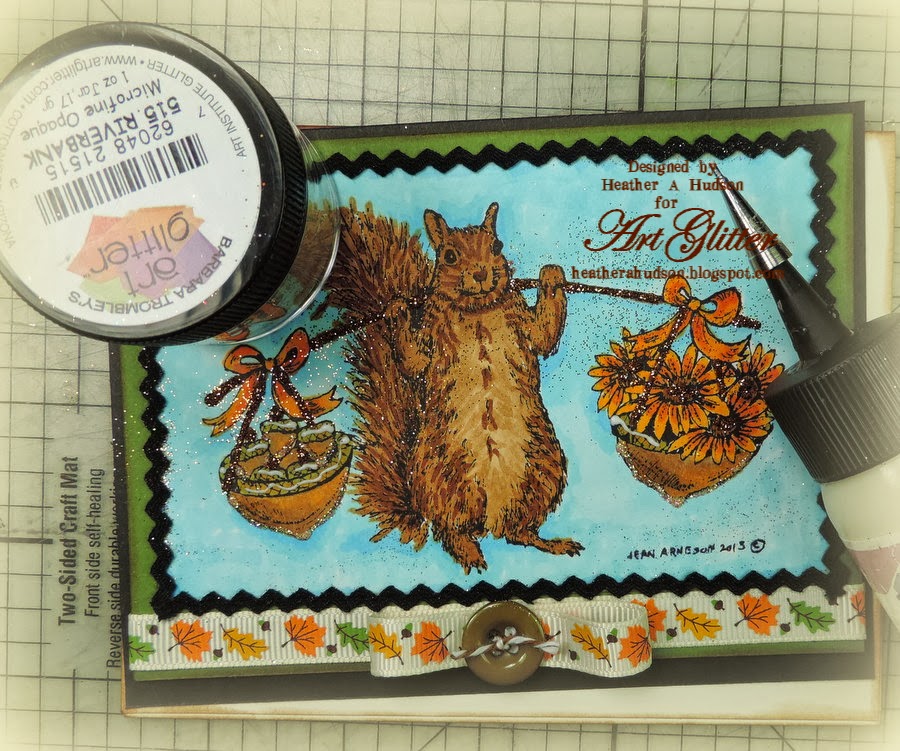
Heather started out by using the Northwoods Nora's Bountiful Squirrel Stamp and the Art Glitter Black ink pad to stamp her image onto white card stock.  Heather LOVES Squirrels, so she loved playing with this adorable image!
She used Copics to color her image. #BO2  #BO1 were used for the background.  The Squirrel, was colored with E35, E55, and E37, bows and flowers were colored with Y38 and YR14, Same with bows with touches of YO4 and Y68,  Acorns and acron baskets with E35 and touches of Y38.  Stick handle was done with E18.  
  Step 2
Heather used the 1/2 perfect layer ruler to cut a 1/2" mat for the bottom.
Step 3
Heather used her perfect layers ruler to create a mat out of green card stock.  Sides were cut with 3/16 ruler..
Step 4
Heather used the 3/16 perfect layer ruler edge for the bottom of the next cardstock layer (black).

Step 5
Heather used the Perfect Layers Ruler to cut the sides of the black cardstock to a 5/16th" mat.  This time she measured off the stamped image piece instead of the green layer.
Step 6
Heather put a strip of the red sticky tape across the bottom edge of card.
Step 7
 Heather applied her Fall Leaves ribbon to the red sticky tape. The Ultra fine tip applicator and Designer dries clear glue were used to add some glue to the edges of the stamped image, and black mini ric rac was attached.
Step 8
Then she used another piece of the ribbon to create a loop, and then glued it down to the ribbon base to create a bow on the front of the card.  A button tied with Brown Sugar Baker's Twine was added to form the center of the bow.
Heather added glue to the acorns and  basket bottoms and used Lion's Mane Glitter.
Step 9
Heather added more glue to her image, and applied Camel Glitter.
Step 10
Glue was applied to the acorn tops and rims of acorn baskets then Riverbank Glitter was added.

Step 11
Heather continued to use the DDCG and UFTA to apply glue to the bows and then applied Butterscotch Glitter.  

Step 12
Glue was applied to the squirrel, and Goldenrod glitter was used.
Step 13
Swirls of glue were added to the background and Blue Angel Glitter was applied.
Step 14
Heather used the red sticky tape and placed on her ivory card stock base which was inked with Ranger's Vintage photo.  This will hold down her matted focal image.  Dot of DDCG were added to the edges of the green card stock and Cavalado Glitter was added.
Step 15
Heather attached her matted image to her cardstock base.
How about a close up of the Cute 
Northwoods' Nora's Bountiful Squirrel Image!
Adorable!!
Some more Close ups.
Left side of card.

Right Side of Card.
Thank you for stopping by and hope you enjoyed Heather's Tutorial using
Art Glitter and the fabulous
 "Northwoods Nora's Bountiful SquirrelStamp!"

Feel free to stop by and see Heather's other projects using Art Glitter on her blog.

heatherahudson.blogspot.com

Monday, August 19, 2013

Vintage Butterfly Chipboard Album


Ingredients

Directions
Step 1
Heather started by applying the Designer Dries clear glue with an old brush to the "Want to Scrap,"  Butterfly Chipboard Album.

Step 2
Heather applied #243 Gingerbread Art Glitter to the piece.  She wanted the piece to have a "Vintage look" so she did not paint the piece first and the glitter applied was transparent, letting the chipboard show through.  
Step 3
Heather used #300 Camel Art Glitter to cover the three center pieces on each side of the Butterfly Chipboard Album   Heather used the Designer glue to adhere the Pink Crochet lace & roses to the glittered surface. 
 Step 4
Next she used the  Designer dries clear glue and an old brush and applied the glue to the chipboard pieces and covered with Gecko Galz Digital Papers.

Step 5
Heather removed the excess paper with a kraft knife.  Any papers that would be overlapping another layer, had the edges inked with Ranger's Vintage Photo distress ink.  After all pages were covered and trimmed, they were inked as well.
 Step 6
Heather used a Martha Stewart Lace Punch on some of her pages. 


Step 7
Heather up-cycled some tags.  She covered them with glue then adhered the papers and trimmed them in the same manner as her pages.
Step 8
Glitter was applied to tags and ribbons attached.

More inside pages.
Another page
Another page
One more page that is different.  
Heather did some of her pages the same, because she really liked certain papers.
Step 9
Heather used the Gecko Galz Frame ephemera
 with her Photos. She uses a free program called GIMP to resize her photos, and place them in the frames.  She has free videos on Youtube demonstrating GIMP.  Candi fix it foam pads were used to elevate the framed photos 
Step 10
Heather used the Ultra fine Metal Tip and Art Glitter Designer dries clear Glue to apply glue to the frames .

Step 11
Heather applied the glue differently to each frame, then applied #160 Rose Gold Art Glitter.  She also added glue to each of the pages then added coordinating glitter.  #193 Martha's Yard Art Glitter was used on the dots below.

Step 12
Sticky tape was applied to the back of the butterfly piece and was adhered to one of the pages of the chipboard album to create a solid cover.

Step 13
Heather used the Ultra fine Metal Tip and Designer's Dry Clear glue to add some decorative strokes to the digital paper.  Here you can see the #243 Gingerbread and #109 Cavalado on the leaves. The #717 Poupon Glitter was used on the cream rose, and  #267 Cheeky Pink on the Pink roses.  
Step 14
  #317 Dew Drop glitter runs across the top of the album and #160 Rose Gold runs up along the left side.
Step 15
The frames were elevated with 3d Foam tabs so that tags could slide behind for easy storage.  Heather will be journaling on the front and backs of tags.
Close Up
#85 Crystal Art Glitter was applied to the flower petals on the right.  #268 Pink Smoothie Art Glitter was added to the tag.  Pink Organza was used for the tag top.
Another Page
Detail Close up
#193 Martha's Yard Glitter was used on this tag.  
Detail Close-up
#162 Just Peachy, was used on the pink roses,  #717 Poupon for the flower centers and # 358 Jungle on the leaves.
Last Page
This photo takes up most of the page, so two tags slip in behind for journaling. 
Detail Close-up
#85 Crystal was used to outline the envelope, #300 Camel was used for the bow.
Another Detail Close-up
#85 Crystal was used for the flowers, #717 Poupon for flower centers, #295Ensalada for leaves and #229 Cosmos was used on the pink buds.

What a Gorgeous Vintage Butterfly Chipboard Album!


 The Butterfly Chipboard Album from "Scrap That" and Glitters from Art Glitter make a beautiful combination.


Thank you for stopping by and hope you enjoyed Heather's Tutorial  using Art Glitter and the "Want to ScrapButterfly Chipboard Album.
Feel free to stop by and see Heather's other projects using Art Glitter on her blog.
heatherahudson.blogspot.com

-- Please visit my blog: My Artistic Adventures :0) Check out my tutorials & Creations on Youtube