Sunday, July 14, 2013

Happy Birthday Friend


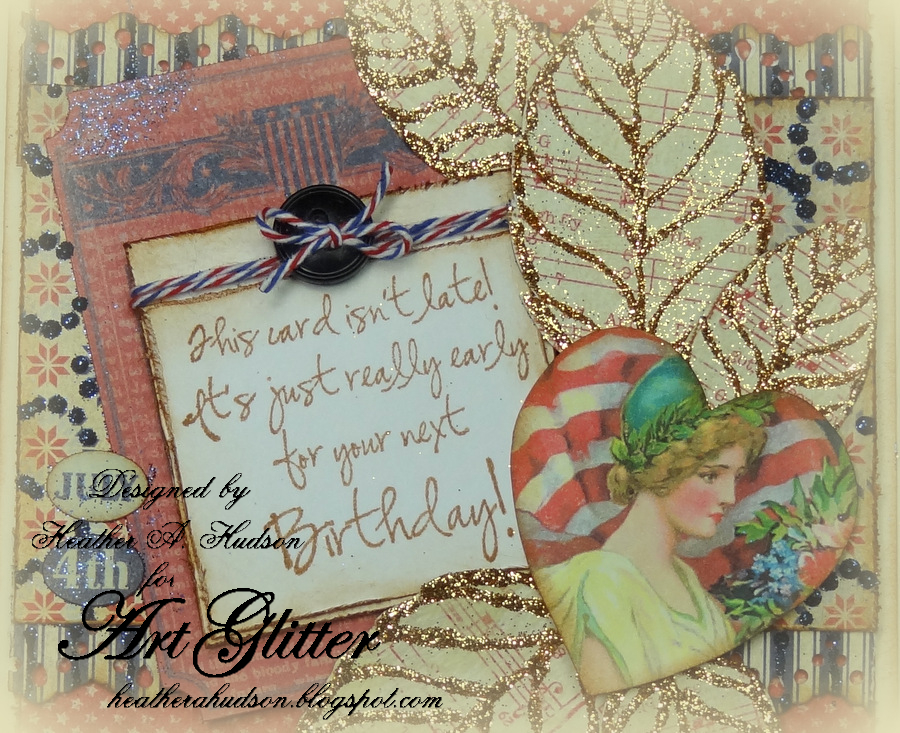
This month, Art Glitter is pairing with Penny Black.  I was so glad that I had the opportunity to use these gorgeous stamps!  For today's post, I have a materials list and a brief description of how I made this card.  Order from Art Glitter the entire month of July in the amount of $25 or over, use the code PB20, and you will receive 20% off your order total! And remember, Art Glitter is MADE IN THE USA!!!

MATERIALS:
Penny Black Stamp Kisses in the Sun
Penny Black Acrylic Stamp Set Simply the Best
Art Glitter Parchment Paper
Versafine Ink in Majestic Blue
Distress Ink in Faded Denim
Distress Ink Blending Tool
Non Stick Craft Sheet
Large Acrylic Block
Iron
Small, Sharp Scissors
Heat Tool
Needle
Black Thread
Adhesive
Card Stock
Patterned Paper

DIRECTIONS
1)  Stamp butterfly image on light colored card stock with Art Glitter black ink and heat set with tool.
2)  Stamp Happy Birthday across paper with Versafine Ink.  Fill the entire page.
3)  Stamp just the word friend from the acrylic stamp "you are a friend for life" across the top of the lighter blue paper.
4)  Cut around the outer, lower wind of the butterfly and then  rip all the way around the edges on the light card stock.
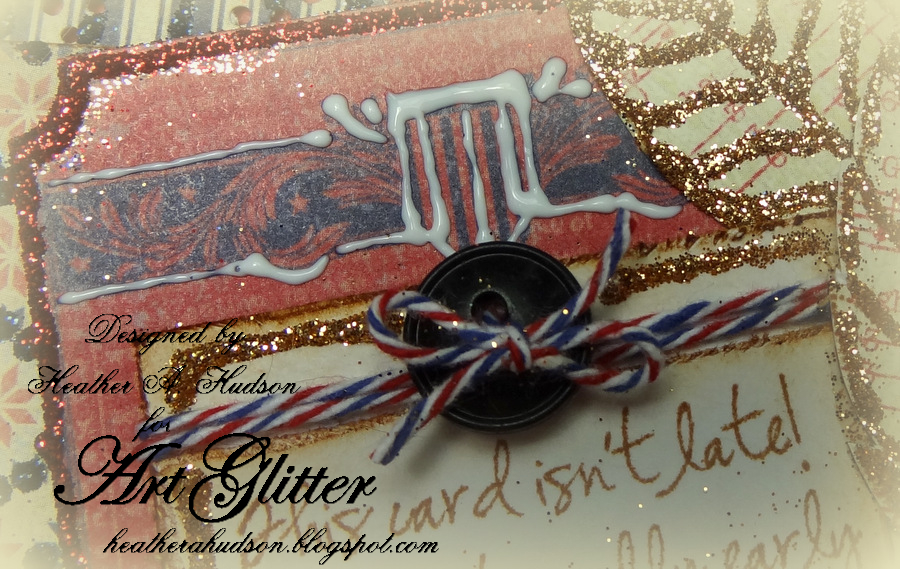
5)  Use the Distress Ink, Blending Tool and Craft Sheet to distress the edges of all of the papers.
6)  Use the Designer Dries Clear with the metal tip to color the foliage with the transparent glitters.  Put one color on per pass. I used a light, medium and dark glitter in each section.  The transparent glitter allows the beautiful detail of the stamp show through when the glue is dry.
 7)  Set up the iron.  Apply the Art Glitter Ink to the butterfly portion of the stamp.  Lay the Fantasy Film over the top, cover with the Parchment Paper and lay a medium iron on top for a few moments. Make six of these butterflies.
8)  Use the Designer Dries Clear and the metal tip to select words from the background and the word friend to glitter with the Microfine.


9)  Cut out, stack and adhere the centers of the butterflies in two groups of three.  
10)  Adhere the centers of the butterflies over their positions.  One will go where the stamp has placed it.  The other is up to you.
11)  Poke guide holes with needle and then stitch into place.
12)  Assemble the card.
 I just love the three dimensional look of the butterflies and the transparency of that Fantasy Film.  The sheen looks different depending on the lighting.  (That is why I included so many different pictures).  This is the first time that I ever used the Fantasy Film according to the packaged directions, and I have to say, I love it!  It is much easier to use than I thought and the results are gorgeous.
Thanks for stopping by today.  I was really excited to share this project with you. Stop by my blog any time at www.rememberinglifesmoments.blogspot.com.  Until next time, glitter on!


Friday, July 12, 2013

Anniversary Wishes


Supplies
Art Glitter 183 Blue Angel Ultrafine Pearlescent Glitter
Art Glitter 185 Varsity Blue Ultrafine Pearlescent Glitter
Art Glitter 199 Torch Lake Ultrafine Transparent Glitter
Art Glitter 211 Glacier Ultrafine Transparent Glitter
Art Glitter Gala Glitz Blue
Art Glitter Dries Clear Designer Glue
Art Glitter Ultrafine Metal Tip
Art Glitter Transparency Sheets
Art Glitter Sticky Paper
Sticky Tape
Scor-Tape  6" x 6" Sheet adhesive
Thicker Stickers
Penny Black eloquence Transparent Stamp Set 
Cricut Craft Room Software
Cricut George Basic Shapes
Cricut Base Camp Cartridge
Cricut A Child's Year
StazOn Black Ink
Pop dot


Do you need an idea for a special birthday card?  Well, why not try a special clear card, like the one Clare Dempsey made with Art Glitter and Penny Black Stamps!?
She started by folding an Art Glitter Transparency Sheet in half and cutting a circle card.  From blue card stock Clare cut a design made with Cricut Craft Room software, George Basic Shapes, Base Camp, and A Child's Year Cartridges.  To high light 60, Clare used Art Glitter Dries Clear Adhesive, applying it with the Ultrafine Metal tip and then sprinkled on Art Glitter Blue Gala Glitz.
While this dried, Clare cut an assortment of stars.  For the solid back ground stars (two smallest), Clare used Art Glitter's Sticky paper and glitter.  For the smallest star, she applied 183 Blue Angel, and then applied 185 Varsity Blue afterward.  It give a little variation to the blue that is perfect with the darker card stock and lighter glitter in the biggest star.  She adhered it with a pop dot.   For the outline star, Clare used Art Glitter 211 Glacier, to coordinate with the silver elements in Art Glitter's Blue Gala Glitz.  She loves this combo!


For the largest star, Clare wanted a transparent glitter that would sparkle on both sides of the Transparency sheet, so she used Scor-Tape and cut it with the Cricut.  Be sure to tape this to your mat, as the "wax paper like" backing will slip on the mat!  She peeled off one side of the Scor-Tape and applied it to the Transparency sheet, peeled off the second side and applied the glitter.  The two largest stars are taped to the inside of the card.  She used sticky tape for the outline star.
Using Staz On black ink, Clare stamped the sentiment, "Every single day do something that makes your Heart Sing" using Penny Black's eloquence stamp set.  Placing it on the front layer of the card, so that it fell over the largest star on the inside of the card.  What fabulous sentiments this set has!
To apply the blue card stock to the transparency sheet, Clare used sticky tape.  The stickers are Thickers.

 Order from Art Glitter the entire month of July in the amount of $25 or over, use the code PB20, and you will receive 20% off your order total! And remember, Art Glitter is MADE IN THE USA!!! Find Clare and more of her work at Cricutcraftyclare.blogspot.com. 


Wednesday, July 10, 2013

HappyBirthday!

This month the Glitter Girls are doing a cross promotion using Penny Black Stamps. I was thrilled because these are two of my favorite companies.


For my card today I am using Penny Black's Scintilla (4316K) and
"T" is for Transparent - Cupcakes(30-171)
From Art Glitter I used:
I also used Dries Clear Adhesive which I thinned down with a little water and applied with
a paint brush

I started my card by stamping the image and coloring with Copic markers. I then used one of the cupcakes for the clear set to randomly stamp in the background. I then added my art glitter Crystal on the image and Ruby Red and Bavarian Forrest for the strawberries in the background.
Penny Black stamps are  perfect for using Art Glitter and I hope you'll try you hand with some of these fun images.
Order from Art Glitter the entire month of July in the amount of $25 or over, use the code PB20, and you will receive 20% off your order total! And remember, Art Glitter is MADE IN THE USA!!!


Monday, July 8, 2013

A Card for Every Occasion


There are times when you are in a pinch and need a quick card for something and then there are times when you have nothing to do, but create. Use your creative time to make this quick and easy cards that will wow everyone. This month, Art Glitter and Penny Black have teamed up together to bring more sparkling stamped fun to your creativity. 

Supplies Needed:

From Art Glitter:
Fresh Green Ultrafine Glitter
Lemone Ultrafine Glitter
Garnet Ultrafine Glitter
Jet Eye Chunky Opaque Hologram
Black Wing Microfine Glitter
Diamond Dust Vintage Glass Glitter
Spoon Man!  Spoons    http://www.artglitter.com/retail/rtools.htm 
 
From Penny Black:

Also Needed:
4- 8 1/2" x 11" pieces of white cardstock
A fine paint brush
A 1/4" paint brush
Tear Edger (optional)
Acrylic Stamp Block
Ruler

Begin by cutting the cardstock in half to create 8 cards that measure 5 1/2" wide x 4 1/4" tall. Carefully tear approximately 1/4" off the bottom front using a tear edger tool or just by roughly tearing being careful not to tear up the card front.

Stamp the designs from the Wishes stamp set by Penny Black onto the front.

Now the fun begins. Time to decorate! Use these simple ideas to add sparkle to any card.


Flood the centers in small puddles with of some with Designer Dries Clear Glue and sprinkle glitter or Black Wing Microfine Glitter over the puddle.


Using a small paint brush spread some Designer Dries Clear Glue into the petal areas and sprinkle with glitter. In this picture, you can also see how great the Black Wing Microfine Glitter looks after sprinkling it on over a puddle of glue. Be sure not to forget the stems! Run a line of glue down them using the metal tip and then sprinkle with glitter. Outline the edges such as the dots on this stamped image and add some glitter to bring out the image more.

Add special interest to the torn edges by placing a line of glitter along the back edge. Simply use a ruler inside the card to give you a straight edge, spread some glue using a medium width paint brush along the edge (I suggest doing one half at a time so the glue doesn't dry before it is glittered) and then sprinkle the glitter over the glue. Repeat this step for the second half of the edge. Use the metal tip to run a line or more than one along the bottom edge as shown in the right hand picture and add glitter over them.


Here are some close ups of some of my favorites to show you how great the details of these stamps are with glitter added.


This is using the Diamond Dust Vintage Glass Glitter on it. 


These Baby Love Glass Beads are perfect for these small flowers.


The shine of the Crystal Glitter combined with the Lemone Glitter make this stamped image pop.


Now it's your turn! Start stamping and glittering so that you have a card for that next unexpected occasion. You can't go wrong when it comes to Art Glitter and Penny Black Stamps. They'll be sure to put a "wow!" in any occasion.
Order from Art Glitter the entire month of July in the amount of $25 or over, use the code PB20, and you will receive 20% off your order total! And remember, Art Glitter is MADE IN THE USA!!!

Saturday, July 6, 2013

Doppelganger Tags

 
Doppelganger means "to look alike"  Lynette thinks if she was a "cartoon" she'd want to be these darling Penny Black cling stamps! (especially if she was sketched with the skinny waist, super cute shoes, and a convertible Bel Air, lol.) The inspiration came to her when she saw the "faux fur" collar on the stamp. SoCal professional photographer, Heidi Jones of www.heidijonesphotography.com did a shoot of Lynette a couple years ago for a scrapbooking publication in the exact same outfit and she even her hair swept up! So Lynette went on a quest to find other kinds of photographs to match each of the Penny Black designs.  


Here are the supplies Lynette used in making her fun Doppelganger Tags: 


Lynette likes the comfort of and uniform look of Kraft paper as the background on each shipping tag. 
She used distress ink with a touch of watercolor to softly grunge the paper in a feminine manner. Then glued the kraft cardstock to the shipping tag and adhered a white sticker to reinforce the hole punch. 

Next Lynette put each of the Penny Black clings on an acrylic block and stamped Barbara Trombley's Art Glitter permanent black stamp ink pad on to white card stock. The images started really looking quite cute when she added shading and undertones. 
The fun part was taking Sakura of America's Quickie Glue pen and filling in the "accessories" like shoes, earrings, the collar, and more. Look below how easy it is to make the tiniest dots and sprinkle with the microfine Art Glitter.  


After the images were colored in, Lynette chose Graphic 45's Birdsong Collection and made a 2 inch horizontal strip across the center of the tag. Next she cut "doily" like frames for each tag, used Art Glitter Designer Adhesive all over each circle frame. Tag #1 used Lime Green and Rain forest 
Tag #2 used 512 Bahaman Blue and Tag #3 used #65 Old Gold and #509 Wood Nymph. Tag #2 

Here is Lynette's popular technique ~ handwriting her titles! Each Doppelganger Tag has a cute adjective saying, "FIERCE" "CHIC" and "VOGUE" then using the Sakura Quikie Glue Pen over her lettering she glittered classic #79 Ultrafine Opaque Black.  


Lynette took her Excel Hobby Blade and carefully trimmed to get super close to the stamped image without losing the black outline.   


Order from Art Glitter the entire month of July in the amount of $25 or over, use the code PB20, and you will receive 20% off your order total! And remember, Art Glitter is MADE IN THE USA!!!


Thursday, July 4, 2013

Glitter and Stamped Gift Bag


Supplies:
Art Glitter Ultra Fine Transparent # 85 Crystal
Art Glitter Ultra Fine Opaque # 12 Lush Pink
Art Glitter Ultrafine Opaque Hologram # 131 Black Hole
Art Glitter Ultra Fine Transparent #312 Fresh Green
Art Glitter Ultra Fine Opaque # 23 Periwinkle
Art Glitter Ultra Fine Transparent #305 Goldenrod
Art Glitter Designer Dries Clear Adhesive
Art Glitter Ultrafine Metal Tip
Art Glitter Fantasy Film Sheer Opal
Art Glitter Transparency Black Ink Pad
Penny Black Slapstick/Cling Rubber Stamps  40-188 Guess hoo
Gift Bag
Tissue paper
Bakers twine
Sequins


I had a great time working with Penny Black Stamps. This was the first time I have used her stamps. I found them very easy to peel and stick. They soaked up the right amount of ink and worked fabulous on patterned paper.

 
I began buy cutting out my patterned paper to fit the gift bag.
 
Then I glittered all around the edges of the cut patterned paper with Art Glitter Ultra Fine
Opaque and Transparent glitters in Goldenrod, Lush Pink, Periwinkle and Fresh Green.
Next I proceeded to stamp and decorate my images.
Finally I added a bit of twine and sequins as eyes on the little owls and added the tissue paper and the Fantasy Film to give the gift bag a little shine.

 
Be sure to check the Art Glitter Blog all month long for great creations from the other
Glitter Girls using Penny Black stamps.  Order from Art Glitter the entire month of July in the amount of $25 or over, use the code PB20, and you will receive 20% off your order total! And remember, Art Glitter is MADE IN THE USA!!!


Tuesday, July 2, 2013

Belated But Not Forgotten


Ingredients

Directions
Step One
Heather started out with an ivory card stock base.  She cut out the pieces of Authentique Pride papers for her card.  She used Ranger's Vintage photo distress ink to stamp the Penny Black Dahlia leaves onto the Authentique paper, and the "Better Early" sentiment onto ivory card stock paper.  Baker's Twine was wrapped around the sentiment, and a vintage button with Baker's twine bow was added to the top using Art Glitter Designer Dries Clear Glue.  She used scissors to distress the edges of her pieces then inked them with Ranger's Vintage photo.  She used pop dots to elevate the sentiment on one of the Authentique stickers.   She used a Martha Stewart lace punch to punch some of the Authentique paper.


Step Two
Heather cut out the leaves, then used the Ultra Fine Tip and Designer's Dry Clear glue to outline the leaves.


Step Three
Heather applied #337 Challis glitter to the leaves.


Step Four
She removed excess glitter and placed it back in it's container.


Step Five
Heather arranged the Authentique Pride papers and stickers on her card base.  She used dimensional dots to elevate some of the leaves, sentiment and Lady Liberty image.  Penny Black leaves were arranged on the card.  All layers were placed on the card base using the Sticky tape.


Step 6
Next she used the Ultra Fine tip applicator and applied the Dries Clear Designer Glue to the Authentique Paper.  Please refer to photo below for placement.


Step 7
 Midnight #23  Glitter was applied to the stripes of the punched pieces and Other areas of the Authentique paper.  Please refer to photo below for placement.


Step 8
 Heather added Designer Dries clear glue in the same manner to the edges of the Authentique Sticker.  Please refer to photo below for placement.

Step 9
Areas of the "Lady Liberty" image and Sentiment were outlined with Designer Dries Clear Glue and both Red Oak and Challis glitters were applied.  Please refer to photo below for placement.


Step 10
#107 Red Oak glitter was applied to the sticker.  Please refer to photo below for placement of glitter.  She outlined the "Better Early" Penny Black sentiment, and the "July 4th" stickers with Designer Dries Clear glue.  #337 Challis glitter was applied.


Step 11
Designer Dries clear Glue applied to Authentique Sticker.

Step 12
 Midnight Glitter was applied to sticker, and excess glitter was removed.

 Step 13
Heather used the Ultra Fine Tip to apply decorative strokes with the Designer Dries Clear Glue to the top area of card.  Please refer to photo below.

Step 14
She did the same to the bottom area of card.  Please refer to photo below.

Step 15
Red Oak Glitter was then applied to these areas.  The card is now finished.
  
Heather's application of the gorgeous Art Glitters, really makes the Penny Black leaves stamps, sentiment and Authentique papers stand out!


Thank you for stopping by and hope you enjoyed Heather's Tutorial  using Art Glitter, Penny Black Stamps and Authentique Papers!
Order from Art Glitter the entire month of July in the amount of $25 or over, use the code PB20, and you will receive 20% off your order total! And remember, Art Glitter is MADE IN THE USA!!!
Feel free to stop by and see Heather's other projects using Art Glitter on her blog.