Saturday, November 9, 2013

Hugs and Kisses Card

Make sure and check out the Tombow Blog for the details on how to win!  Check back every other day this week with us, here on the Art  Glitter blog for, new projects all month long using Tombow and Art Glitter together!
 
 
This  month the Art Glitter designers are working with Tombow.
I love the true color of these markers they were very easy to work with.


Supplies:
 
Cardstock
pattern paper
twine
bling
 
 
I stamped my image onto cardstock and used the Tombow brush pens to color the heart.
then I added a bit of glitter in the middle for some bling. I also outlined my pattern paper
before I adhered it to the card.
 
 
Be sure to check out all the other designers this month. Also if you purchase $25.00 in product
 use  the TB20 code and you can save 20%.

My Blog: zippity-do-dah-tabitha.blogspot.com


Thursday, November 7, 2013

Just a Note


Ingredients


Make sure and check out the Tombow Blog for the details on how to win!  Check back every other day this week with us, here on the Art  Glitter blog for, new projects all month long using Tombow and Art Glitter together!


To celebrate, Art Glitter is having a 20% off retail sale of any $25 purchase.  Just use code TB20 at Check out!


Directions
Step 1
Heather started out by creating a card base out of white card stock.  She then cut a piece of white card stock 1/2 inch smaller around.  She used a scallop heart spellbinders die and cut out two hearts.  She also embossed her smaller piece of cardstock and hearts with a polka dot embossing folder.  She colored the smaller heart with #725.  She tied the fushia ribbon around her card piece and held it in place with the Art Glitter Sticky tape.
  Step 2
Heather used a Martha Stewart Lace punch with a scrap of white cardstock.  She colored it with #606.
 Step 3
Using the Designer dries clear glue, Heather attached the punched pieces to the back of her card piece.  The glue works great to hold the punched piece to the embossed card piece!
Step 4
Next Heather used some Foam Tabs from Tombow to elevate her heart die cut!
Step 5
Heather used the Ultra Fine Tip Applicator and Designer Dries Clear glue to add some dots of glue to the embossed piece.  Please refer to photo below.
Step 6
Next Heather added the Fandango Hexis...she thinks they are SUPER FUN!!  What a great way to Brighten up your cards!  She then applied more of the Designer Dries clear glue to the heart.  Important to use the dries clear, because she used Fairy Dust glitter on the heart.
Step 7
Next Heather used the Tombow #195 marker to draw some leaves.  She cut them out and added a Tombow Foam tab to the back of each one.
Step 8
Heather added the leaves to her card, then used the Ultra Fine Tip and Designer Dries clear glue to outline and create a vein on the leaves.  Heather used #94 Key Lime glitter on the leaves.
Step 9
Heather used Tombow #025 to color her newsprint candee, and then added it to her heart shape (please refer to photo below).  She loves the added "pop" of color!
Step 9
Heather used another scrap piece of white cardstock, and cut the edges to resemble the edge of a ribbon.  She inked it and used the Tombow #555 marker to hand write "hello."
Once last look at Heather's Finished Card
Heather loves the Bright Crisp colors of the Tombow Markers!!  So cheerful!
Thank you for stopping by and hope you enjoyed Heather's Tutorial using
Art Glitter and the fabulous
 "Tombow Products!"


Ultra fine Metal Tip to apply glue to her tag on the left and added both #56 Pumpkin and #188 Black Vinyl glitters. Heather's tag to the right used  #91 Orange Crush and #188 Black Vinyl glitters.  She love LOVES the TOMBOW FOAM TABS!
Christmas Mitten Ornament
Heather used the TOMBOW Foam tabs to elevate her focal image.  She used #160 Rose Gold glitter on the edges of her mitten, #324 Country Red was used on the candy canes, red ribbon, tree ornaments, holly berries and red scallops. 
Heather outlined the tree with #295 Ensalada and  #300 Camel glitter was used for the tree trunk. The star and the tag on the front of Heather's mitten were outlined using  #196 Lion's Mane glitter!
Feel free to stop by and see Heather's other projects using Art Glitter on her blog.
heatherahudson.blogspot.com

Tuesday, November 5, 2013

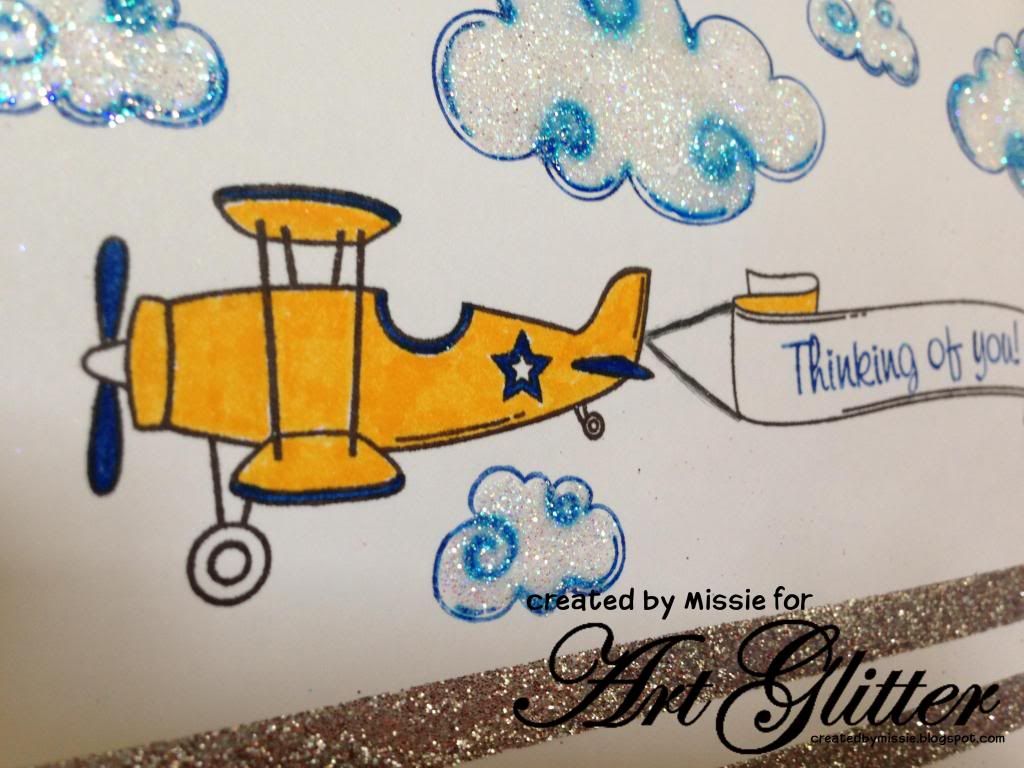
Thinking of you with Art Glitter

Make sure and check out the Tombow Blog for the details on how to win!  Check back every other day this week with us, here on the Art  Glitter blog for, new projects all month long using Tombow and Art Glitter together!  Also use the code at www.artglitter.com of TB20 for 20% off of your glitter order of $25 or more!

 
Supplies:
 
Art Glitter dries clear adhesive
Assorted Cardstock
Stamps- Lifting Spirits
Double sided adhesive
 
 
Gather your supplies and begin by stamping on white cardstock using the markers to "ink" the stamps.


Using the markers color in the plane and accent the banner with yellow.  Use double sided adhesive to add glittered stripes to the bottom of the card front, then using Art glitter dries clear adhesive and crystal glitter, add glitter to the clouds.


Add the card front to a layered 5*7 card base to complete the card.  This example used a grey base to coordinate with the Platinum glitter stripes, and a yellow layer to coordinate with the airplane.


Thanks for stopping by to see my creations.
Missie Todd
createdbymissie.blogspot.com


Sunday, November 3, 2013

Art Glitter and Tombow! Winning Combination

 
Make sure and check out the Tombow Blog for the details on how to win!  Check back every other day this week with us, here on the Art  Glitter blog for, new projects all month long using Tombow and Art Glitter together!
 This pear was made with Tombow Markers and Art Glitter for our collaboration.  It was very simple.
SUPPLIES:
Tombow Dual Brush Markers 025, 026, 055, 062, 098, 173, 177 and 977
Art Glitter Designer Dries Clear
Art Glitter Ultrafine Transparent 85 Crystal
Dreamweaver Stencil Pear LL563
Dreamweaver Stencil Tool
White Card Stock
Graphic 45 French Country Paper
Card Stock in Ivory and Yellow
Adhesive

DIRECTIONS (so, so simple)
1)  Use the Dreamweaver Stencil Tool to emboss the pear image on the white card stock.
2)  Flip the card stock over, so that the pear image is indented into the card stock.
3)  Use the Tombow Markers to color the image.  They blend well because they are water based.
4)  Cover the image with Designer Dries Clear.  It should be easy to do this because the image is indented. (The Tombow team would use Tombow Multi Glue)
5)  Pour the Crystal Glitter over the top and let dry.
6)  Assemble the card.

You can see the beautiful marker colors through the glitter.  It looks sugar coated, which is great for this time of year!  If you want to give it a try, the Art Glitter site is giving you 20% off an order of $25 or more this month.  Just use the code TB20.

Until next time, glitter on!

Friday, November 1, 2013

Tombow & Northwoods & Glitter OH MY

A Little Sparkle Page 

Supply List

K & Company  Patterned Paper
Cricut Disney Tinker Bell Cartridge (fairy and title)
Small Water Color Brush
Karen Foster Sparkle Burst Brads
Want2Scrap Red bling
Red Card Stock
White Card Stock
Cricut CTMH Artist Cartridge (ornament)
Fiskars paper crimper (top of ornament)
Microtip black marker
Gold Card Stock

For this project, Clare wanted to try using the Tombow marker to color Tinkerbell.  Clare loves how vibrant these markers can be and that they can also be as soft as a water color paint!  If you have every tried to cut a Tinkerbell and all of her little parts (eyes, fillagree wings, lips, etc) you may understand that Clare find cutting these tiny pieces, lifting them from the mat and gluing them too frustrating!  So she loaded the Chomas creations pen holder in her Cricut and drew the detail Tinkerbell to use as a coloring guide.  She replaced the pen holder with the blade and cut a separate Tinkerbell black out in white card stock.  She placed the pen drawn Tinker bell behind the blackout Tinkerbell on a light box and colored it with the Tombow markers.  

For the skin color, Clare blended Tombow 933, 743, 055.  For the Wings, Tink's Eyes and the large Christmas ornament, Clare used Tombow 452.  Clare is so excited to play with these markers again, because of all the water color posibilities with the control of a marker!  To keep the water content low, Clare sprayed as she worked onto a scrap piece of clear plastic and added more water as needed.  You can find lots of videos on using these markers on Youtube.  Just search for Tombow marker tutorials.  
Clare also used the Chomas pen holder for the title outline and then colored it in with Tombow 452.  She then applied Art Glitter Blue Angel to the title and Tinkerbell's wings using the Ultrafine tip.  She added a few rhinestones and a Sparkle burst brad and a Christmas Card Photo.  The top of the ornament was crimped with Fiskars paper crimper to look like a real ornament in gold card stock.  

Joy Card


Supply List
White Card Stock
Red Card Stock
K & Company patterned paper
K & Company Rub on
Martha Stewart Snowflake Border Punch
Teal Marker
Red Swiss Dot Card Stock
Red Ink
To create this card, Clare stamped and cut a Christmas tree using Northwoods Berry and Leaves Tree Stamp.  Clare applied Art Glitter dries clear glue using the Ultrafine tip to the ribbon only on the tree stamp.  She added Art Glitter 332 Red Rocket  Chunky Opaque Hologram Glitter and allowed it to dry.  She then matted it on red card stock and cut around it.  She cut a white mat and faux stitched it with a teal marker.  She matted that on some red Swiss dot card stock.  She punched the Martha Stewart snowflake border along the edge of the white card stock and adhered  the border to the back of the K & Company patterned paper.  She used a K and Company Rub on for the Joy to the World Sentiment.  She then assembled all the mats and borders.  
Christmas Tree Star Page


Supply List
October Afternoon Good Cheer:  Falling Snow Paper
Cream Card Stock
Red Card Stock
Red Ink
Forever in Time Gem Swirls

Silhouette America Merry Christmas Title
Clare loves to stretch her stamps to make multiple images with one stamp.  For this project she used the tree stamp to create a star.  To create the star, she stamped and cut 12 Christmas trees using Northwoods Berry and Leaves Tree Stamp.  Clare cut out all 12 trees.  Using Art Glitter Ultra fine tip and Designer dries clear glue; Clare applied glue to the ribbon only on all 12 trees.  She added Art Glitter 332 Red Rocket  Chunky Opaque Hologram Glitter.  She allowed the glue to dry and using 6 trees placed them in a circle to form a snow flake, matching ribbon ends.  She adhered the trees to red card stock and cut around snowflake to form a red mat.  
Using the next six trees overlapping ribbons, she created a smaller snowflake on red card stock.  She adhered the trees and cut out the smaller snowflake.  She adhered the larger snowflake to page, and adhered smaller snowflake inside larger snowflake, alternating tree points.  Clare cut her photo in circle and placed in center of the snowflake, fussy cutting the baby’s hand and feet because they were just so sweet she could not crop them out! 
Clare created the title using a Silhouette file and the Cameo to print and cut the title.   She added the Red Rocket to the title using the Ultra fine tip as well.  She added bling in the lower right hand corner.


If you would like to see more of Clare's work you can find her blog at www.cricutcraftyclare.blogspot.com


Monday, October 28, 2013

Wheeeeeeee

 
Winter Fun
 
 Even the woodland creatures like to have fun in the snow and these cute little tobogganing squirrels are no exception.  This wonderful stamps from Northwoods Rubber Stamps makes an awesome card for the holiday season.  This month, the Art Glitter design team has teamed up with Northwoods Rubber Stamps to bring some sparkle to your holiday season.

Add even more sparkle this month by using the PROMO CODE:  NW15 for 15% off the retail prices when making a $25 or more purchase. 

Supplies Needed:

     From Art Glitter: http://www.artglitter.com/%3Cbr /> Glitter:http://www.artglitter.com/retail/Rartglitter.html
     Lime Rind Ultrafine Opaque Glitter
     Varsity Blue Ultrafine Pearlescent
     Garnet Ultrafine Opaque Glitter
     White Satin Ultrafine Pearlescent Glitter
     Designer Dries Clear Glue:http://www.artglitter.com/retail/Radhesives.htm
     Spoon Man! Spoons:http://www.artglitter.com/retail/rtools.htm
     Metal Tip:http://www.artglitter.com/retail/rtools.htm

     From Northwoods Rubber Stamps:
       Nora's Tobogganing Squirrels:  http://www.northwoodsrubberstampsstore.com/p9248.html%3Cbr />
Also Needed:  Ink for stamping, card stock to make card base, white card stock, 1 sheet of patterned paper for layering onto card base, markers, dark blue/grey ink pad for inking sky line and a piece of ribbon

Begin by creating the card base and trimming a piece of patterned paper to fit onto the base.  Add the ribbon across the card.  Lay all of this aside.

Stamp the image onto the white card stock and color.  Trim it to fit the card.  Use the blue/grey ink pad upside down and beginning off the paper move in small circles gradually moving it onto the paper and into the areas needed to be shaded. 
 
 
Place the metal tip onto the bottle of Designer Dries Clear Glue and place small balls of glue onto the tassels of the squirrels hats.  Sprinkle each with glitter and allow it to sit for just a minute to get a good adherence.  Shake off the excess.  You can do this one at a time and put the colors back into their original containers or do them all at once and shake the excess into a separate container to have a glitter mix for other projects.  It's a fun way to create a mixture of colors.  

 Now, add small dots of glue onto the dotted areas of the stamped image.  Work in small sections and add the glitter to them while the glue is still wet.  Continue to cover all of them with glue and glitter.  Allow it to set and shake off the excess. 

 Still using the glue with the tip on it, add some glue to the ends of the branches and trace the lines under the toboggan.  Sprinkle glitter onto those areas and shake off the excess. 

Allow the image to dry and adhere it to the card base. 

Join these fun loving squirrels and have some sparkling fun this season.  Share the fun with someone in your thoughts and send one to him or her, too.  Everyone needs to have a little fun once in a while.


To see more of Peg's work join her on her blog at http://www.pegscraftingcorner.blogspot.com/