Showing posts with label greeting card. Show all posts

Tuesday, July 2, 2013

Belated But Not Forgotten


Ingredients

Directions
Step One
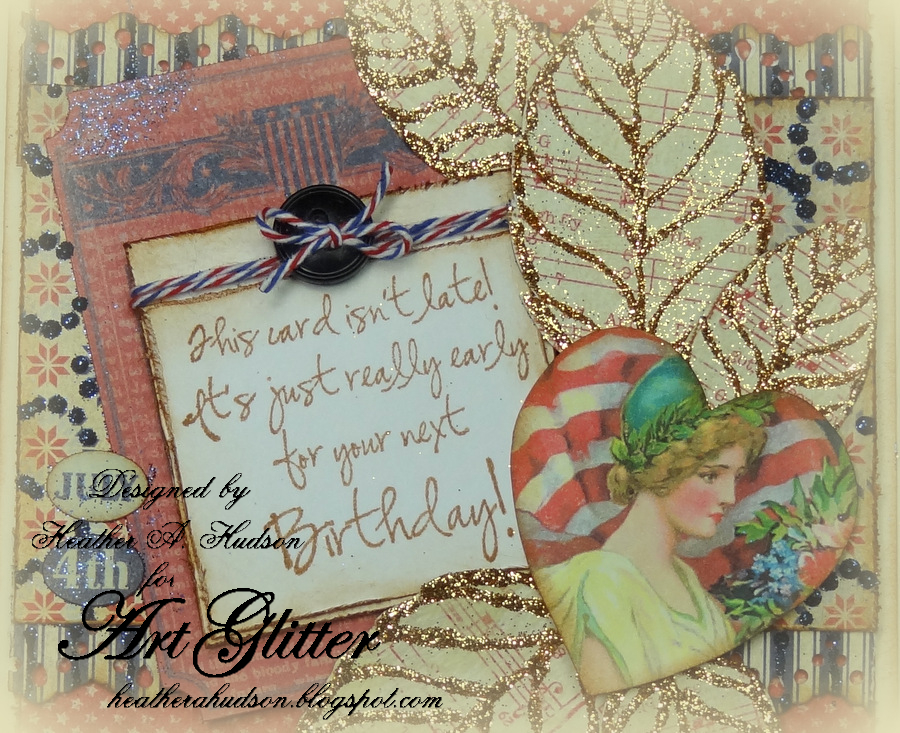
Heather started out with an ivory card stock base.  She cut out the pieces of Authentique Pride papers for her card.  She used Ranger's Vintage photo distress ink to stamp the Penny Black Dahlia leaves onto the Authentique paper, and the "Better Early" sentiment onto ivory card stock paper.  Baker's Twine was wrapped around the sentiment, and a vintage button with Baker's twine bow was added to the top using Art Glitter Designer Dries Clear Glue.  She used scissors to distress the edges of her pieces then inked them with Ranger's Vintage photo.  She used pop dots to elevate the sentiment on one of the Authentique stickers.   She used a Martha Stewart lace punch to punch some of the Authentique paper.


Step Two
Heather cut out the leaves, then used the Ultra Fine Tip and Designer's Dry Clear glue to outline the leaves.


Step Three
Heather applied #337 Challis glitter to the leaves.


Step Four
She removed excess glitter and placed it back in it's container.


Step Five
Heather arranged the Authentique Pride papers and stickers on her card base.  She used dimensional dots to elevate some of the leaves, sentiment and Lady Liberty image.  Penny Black leaves were arranged on the card.  All layers were placed on the card base using the Sticky tape.


Step 6
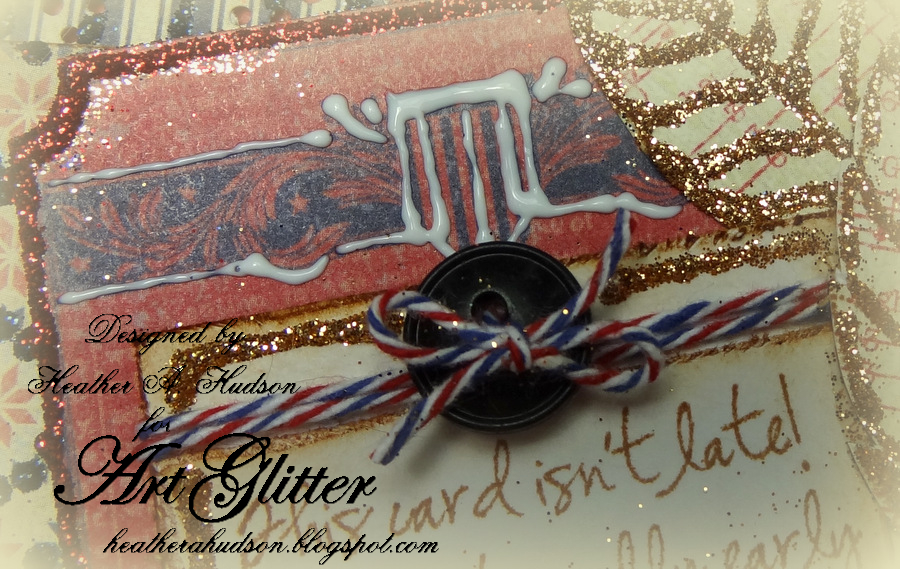
Next she used the Ultra Fine tip applicator and applied the Dries Clear Designer Glue to the Authentique Paper.  Please refer to photo below for placement.


Step 7
 Midnight #23  Glitter was applied to the stripes of the punched pieces and Other areas of the Authentique paper.  Please refer to photo below for placement.

Step 8
 Heather added Designer Dries clear glue in the same manner to the edges of the Authentique Sticker.  Please refer to photo below for placement.

Step 9
Areas of the "Lady Liberty" image and Sentiment were outlined with Designer Dries Clear Glue and both Red Oak and Challis glitters were applied.  Please refer to photo below for placement.


Step 10
#107 Red Oak glitter was applied to the sticker.  Please refer to photo below for placement of glitter.  She outlined the "Better Early" Penny Black sentiment, and the "July 4th" stickers with Designer Dries Clear glue.  #337 Challis glitter was applied.


Step 11
Designer Dries clear Glue applied to Authentique Sticker.
Step 12
 Midnight Glitter was applied to sticker, and excess glitter was removed.

 Step 13
Heather used the Ultra Fine Tip to apply decorative strokes with the Designer Dries Clear Glue to the top area of card.  Please refer to photo below.

Step 14
She did the same to the bottom area of card.  Please refer to photo below.

Step 15
Red Oak Glitter was then applied to these areas.  The card is now finished.
  
Heather's application of the gorgeous Art Glitters, really makes the Penny Black leaves stamps, sentiment and Authentique papers stand out!


Thank you for stopping by and hope you enjoyed Heather's Tutorial  using Art Glitter, Penny Black Stamps and Authentique Papers!
Order from Art Glitter the entire month of July in the amount of $25 or over, use the code PB20, and you will receive 20% off your order total! And remember, Art Glitter is MADE IN THE USA!!!
Feel free to stop by and see Heather's other projects using Art Glitter on her blog.


Friday, June 28, 2013

Old Glory

The month of June Art Glitter is partnering with Authentique Papers. The papers are so pretty and the addition of Art Glitter Makes them POP! Use the code AQ20 on your order at www.artglitter.com to save 20% on your order of $25 or more! Happy Shopping and hope you enjoy the month of Art Glitter with Authentique!

This time, we have created with the gorgeous Freedom Collection.  I made two creations.  The first is a card.  


MATERIALS:
Art Glitter Microfine Pearlescent 533 Mini Pearl
Authentique Pride Collection Papers
Authentique Pride Collection Sticker Sheet
White Card Stock
Dreamweaver Stencil LL 359 Flag
Dreamweaver Double Sided Mounting Paper
Dreamweaver Handmade Hawaiian Coconut Soap
Dreamweaver Large Stencil Brush
Pencil
Craft Knife
Adhesive

DIRECTIONS:
1)  Center the flag on top of the Double Sided Adhesive Paper, being sure to leave a border around the stencil, and trace the blue area with a pencil.

 2)  Very gently use the craft knife to cut through the protective layer of paper around the tracing and remove.
3)  Rub the bar of soap across the back of the stencil to create a light, cloudy, layer.
4)  Use the stencil brush to remove any of the soap "crumblies" that cling to the edges of the openings on the stencil.
5)  Place the stencil, soap side down, so that the stars are on the opening in the paper.
6)  Pour a little Art Glitter 533 Mini Pearl over the stars and rub in with your finger.  This is the perfect glitter for this because the small grind allows it to get into all of the detail, and the pearlescent effect makes the stars more opaque.
7)  Brush off excess glitter with the stencil brush.
8)  Carefully remove the stencil.
9)  Remove the remaining paper from the adhesive and place the stencil, soap side down, so that the blue square surrounds the stars.
10)  Pour a little Gold Tone onto the pole and the edges and rub in with your finger.
11)  Pour the Ruby Red onto the stripes and carefully rub in with your finger.  Avoid the square.
12)  Pour a little Terra Nova into the square, right over the stars, and rub in with your finger.
13)  Brush off any excess glitter with your stencil brush.
14)  Place the whole thing face down on a flat surface and carefully remove the adhesive paper from the stencil.  Make sure the stencil stays flat on the surface the entire time.
 15)  Brush off the excess with your stencil brush.
16)  Assemble the card.

Now for the bonus project!  A cute, little patriotic birdhouse.


MATERIALS:
Art Glitter Vintage Glass Glitter 611 Antique Silver
Authentique Pride Collection Papers
Authentique Pride Freedom Collection Sticker Sheet
Authentique Pride Collection Alphabet Sticker Sheet
Authentique Pride Freedom Collection Word Sticker Sheet
Small Birdhouse
Blue Acrylic Paint
Cotton Swab or Paintbrush
Ruler
Big Bite
Craft Knife

I won't go through an entire tutorial on this one.  Suffice to say, first you paint the edges.  I used a cotton swab, but you can use a paintbrush.  Then, you measure and cut the panels from your choice of paper.  I pressed the front onto the birdhouse to determine where the perch was, and then used the Big Bite to punch the hole there.  
When you adhere your papers, don't forget to use a little Designer Dries Clear.
Finally, you add the stickers and beautiful glitter.  I chose the colors I did because they had a vintage feel.  When applying the stripes and edges, I used the Sticky Tape so that I did not have to worry about the edges being crooked.  I simply peeled off one side, adhered it to the house, and then peeled the other side and poured the glitter on.
Here is a quick peek at the back of the house.
Thanks for stopping by today.  Come visit my blog some time at www.rememberinglifesmoments.blogspot.com.  
Until next time, glitter on!


Remember, for the entire month of June any order you place at http://artglitter.com/ of $25 or more you can use the coupon code of AQ20 for a 20% discount! You can also be entered in a prize drawing at the end of the month by commenting on this blog all month long! One comment per person per post! Also, every Wednesday for the month of June Authentique Paper will be featuring Art Glitter on there blog with a prize package offered also.  Check them out at http://blog.authentiquepaper.com/

Monday, June 24, 2013

Celebrate With Authentique and Art Glitter

 
For the month of June, Art Glitter is partnering with Authentique Papers to bring you some great new creations. The papers are so pretty and the addition of Art Glitter is sure to make them POP! Use the code : AQ20 on your order at www.artglitter.com to save on your order of $25.00 or more, Happy Shopping and hope you enjoy the month of Art Glitter and Authentique.
Supplies used from Art Glitter
Micro fine Opaque Glitter
#300 Ruby Red
#27 Navy
#508 Silver Moon
Ultrafine Transparent Glitter
#85 Crystal
Small Sticky Paper

My card today uses the "Pride" collection of papers from Authentique
The card is a pocket card that has openings for and a tag and anything else you might want to give. I made the card by first cutting a cat that when folded is 4 1/2 X 6 1/4
then I cut a second card the same size using an different pattern. I folded the front of the card in and the inside of the card back to form the pockets which the used adhesive to adhere to the card. I added the silver glittered stars to the front pocket.
The tag was done using the star stencil from Dreamweaver stencils and the double glitter technique . I used Ruby red for the stars and Navy for the flourishes and for the background I used Crystal glitter. Here is the finished project.
                        I hope everyone has a glittering and sparkling  4th of July!
To see more ideas for cards using Art Glitter go to my blog


Remember, for the entire month of June any order you place at http://artglitter.com/ of $25 or more you can use the coupon code of AQ20 for a 20% discount! You can also be entered in a prize drawing at the end of the month by commenting on this blog all month long! One comment per person per post! Also, every Wednesday for the month of June Authentique Paper will be featuring Art Glitter on there blog with a prize package offered also.  Check them out at http://blog.authentiquepaper.com/

Tuesday, May 21, 2013

Butterflies and Blossoms Greeting Card

 
Supply List:
      Razzle Dazzle Basic Kit by Art Glitter: Flamingo Pink, Cheeky Pink and Astro Turf and Designer Dries Clear Adhesive (DDCA)
      Spoon Man!  Spoons
      Paint Brush
      Dry Adhesive (a tape runner)
     12" x 6" brown card stock folded in half to create a 6" x 6" card
     5 1/2" x 5 1/2" vintage flower patterned paper (Madeline by Prima)
     4 1/2" x 4 1/2" brown card stock for mat
     4" x 4" white card stock
     Tea Dye Distress Ink Pad
      Ink Tool
     4 roses or flowers (Prima)
     Butterfly Punch (Martha Stewart)
     Chipboard Scroll (Tim Holtz)
 
Instructions:
     Prepare the card base by adhering the patterned paper and the brown mat paper to the card base using a dry adhesive such as a tape runner. 
 
     Ink the edges of the white card stock using the distress ink pad and ink tool.  Adhere it to the card base.  Punch 2 butterflies from the white card stock and lay them aside.
 
      Using the paint brush add the DDCA to small sections of the chipboard scroll and sprinkle the Astro Turf Glitter over the glue.  Let sit several seconds to allow to adhere and then shake off the excess.  Continue to work in small sections until the entire scroll is covered and allow to sit and dry completely.  If there are areas that need a little touch up use the edge of the paint brush to dab a little glue into the area and add more glitter.  


Add a line of DDCA down the center of the butterfly and sprinkle some of the Black Wing Microfine Opaque Glitter using one of the Spoon Man! spoons.  Tap off excess glitter back into the jar. 

Pour a small amount of the DDCA onto your work surface and using the paint brush spread a small amount of the adhesive on a small area of one of the butterfly wings.  Lightly sprinkle some of the glitter (either the Flamingo Pink or Cheeky Pink) onto the adhesive and allow to sit for just a minute to adhere securely.  Sprinkle off the excess and continue to work until the entire butterfly is completed.  Do the second butterfly in the same manner with the second choice of glitter.  Allow them to completely dry.  If an area is not completely covered carefully add more adhesive and glitter.  It is also okay to allow some areas to show through which will add a little pattern to the butterfly wing.  NOTE:  You will want to spread the adhesive on carefully with the paint brush so not to tear the paper butterfly. 
Add a little of the DDCA to the bottom of each butterfly to adhere them onto the card.  Also, add some to the scroll and add it to the corner.  Place the flowers the corner and on the scroll as shown and your card is now finished.  


Thursday, February 28, 2013

Glittering Mosaics


Linda here with a cute little technique for glittering mosaics. Using scraps of pattern paper I cut 1-inch squares with my paper trimmer. These could be easily punched as well with a 1-inch square punch.


After all the squares were cut I ran them through the Xyron 2.5" Create-a-Sticker to put adhesive on the backside. Then I flipped the Xyron sticker sheet over and ran it through the machine again so the adhesive would be on both sides of the squares.

For this project I used Art Glitter Desert 266 and Goldenrod 305 Ultrafine Transparent glitters. I had several colors out but then opted to use only two contrasting colors. It was easy to put the glitters on the squares by simply pouring a good amount of each glitter into bead trays and using tweezers to dip the squares enough to coat one side.


I then placed them evenly apart on a background piece of paper and cut it down to fit an A2 card front when done. I actually started this as a scrapbook page (above) but it wasn't working for me so I switched over to a greeting card. I matted the mosaic paper and wrapped it with a pretty May Arts ribbon before adhering it to the card.


It still needed an embellishment so I reached for my good ol' corrugated heart stand-by and roughed it up a bit before brushing on some Designer Dries Clear and sprinkled it with some of the same glitters.

 
Sparkle On!
Linda