What an awesome month it is going to be on the Art Glitter blog!! For the month of July, Art Glitter is teaming up with Graphics 45 and Want2Scrap. What fun!!!!
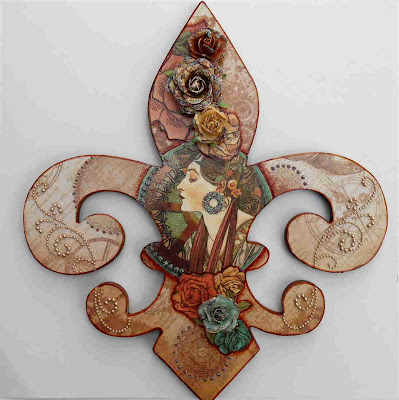
For this project, I've use papers from Graphics 45
Steampunk Debutante Collection, Chipboard Fleur-De-Lis (found at my local box store), Mod Podge,
Swirls Finesse - LeCreme (pearl flourish designs) from Want 2 Scrap, Brown Copic Marker and blender, Designer Dries Clear Adhesive, and Ultrafine Transparent Glitter - #249 - Wood Berry from Art Glitter, and a few Prima Marketing Paper Flowers.
I started by tracing the Fleur-De-Lis onto the 12" x 12" piece of steampunk paper, and carefully cutting it out. I painted the sides and back of the chipboard with brown acrylic paint. I then decoupaged the paper to the chipboard. I cut out the round medallion from another paper in the collection, and a few of the roses from the rose paper in the collection. I placed the medallion where I wanted it and then flipped the chipboard over so that I could mark and trim the excess that stuck out beyond the chipboard. I did the same with the roses so that once glued in place, there would be smooth edges along the line of the chipboard. These pieces were then decoupaged in place with the Mod Podge.
To add a little more depth, and make the designs stand out a little more, I took a brown Copic marker and outlined the rose pieces and the round medallion. Then I took the blending pen and blended the marker out a little. I used the same marker to go around the edge of the whole piece.
The Want 2 Scrap pearl scrolls were place so that they spanned from the "arm" down to the curl at the bottom. Once in place, I snipped off the small section of pearls that was suspended between these two sections.
Finally, it was time for glitter! I used the "sprockets" as a guide and made tiny dots of Designer Dries Clear Adhesive (DDCA) - using the fine point tip, and then coated these in Wood Berry Glitter. I used the fine point tip to add DDCA over the lady's earring and then glittered that. Finally, I drew DDCA along the petals of the paper flowers and then sprinkled these with Wood Berry Glitter. Once the DDCA was dry, I used a soft brush to brush any excess glitter off the flowers and Fleur-De-Lis, and then glued the flowers in place, using DDCA.
 I can't wait to do more with these wonderful products!! Please come check out my blog to see my other projects. http://kc-distractedbyshiny.blogspot.com/
ULTRAFINE 1 OZ JARS STILL ONLY $5.98
I can't wait to do more with these wonderful products!! Please come check out my blog to see my other projects. http://kc-distractedbyshiny.blogspot.com/
ULTRAFINE 1 OZ JARS STILL ONLY $5.98
BY POPULAR DEMAND THROUGH JULY 31 • Reg. $7.32*Get Coupon here... • Wholesalers Details here...
KC


really stunning
ReplyDeleteOh, KC, I love every inch of this project...the colors, the papers, the flowers, the pearls, and the glitter in just the right places. Beautiful work!
ReplyDeletethis is a stunning project, your attention to detail is so inspiring, hugs
ReplyDeleteJust lovely. I love the tones and textures.
ReplyDeleteLovely. I love the tones and the textures.
ReplyDeleteWow KC, very nice! colors are gorgeous.
ReplyDeleteThat looks amazing!
ReplyDelete