Showing posts with label ATC. Show all posts

Thursday, March 28, 2013

Swapping Glittery ATC's


Howdy! Linda here to share my glittered ATC with you.

Linda Neff
linda-neff.com
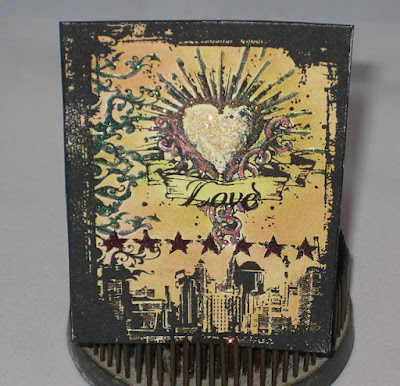
I belong to a very casual stamp club that meets monthly to share ideas and techniques. Our recent demonstrator opted to share varying techniques with us this month for creating ATC's (Artist Trading Cards). We enjoyed the techniques and information so much that we decided to hold an ATC swap at our next meeting in April. This is a sample of my ATC that I might use for the swap.

I started by stamping with Tim Holtz ATC - Urban Tatoo. I don't know what it is about the heart explosion but I just love it! I used a waterproof black ink to stamp my image on heavy-duty white cardstock. Then, using my Designer Dries Clear with Fine Metal Tip I started to outline parts of the stamped image and sprinkled on Art Glitter Cupid #735 Microfine Transparent Glitter. I love the microfine glitters due to their more vintage look rather than lots of sparkle.


When the heart was all glittery I moved on to the other designs. I used a darker pink for the stars from the Monochromatic Pink Mixed Pee Wee Kit.


The curly-cue designs running down the one edge were glittered with Art Glitter Elfin #705 Transparent Microfine Glitter.

 
When I had all the glittering done I added some Crackle Accents to the heart center and sprinkled on a pinch of a pink from the Monochromatic Pink Pee Wee Kit used on the starts. I set it all aside to dry while we fixed and ate dinner (it's nice to have a chore or project to do while waiting for a piece to dry, otherwise I'm usually tempted to rush it along and that's never good)!

When it was dry I simply colored it with a gently coating of Ranger's Distress Inks. One down, 12 more to go!



Thursday, August 16, 2012

Last Post From Trudy...

Hi everyone!
True here.

I am sad to say that this will be my last Art Glitter post.
I truly LOVE being on this team but am finding that the majority of my "crafty" time needs to focus more on my illustrations and stamps.
I want to thank Art Glitter and all of the wonderful girls on the team for the fun, friendship, and support!
For my last post, I wanted to use the stunning #811 Grape Cluster Large Glass Beads.
I took the name seriously and created a grape ATC. :)


 I thought I would show you real quick, just how easy it is to create grapes with these beads.
I simply squiggled a rough shape of grape bunches onto my ATC, then sprinkled on some "grapes".


After allowing a little drying time, I added some more towards the top of the clusters to give them more dimension. Just a note, the Designer Dries Clear Glue is the best adhesive for Art Glitter projects.  Diamond Glaze dries a bit faster when in a hurry!


After that dried, I went back over the clusters with a coat of the glaze to insure they would all stay in place. I tore some green cardstock into tiny "leaves", added some "veins" with a Copic marker then attached them to the grapes with more glaze. Very quick and easy! I hope you will give it a try!


Hugs,