Showing posts with label Laura. Show all posts

Saturday, November 24, 2012

Fall Wreath with Tombow and Art Glitter

Art Glitter is having an exciting cross promotion with Tombow.  I knew as soon as I heard we were going to do something with them that I would be using one of my favorite products, Tombow Dual Brush Pens.  So, here is how I made this wreath:
MATERIALS:
Art Glitter Dries Clear Fabric Adhesive
Art Glitter Ultrafine Opaque 62 Copper Canyon
Art Glitter Ultrafine Transparent 197 Flax
Art Glitter Ultrafine Transparent 295 Ensalada
Art Glitter Ultrafine Transparent 90 Melone
Tombow Dual Brush Pens in various fall colors
Tombow Mono Multi Liquid Glue
Tombow Power Adhesive Tabs
Inkssentials Craft Sheet
Tim Holtz Alterations Tattered Leaves Die
Manual Die Cut Machine (I used Cuttlebug)
1/4 yard Muslin
1/4 yard Brown Duck Cloth
Brown Wrapped Florist Wire
Green Wrapped Florist Wire
18" Grapevine Wreath
Burlap Ribbon
Small Styrofoam or Carvable Pumpkin (I bought mine at the Dollar Store)
Wire Cutters
Mister
Paper Towels
Small Paint Brush (optional)

DIRECTIONS:
1)  Use Die Cut Machine and Tattered Leaves Die to cut leaves from muslin and duck cloth.  There is no magic number, although I had at least 16 of each leaf.  You should judge it based on your own thoughts of how full the wreath should look.  Also, I found that the muslin cut best with 6 layers and the duck cloth with 3.
2)  Use the brush side of the Dual Brush Pens to color in the muslin.  There is no wrong way to color these.  I wanted tons of color, so I used many pens, but an almost monochromatic look is good, too.  I focused on a different set of colors in each type of leaf.  You don't have to do a great job on coloring these, as the next step erases many errors. Just make sure you saturate them. It might be a good thing to let kids help you with!

3)  Set leaves on the craft sheet and mist with water.  Because the colors are water based, they will move and blend.

4)  Remove the leaves from the craft sheet and set on paper towels to dry.  Allow to dry completely.

5)  Cut the wire into pieces about 4" long.
6)  For each leaf, match the colored top of the leaf with a duck cloth bottom leaf.  Remove the top leaf and set aside.
7)  Use Fabric Dries Clear on duck cloth leaf and smear with either your finger or craft brush.  You want to completely cover the upside of the duck cloth leaf with a light coating of glue.  You don't want to make the glue too saturated so that it removes the color.
8)  Set wire on duck cloth leaf about 1" on the leaf and 3" beneath it.
9)  Match up the colored leaf and press down.  Hold for a few moments and set aside to thoroughly dry.
10)  Make a small puddle of fabric glue on the craft sheet. Use your finger or brush to put a light coating of glue on the leaves where you want them to look "frosted" with glitter.  Don't put over the whole leaf, because you want it to be a lovely accent, but still see the coloring.
11)  Glitter the leaves.  I used the Flax for the leaves with yellow, the Melone for the primarily red leaves, and Ensalada for the green leaves.  You do not want to use the opaque glitter for the leaves because it would obliterate the colors underneath.

12)  Cut styrofoam pumpkin in half.  I used a styrofoam knife.
13)  Cover the pumpkin with Tombo Mono Adhesive.  You can use the wide applicator end, your finger or a brush.  Don 't apply glue to the bottom.
14)  Glitter with Copper Canyon (one of my absolute favorite colors).  Because it is opaque, it can cover an ugly color or even an unattractive seam (Dollar Store pumpkins are not pretty).  Let dry.

15)   Wrap the burlap ribbon around the wreath.  Don't tie yet. 
16)  Attach the pumpkin with Power Adhesive Tabs on the bottom.  You can enhance the adhesion with a little of the Mono Adhesive squeezed into the cracks with the fine applicator.
17)  Use wire to wrap leaves around the vines.
18)  After your placement is correct, use the Mono Adhesive with the fine applicator to glue the backs of some of the leaves to the wreath and make more secure.

You're finished!  Don't want to make a fall wreath this late in the season?  Just imagine how great this wreath would look with frosted Sizzix holly leaves and sparkling mini houses in the center!!!  I feel another project coming on!   Happy Holidays, everyone!
 
Laura
 

Monday, October 22, 2012

The Witching Hour by Laura


For this Connie Crystal Tombow Collaboration, I am featuring a Halloween Cake Stand.  It has a LOT of parts.  It is supposed to be your own creation, so I am breaking it down into sections for you.  You can use just the parts that you like. 

MAIN CAKE STAND
MATERIALS:
Parmesan Cheese Shaker (I bought mine from the Dollar Store)
Cheap Pizza Tray  (Also from the Dollar Store)
Black Sharpie
Big Bite from We R Memory Keepers
Black Brads
Two 8x10 Black Adhesive Backed Foamie Sheets
Tombow Mono Multi Liquid Glue
We R Memory Keepers Witching Hour Die Cut Paper
Scissors

DIRECTIONS:
1)  Position lid of cheese shaker on the bottom of the pizza tray and use Sharpie to trace around it and dot in the holes.
2)  Use the Big Bite to punch holes on the tray that match the cheese shaker.
3)  Match up the cheese holes from the top of the lid to the bottom of the pizza tray.
4)  Attach lid to tray with brads, keeping the heads in the lid and opening the bottoms on the top of the pizza tray.

5)  Cut Foamie Sheets to match the circular pizza pan.  Each should be in a semi circle and they should match up in the center.
6)  Cut a smaller circle out of the center of the large foam circle to coincide with the circular area of opened brads.  This foam circle will be raising the paper off of the base so that it doesn't pucker.
7)  Place the paper over the top of the foam to make sure that it fits right.  Trim a little if necessary.
8)  Use the Tombow glue on the back of the paper die cut.  Attach to the foam and let dry.
9)  Use the Big Bite on the rim of the pizza plan to create small holes next to all twelve of the markings on the paper clock. 
10) Estimate the halfway point between the holes and punch the larger size hole with the Big Bite.
11)  Use the Sharpie to color the rim.

Okay, so I thought that when I finished this part, I would be just about done.  Sadly, the pizza pan was much bigger than the cheese shaker, so when I put pressure on one side of the pan, it threatened to flip.  Therefore, I had to create the

PILLARS
 
MATERIALS:
Cardboard tubes (you could use toilet paper rolls, but I used the rolls from my Silhouette Vinyl)
Foamcore  (I used 3 8x10 sheets)
Craft Knife
Steel Ruler
Chipboard or self healing mat to cut on
Pen or pencil
Rubber creatures (I used snakes, but they were very difficult, a softer rubber is best)
Masking Tape
Stone Fleck Spray Paint
 
DIRECTIONS:
1)  Measure distance needed to go from table to bottom of pizza pan.  Subtract 1".
2)  Mark and cut four cardboard tubes to size.
3)  Measure the diameter of the bottom of the tube.
4)  Use craft knife and metal ruler over chipboard to cut the foamcore to these sizes:  8 square pieces that are 1" larger than the diameter, 8 square pieces that are 3/4" larger than the diameter, and 8 square pieces that are 1/2" larger than the diameter.
5)  Place two pieces of foamcore above and two pieces below the tube and place under the overhanging plate.  It should almost fit, but just be a little bit bigger than the opening.
6)  Trace the tube on the smallest piece of foamcore.  Cut out the circle.

 
7)  Trace the circle you just created on the medium sized piece of foamcoare.  You will cut outside and inside the line, but only cut through the upper layer, not all the way through the foamcore.

7)  Remove the ring you have created.
8)  Use the Tombow Mono glue inside the circle on the smallest piece.  Slip over tube and push down about 1/4".  Do this on the top and bottom of all four tubes.


9)  Apply Tombow Glue to the bottom of the foamcore and to the inside of the ring that you removed in step 7.  Press tube into medium sized piece.  Be sure to give it a little pressure.  Also, make sure that smaller piece makes contact with medium piece.  Do with tops and bottoms of all four columns.
10)  Apply glue to bottom of the medium piece and attach to the larger piece.  Do this with the tops and bottoms of all four columns.
11)  Apply glue to bottom of rubber snake.
12)  Attach snake to column and tape down to let dry.  Do to all four.
13)  After snake is dry, remove tape.
14)  Any areas of snake that are raised up can be tacked down with Power Tabs.
15)  Spray paint all four columns.  Now, this is the tricky part.  Follow the directions completely.  I live in Michigan, where it was colder than recommended and humid.  I also applied it MUCH too heavily.  It took way too long to dry, and in that amount of time, the wet paint damaged the glue.  I would have been better off using a room temperature, well ventilated spot in the house, as recommended.  I had to reapply the snakes later.  (They would also have stuck better if they were a more flexible rubber).  You shouldn't have to reapply them.
 
SPIDERS
MATERIALS:
Grungeboard
Manual Die Cut Machine
Craft Knife
Cutting surface
Heat Gun
Black 20 Gauge Wire
Black 18 Gauge Wire
Wire Cutters
Jewelry Pliers
Black Chain
Black Jump Rings--24 small, 12 large
 
DIRECTIONS
1)  Use manual die cut machine and Sizzix Die to cut twelve spiders.
2)  Use Big Bite to punch two holes in spiders--one for head and one for body.
3) Measure the crystals against the spiders and scratch with craft knife where you would like to cut.
4)  Enlarge holes with craft knife.  It helps to outline new hole size and then make cuts leading up to that new hole. Use the craft knife tip to make hole in "mouth".

5)  Cover front and back with Archival Ink.  Let dry.
6)  Use the Tombow Mono Aqua glue in the holes and add red Connie Crystals.  Let dry.

7)  Insert small jump ring in "mouth" hole.
8)  Use Versamarker pen around crystals and in body of spider.
9)  Add Black Ultra Thick Embossing Enamel and heat set.
10) Add Connie Crystal Raindrop into "mouth ring" with 20 guage wire. 
11)  Put top of spiders' "strings" in the smaller holes.  Fold over the "string" to length desired and wrap closed with 20 guage wire.  Do not try to make the same length.
12)  Cut 6 lengths of chain.  Pass each through two of the large holes, leaving the chain between on the top of the plate and passing it through the loop left by spider. 
13)  Attach Teardrop Connie Crystal and small red Connie Crystal at each end of chain.
14)  Use large jump ring through link on top of plate to lock the chain into place.
15)  Cut pieces from remaining chain and use small jump rings to attach to the larger jump rings.  Drape chaing between teardrops as in above picture.
 
FINAL BITS
MATERIALS:
Rubber Rat
Glow Bracelet
 
DIRECTIONS:
1)  Place glow bracelet, Fantasy Fiber and rubber rat into glass bottom of cheese shaker and reattach to the lid.
2)  Use Tombow glue to attach pillars
 
 
Now, if you want to put this through some real washing, be sure to spray it with a sealant of some sort.  While the crystals and cheese shaker would not need to be sprayed, everything else should be.  I tried to assemble it in a way that some of the chain can be removed fairly easily, but it might still be a pain.  I would recommend that you use this cake plate either for decorative purposed, with a large doily or paper covering or with prewrapped goodies.
Happy Halloween!


Tuesday, October 16, 2012

October Fun with Globecraft and Art Glitter

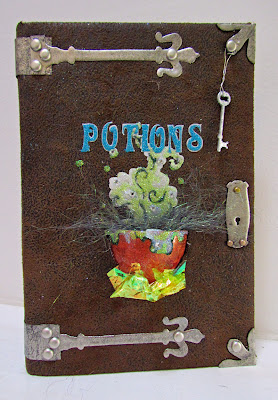
It's October, so I am in a Halloween mood!  This time, I am working on a collaboration between Art Glitter and Globecraft Memories.  It is an involved project, so let's hop in!

MATERIALS
Book (I used Regis and Kathie Lee Cookbook I found at a second hand store--who knew?)
Enough imitation leather to cover book, front and back
8" by 10" Muslin Fabric
Xyron Creatopia
Xyron Fabric Adhesive
Sizzix Tim Holtz Hardware Findings Die
One Sheet Heavy Kraft Cardstock
Die Cut Machine
Silhouette Machine
Silhouette Machine Clean Cut Fabric Interfacing
Globecraft Memories Ornament Globe
Globecraft Memories Large Flower Shaped Piccolo
Globecraft Memories Key Shaped Piccolo
Globecraft Memories Keyhole Shaped Piccolo
Globecraft Memories Enamel Powder Adhesive
Globecraft Memories Piccolo Powders in Vintage Silver
Globecraft Memories Piccolo Powders in Siam Silver
Globecraft Memories Cool-Set Enameling Gel in Metallic Copper
Art Glitter Dries Clear Fabric Adhesive with Fine Tip
Art Glitter Ultrafine Opaque 357 Wintergreen
Art Glitter Ultrafine Transparent 104 Spring Mint
Art Glitter Ultrafine Transparent 94 Key Lime
Art Glitter Microfine Opaque 512 Bahaman Blue
Art Glitter  Fantasy Film Dandelion
Art Glitter Fantasy Fiber Briarwood
Want2Scrap Clear Gems
Brads
Heat Gun
Iron
Big Bite
Scissors
Craft Knife
Large Stencil Brush
2" 22 Gauge Wire
Tape Roller

DIRECTIONS:
1)  Cut Globecraft Ornament roughly in half to create cauldron.  I used just a little more than a half for this.  Also, be sure to cut the chipboard frame as well.
2)  Cover the plastic half with Cool-Set Enamel.  Use it directly from the bottle and swirl it a little as you apply to create the "hammered" look.  Set aside to dry.

3)  Cut fake leather fabric about 1" larger than the book both vertically and horizontally.  You will be cutting one piece for the whole thing, so be sure to open the book and measure it all the way around before you cut.
4)  Place the chipboard frame piece from direction one where you would like the cauldron.  Use the craft knife to cut around the inside of the frame.
5)  Iron the Clean Cut Fabric Interfacing on muslin.
6)  In Silhouette Studio Program, create the potions word and steam section and cut.  I used a premade steam portion and welded on the word with the font Argo.  This step can be skipped if you have another way to cut out the muslin--either by hand or another machine.
7)  Set the cut out muslin in position and iron on.
8)  Add some Want2Scrap gems for "bubbles" on the muslin steam and the cauldron edge.
9)  Use your Art Glitter Fabric Adhesive to add the Microfine Glitter to the word potion.  Set aside to dry.
10)  Use the Art Glitter Fabric Adhesive to create the "steam" colors.  I used the Wintergreen first to create the details, then Spring Mint for the highlights and finally Key Lime for the pop of color.  Wait a few moments for each color to dry and tap off in between colors.  Do not brush.  The colors here do not have to dry in between, because it looks better if they blend a little.
11)  Repeat step 10 on the edge of the cauldron. 

12)  Use your die cut machine and Sizzix die to cut four straps from the heavy cardstock.  Cut 2 more pieces of the scrap to wrap around the binding.
13)  Cut Globecraft Flower into quarters.  You will have one full and two half petals in each part.  They are the corner pieces.
14)  Using the Globecraft Embossing Fluid and your heat gun, emboss the straps. the eatra heavy cardstock and all the remaining Globecraft Memories Elements EXCEPT the key with Vintage Silver Embossing Powder.
15)  Emboss the key with Siam Silver Embossing Powder.  We switched the embossing powder because this one is more detailed, which suits the detailed key better.
16)  Make sure that all the glue is dry before you proceed.  Send the leather through the Xyron Creatopia with the fabric adhesive.
17)  Before removing from the background paper, carefully pry open the oval cut you made in step 4.  Insert the cauldron, placing the edging under the cut leather.
18)  Carefully remove leather from background and cover the book.  Use the extra fabric to wrap under the edges.
19)  Use the Art Glitter Fabric Adhesives to attach all of the embossed pieces except the key.
20)  Use Big Bite to create holes for brads. 
21)  Attach brads, leaving one just a little loose to attach the key.
22)  Cut, crinkle and glue the Fantasy Film to look like "fire" under the cauldron.
23)  Glue Fantasy Fiber into the cauldron to look like an "explosion".
24)  Use wire to attach the key from a brad.
I realize that this project is a little intense, but it can be modified in any way that you like.  It is your book, so enjoy its creation.  I loved making it so much, that I have created a second one, pictured here.

If you want to see how I did the second one, check out my blog at www.rememberinglifesmoments.blogspot.com.  See you later, glitter on!