Monday, February 28, 2011
My little tin can by Connie K.
I found this little tin bucket a few days ago and knew immediately what I wanted to do with it. For my collection of wooden rulers, this would be a great way to display them. I should have taken a before photo... but in the excitement of getting started I forgot... let’s just say it started out as an ugly duckling!
Get out the spray paint for this... first spray the whole piece with turquoise (my favorite)...let it dry overnight. I then covered it with paper... both vintage dictionary paper and some 7 gypsies that I had in my stash. I used matte multi-medium to adhere and then sealed everything. Once it was dry I applied the color using watercolor crayons... which I love. It is a fun way to add color in layers.
I cut hearts in two sizes out of chipboard using my accucut and a sizzix die... These were both covered with papers... a print on the larger one and vintage dictionary on the smaller one that is on top. Once the paper was adhered, layer the smaller heart on top of the larger piece, I used my water color crayons to add some color again. Once this element is finished, adhere it to the tin can with a glue gun.
I outlined the edges of the hearts with Art Glitter Ultrafine Pearlescent glitter in Florida Orange ...using the Art Glitter Designer Dries Clear Adhesive, and also on the polka dots that I painted on the papers... using the watercolor crayons. Next I added the words follow your heart using some letter stickers on the hearts.
Using the Art Glitter Vintage Glass Glitter in Ultramarine... around the edges and also on the handle using the Art Glitter Dries Clear Adhesive finishes it off nicely.
Here are the things you will need to make your own little tin can:
Art Glitter Ultrafine Glitter #177 Florida Orange
Art Glitter Fine Vintage Glass Glitter #604 Ultramarine
Art Glitter Designers Dry Clear Adhesive
spray paint... I used valspar..lowes
metal container... thrift store
vintage dictionary paper... thrift store
7 gypsies multi-medium matte
chip board... scraps
letter stickers... girls paperie
water color crayons... caran d’arche
This is my last post for Art Glitter... I have really enjoyed sharing some of my ideas with you and of course playing with glitter!
Tuesday, February 22, 2011
Charity Banner Project by Janelle K. Burba
My list of supplies for the banner project:
Gala Glitz, Black Art Glitter
Gala Glitz, Red Art Glitter
Ultrafine Opaque Black #79, Art Glitter
Ultrafine Opaque Yellow #66, Art Glitter
Ultrafine Metal Tip, Art Glitter
Designer Dries Clear Adhesive, Art Glitter
3D Foam Squares, Scrapbook Adhesives
3 in 1 Advanced Craft Glue, Beacon’s
Lost and Found Collection, My Mind’s Eye
Lost and Found Embellishments, My Mind’s Eye
Assorted red beads, wire, boa and ribbon/tulle, Joanne Fabrics
Brace closer, (not sure what brand name ~ sorry)
Frame, Unique Pages
Black Eyelets/brads, American Tag Co.
Tim Holtz Distressed inks, Barn Door, Black Soot
Template for mannequin came from milkwood.com
The project started with a simple re-purposed piece of cardboard. The pattered paper, inked with a matching color, was cut to fit the banner template. I took one side and used the “purple monster” to punch holes in top for eyelets and holes in one side to add wire and beads. I strung the beads down the sides and added the black eyelets at the top. The chipboard pieces had to have maximum “glitterage” so I went at it! This would have been nearly impossible if not for the use of the metal tip. I really love that little thing! The red gala glitz is amazing! The mannequin turned out better than I expected and the boa added the needed feminine touch.
The opposite side of the banner was the coordinating patterned paper dressed up with black glitter and black gala glitz. The chipboard clock turned out nicely with intricate detail again making all the difference. I took the paper from the first side and created a corset type (two simple triangles butted together) fastener on the lower section of the banner. The “T” was covered with the Black Gala Glitz. For my project, my section was the “T” in ARTSY!
Attention to detail for a project like this is significant. One should always be aware of the audience that will be enjoying the creation. For the banner, both sides will be viewed by the public, so I was sure to add the glitter to both sides. The finishing touch was the hanging beads at the point of the banner. I think it turned out nicely. I should mention that the photograph is of me and my friend Janice. She is an amazing artist that inspires me daily. I hope you enjoy this project and try making a banner for your home. It was tons of fun. J
FYI ~ Do you know that using a coffee filter is the best non-static product you can use with your glitter? Try it!
Monday, February 14, 2011
Valentine Votive's by Laura Bray
Art Glitter Guest Designer Laura Bray demonstrated these fantastic Valentine Votive's at Art Glitter's booth during the CHA Trade Show in Los Angeles, CA on February 4th. Join her and "When Creativity Knocks" host Ana Araujo for a quick fun filled episode showing how easy they are to make with Art Glitter's Ultrafine Glitter: #119 Cranberry (Opaque) and #85 Crystal (Transparent).
See the episode on "When Creativity Knocks" here.
To see more from Laura visit her site here.
A great project for any holiday or wedding like Laura suggests in the video. Thank you for sharing Laura!
Wednesday, February 9, 2011
Tickled Pink by Connie K.
When I am out thirfting I pick up boxes, and this was from my stash... I think it is just the perfect size. Originally it was probably filled with greeting cards ...the lid is attached and lifts up...but any box could work.
I used valentine paper I had but it was a little to bright for the shabby look I was going for ...sooo I white washed it, (once it was adhered to the box) with craft paint and then wiped it off with some baby wipes while it was still wet. It has a much softer look to it... then the edges were distressed with tattered rose distress ink to shabby it even further.
Once the box was altered I started with the embellishments...my favorite part!
First, was the glass fringe around the edge of the lid and then I layered some cotton lace on top of that. I used beacons 3 in 1 for this...
For the feet I used little wooden knobs from the wood section at hobby lobby...painted those and then lightly distressed using the tattered rose distress ink. Those little feet gave it a whole different look...
The kissing birds on the front and the resin flower on top of the knob are from making memories. I painted those with craft paint first and glittered both pieces with ART GLITTER Ultrafine Transparent #101 Baby’s Breath using Designer Dries Clear Adhesive. This is such a yummy color...
Once the knob was attached...I adhered the resin flower to the top and the kissing birds to the front of the box. I used two colors of rayon seam binding for a bow on the top and attached a love ticket with some pale pink thread..
I was tickled pink with the results!
Sunday, February 6, 2011
Pretty to look at, hard to catch Scrap Page by Janelle K. Burba
I am a scrapbooker that loves all types of mixed media and texture. As you will see in the coming months, I enjoy adding bling to everything…especially in the form of glitter. Scrapbooking for me isn’t just a hobby, it is a way of life. Scrapbooking and memory keeping, in general, keeps the wonderful moments in life alive. I recently read that it relieves stress and strengthens bonds and I must say, “I concur”.
The following is the list of supplies I used for this page:
Medium sized butterfly stamp, Art Glitter
Ultrafine metal tip, Art Glitter
Designer dries clear adhesive, Art Glitter
Glitter from Art Glitter:
Large glass beads, Solar #803
Large glass beads, Fox Trot #809
Small glass beads, Sonata, #806
Ultrafine Pearlescent, Duck Tail #178
Ultrafine Opaque, Black #79
Ultrafine Opaque, Sedona Sun #54
Ultrafine Opaque, Copper Canyon #62
Love Shack Collection, funky, Bo Bunny
Blue and copper cardstock, Coordinations
Amber and clear flourish jewels, Zva Creations
3D Foam Squares, Scrapbook Adhesives
3 in 1Advanced Craft Glue, Beacon’s
Cricut Expression
My favorite inspiration is my daughter Natalie. This page was designed to bring out her beautiful blue eyes and autumn skin tones and hair. She is truly a free spirit, growing and spreading her “wings” in life in this her sixteenth year.
Trying to accentuate the positive of the paper and the product was a fairly simple task as I strived to create a beautifully understated page full of texture. I began by matting my 8x10 photograph three times alternating cardstock. I also matted the Funky paper on a solid in order to show contrast of color. I was inspired by a Tim Holtz mask to put my flourishes together to pull your eye to the edge of the page.
The butterfly stamp was a bit more complicated as I stamped the butterfly, cut out the subject and began the “glitterfest”.
There is definitely a method to the madness to make the most of your butterfly stamp. To begin, you should outline your butterfly with the clear glue and then add your black glitter. Next, use your clear glue on the inside of the wings, working outward with the glitter array of your choice. Then on to the accents, such as large glass beads. Be sure to let your different glitter colors and textures dry before moving on. Patience is a virtue for this task! I used the 3 in 1 glue and the foam squares to add my butterflies to the page. I wanted them to stand off the page so I folded the wings up a tad so as to look as though they were flying.
Last but not least, I used my Cricut Expression and cut out the words needed for my title. WALAH….a beautiful scrapbook page with a nice message she will always remember as her cocoon opens from teenager to woman.
I hope you enjoy the simplistic beauty of this page and try something similar for someone in your life. J
Thursday, February 3, 2011
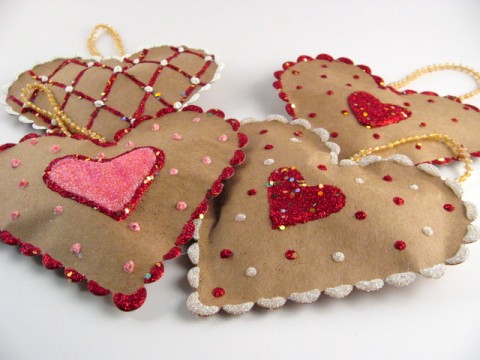
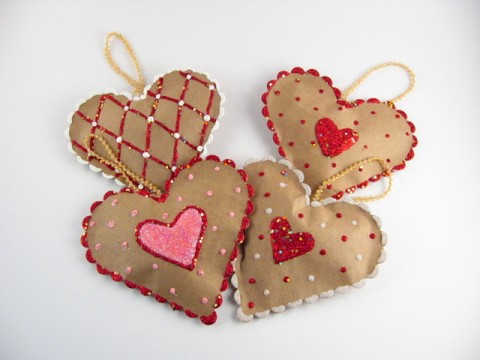
Glittery Kraft Paper Hearts by Christine Lehto
I altered my heart decorations slightly from the idea shown at Happy Chick Junk. To make my heart shapes, I used my Big Shot machine and the Classic Heart die template from Spellbinders. Instead of painting the hearts with acrylic paint, I used one of my favorite mediums, glitter. I used Art Institute Glitter colors #174 Pink Cadillac Ultrafine Pearlescent, Dazzlers #D3 True Love Funky and #189 Pearl Ultrafine Pearlescent. I decided to use Fabri-Tac to bond the hearts together instead of using hot glue. For the heart hanging loops I used some decorative beaded trim.
Something about making Valentine hearts and decorations makes me so happy. It was so relaxing and enjoyable sprinkling the hearts with glitter and seeing their joyous Valetiney-ous colors and classic Valentine shapes. I love seeing all the Valentine decorations, etc in stores this time of year too. Maybe it’s partly to do with the bright red and pink colors to brighten up a cold, gloomy middle of the winter day in Wisconsin. What do you enjoy about Valentine’s Day?