Saturday, January 26, 2013

Valentine Treats with Glitter

Today, I'm going to make little glittered sticker covers for Hershey's Nuggets chocolates so you can give them out for Valentine's Day...
Here's what you'll need...
  1. 1 or 2 bags of Hershey's Nuggets chocolates
  2. Printed labels (See below)... I created mine in Photoshop and printed them on a full sticky sheet of paper. You can also print them on regular paper and glue the backs down.
  3. #7 - Red Rose - Ultrafine Opaque Glitter
  4. #10 - Baby Pink - Ultrafine Opaque Glitter
  5. #13 - Plum Pink (Purple) - Ultrafine Opaque Glitter
  6. Small cellophane bags
  7. Ribbon
And I used 3D Embossit Art Glitter Adhesive to give the areas I glittered a little bit of a lift. If you would like to use my labels, you can open them by clicking here. It's a PDF file that is 8 1/2" x 11". You can also make your own labels. Each little label is 1" wide by 3 1/4" tall with the top "face" of each chocolate starts at the 1 1/8" mark to the 2" mark. First, I glittered the entire sheet of labels...
Then, I cut them out and stuck them on the chocolates...
I then put them in a little bag with a ribbon... and I even wrapped one group in cellophane and wrapped it like a present...


And there you go! Great little Valentine's treats that are sparkly and personalized :)


To see more projects and art by Carrie, check out her blog Violet Cottage.


Thursday, January 24, 2013

Have A Little Heart

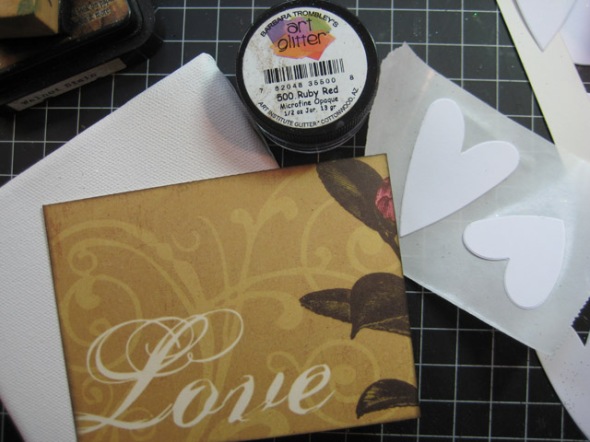
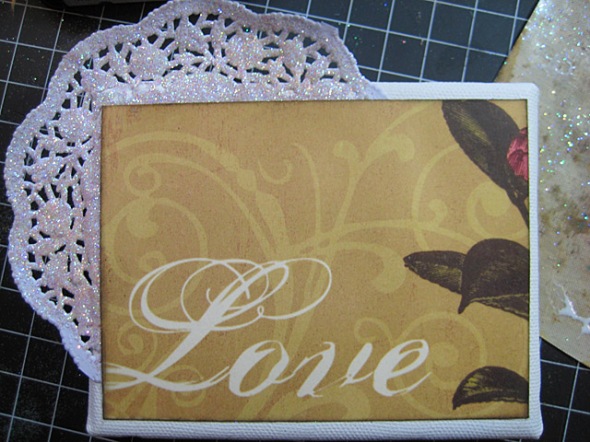
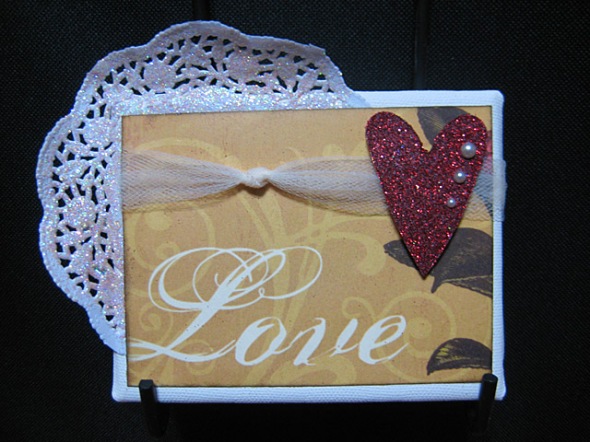
Hi, Linda here and with Valentine's Day just around the corner I wanted to share with you how you can create this quick-n-easy little shelf sitter to commemorate the day. I started with a mini canvas - it's about 4-inches by 5-inches. I cut a piece of paper from my Ciao Bella Stack by DCWV. It worked out well because the word 'Love' was already on there. I inked the edges with Walnut Stain Distress Ink then ran it through Xyron to put adhesive on the back. Then I cut two heart shapes from white cardstock and processed those through the Xyron as well. Art_Glitter_Xyron_Linda_Neff_canvas_heart_photo_1 With total adhesive coverage of the heart shapes I peeled off the backing and dipped them in Ruby Red Microfine Opaque glitter. I love Ruby Red. The color is such a nice deep red, it was perfect for a Valentine heart. While the glitter is still on the heart I gently rubbed it into the adhesive with my finger to ensure full coverage. Art_Glitter_Xyron_Linda_Neff_canvas_heart_photo_2 I decided to use only one of the hearts so chose the larger one. I did decide, however, to add a paper doily to the background. I wanted the doily to sparkle and shine so brushed on Designer Dries Clear (DDC) with a craft brush and covered it with Mimosa Ultrafine Transparent glitter. I gently rubbed the glitter into the glue with my finger then tapped off the excess. Art_Glitter_Xyron_Linda_Neff_canvas_heart_photo_3 I used DDC on the back of the doily to stick it to the canvas leaving the glittered portion to hang over the edge of the canvas. Art_Glitter_Xyron_Linda_Neff_canvas_heart_photo_4 At the last minute I decided to add a strip of cream-colored tulle and knotted near the edge. It completely wraps around the plain edge of the canvas and tucks under the pattern paper on the doily side. I added dimensional foam tape to the back of the glittered heart so it would sit on top of the tulle. I used DDC to add three pearl gems from Want2Scrap and my project was done! The canvas makes a cute little holiday decoration and takes very little time to complete. A great project for working with the kids too. Art_Glitter_Xyron_Linda_Neff_canvas_heart_photo_5

Tuesday, January 22, 2013

Framed with Art Glitter

I have been obsessed with canvas lately, and finding fun new ways to use them. Today I have a fun glittery project that was super fun, and super easy to make!


Supplies Used:
Art Glitter
#184 T-Bird Ultrafine Pearlescent
#14 Lavender Ultrafine Opaque
Designer Dries Clear Adhesive

2 Pre-cut decorative frames
2 - 11x14 Canvases
paintbrush

I started with a plain pre-cut frame that I got at a craft store. I then painted it with Designer Dries Clear Adhesive, and covered it in glitter, then tapped it off.


 I did this for each of the frames each in a different color of glitter.


Then I adhered the frames onto the canvases and let them completely dry.


My mom helped me out with this last part and picked some super cute pictures of her grandsons (and my nephews) to put in the frames. Then hung them up in her craft room.

 Here are some close up shots of each of the finished frames. 


I hope you liked this fun new way to add glitter in your life. Be sure to stop by my blog, one.heart.scrapper. for another glittery project.


Saturday, January 19, 2013

Hair Decorations for Dancers

In my spare time I coach a high school dance team.  Like many school teams we operate on a pretty low budget, but the girls still like to change outfits and accessories to match their dances.  We are currently working on a little Latin-flavored dance with black lace gloves and I wanted some cute pink flowers for their hair.  In searching for these I ran into two problems - #1 - it is hard to find 10 of the same thing, let alone 10 in the color I wanted and #2 - even though they were only $4.00 ea, when I have to get 10 of them, that's $40 for a little hair bling.  So I decided to take a stab at making my own.....

For this project I used:  pink roses from the dollar store, Art Glitter Fabric Adhesive, Art Glitter Ultrafine glitter - Pink Diamond, Round brads, Acrylic gems, felt circles, hair clips.

Begin by removing all the leaves and plastic from the flowers so that all you are left with is the layers of fabric petals.

Using a paint brush, apply splotches of Art Glitter Fabric adhesive around the outer edges of the petals.


Waterfall the glitter over the glue while it is still wet, and shake off the excess.  I like to work over a coffee filter to catch the excess glitter.

Repeat on all the petal layers.

Place the largest section, glitter side up and run a ring of AG fabric glue around the center.

Place the next section on top of the first so that the hole in the centers line up, but the petals do not.  Hold in place for a few minutes until the glue starts to grab, then repeat with the other layers.

Run the prongs of a brad through the center hole and bend back to secure.  If I had 10 of the same color brad, these might have made cute centers.

But since I didn't, I covered the brads with acrylic gems that I had on hand.


For the clip, simply place a felt circle in between the prongs of the hair clip.  Use hot glue or E6000 to glue the felt to the back of the flower.

The girls will look spectacular when they dance tomorrow night!  And.... instead of spending $40.00 I spent less than $10.00!!

Please visit my blog for more fun, glittering projects!


Thursday, January 17, 2013

Fantasy Film Wings by Emm for Charity Wings

Wings made from Fantasy Film Sheets, Fantasy Film and Fantasy Fiber, sounds like a marvelous fantasy to me! I made these wings for Elena of Charity Wings to wear at CHA this past week and where ever she wants to really! They are a good bunch at Charity Wings, supporting many worthy causes; you just have to check them out!


I have made so many Fantasy Film Wings, I couldn’t possibly tell you how many. However most all of them vary around 12” long. I have now made 5 of the adult wearable size and my best and first advice to all who want to make a pair, try a small set first to get your feet wet.

That said lets get started on these babies! First of all, I always work in pairs. Obviously wings have a left and right side and it is so much easier to keep them similar by working on both sides at the same time. Start with a wire frame. This frame here is from a larger set of angel wings I made in October 2012. This is 16-gauge hardware wire, not the easiest to work with but strong enough to hold your form. The key is to keep your wire flat as possible. I do this by pulling it straight out from the coil and allowing it to keep much of it’s original shape. The most important thing to remember when making your wire frame is to make one end of your wires a foot or more longer beyond the film edge. This is your connecting wire, a must have!


Now you can lay your Aurora Fantasy Film Sheet over one set of wires. It is 20 inches wide by 5 feet long and the packages come with two sheets rolled together which make it easy to use. Unroll over one set of wires and cut the two pieces at the same time. Do this one more time for a total of 4 pieces (2 for each wing). Lay two pieces down separately and place wire frames on top (like shown above).

Now you’ll need to glue the wire down in a few spots, you don’t have to glue the whole frame; you are just trying to keep your wire in place while ironing. I squeeze some Designer Dries Clear onto my finger and spread it on the wires where they touch the film. Let dry 15 min. or so till clear.

Cover your frame with the remaining two sheets of Aurora. You are ready to iron the two pieces together, sandwiching the frame into place. #1 RULE… you have to place parchment paper on top otherwise the film will melt away and stick to your iron. (You may want parchment paper under bottom piece of film too, depending on your ironing surface). Iron all areas of film, being careful to get close to frame wires.

Cut excess film off of areas you plan to burn away and save pieces. These wings will be covered with “feathers” we will make soon, so don’t worry about making this base part perfect. Light your candle and make sure the flame/wick is above wax line so you can pass your film through it. Got for it! Run edges of wings through flame until you are satisfied with look of edge. (See photo further down for burning feather edges). Melt other wing edges too and blow out candle flame.


For Elena’s wings I made another smaller set of base wings that bend out from the other ones, make as many as you want. Then wire them all together, twisting your connecting wires together to make a tight bridge, about 4 inches long and cover it with duct tape.

Now we are going to make feathers! I made approximately 100 sets for Elena’s wings, but you can determine how many you want based on size and coverage. For one 8-9” set cut two 18”strips of 4” wide Fantasy Film. This photo above shows two sets using Krista’s Eyes and Watermelon, my favorite combination by far. Just like mixing paints you can mix Fantasy Film to create different colors, I almost always mix colors, its lots of fun!


Cover with parchment paper and iron till bonded, just a few seconds. Then bend in half and crease like the bottom one shown.


Hold folded end in one hand and cut triangles off, making a “tie” shape like above.


These are what I call my “happy scraps”. They make me happy! “Why” you may ask, well, it’s because I can reuse these scraps for collage backgrounds, stamping and wrapping around objects (to be bonded with a heat tool). It makes me happy to reuse and these make me especially happy because they are all the same size and shape and I know they will prove to be very handy in a future project. Happy Scraps!


Light your candle; time to melt your tie! Open fold and pass one side along flame briefly, dwelling a touch longer at the ends to make a point. Turn around and melt other side.


Hold directly over candle flame until a hole forms, move feather up away from flame. Make a hole on other side too. It is possible for the film to catch on fire while burning over a flame. Just blow it out quickly, don’t scream and drop it!

Make several at a time, cut several strips of film, then iron/bend them all, cut them all, melt them all…you get it.


Here’s just one, with a little bit of Fantasy Fiber hiding the fold. This is the Krista's Eyes and Watermelon combination, gorgeous isn't it!

To attach them to wings smear a little E6000 glue on base just above fold and place on wing. Smear a little more E6000 on top base and cover with a small amount of Fantasy Fiber and push it into glue. Weight glued part down for at least half an hour. E6000 is perfect for the Fiber when it is not bonded together, other glues won’t hang on to it in its fluffy state.


Elena's wings have feathers on both sides of the base wings; I used 24 ten-foot rolls of film in 6 different colors, 2-3 packages of fiber and one package of Aurora in the sheets. I know that’s a lot! But it gives you a starting point to figure out how elaborate you want to make your wings.

The easiest way of making them wearable is with two ribbons tied to the bridge that will go around your shoulders to tie in place. Use about 3 yards each and knot them in the middle at the bridge. You will no doubt need to do some creative maneuvering to get your wings to sit straight, you may even need to add a support wire somewhere, I can’t tell you where, you will have to figure that out yourself!


Here are my larger angel wings I spoke of at the beginning of this post. They have a wing span of approx. 60” and about 52” long. They took two packages of Fantasy Film Sheets, about forty 4” rolls of Film and five 7-gram packages of Fiber. And about 30 hours to make. They have been at the CHA show with Barbara, I miss them.

I thank Elena for wearing my smaller set and I’m happy they have a wonderful new home with her and Charity Wings where they will hopefully inspire others to give.

Enjoy - emm


Materials:
Fantasy Film Sheets, Aurora
Fantasy Film (various colors)
Fantasy Fiber, Snowflake
Scissors
16-gauge wire
Wire cutters, pliers
Baker’s parchment paper
Iron set to medium high
Designer Dries Clear Adhesive
Candle and matches
Duct Tape
E6000
Ribbon

Tuesday, January 15, 2013

Double Glitter Fun


People often want the look of many glittering colors, but don't want to purchase or store various colors of glitter.  (Personally, I don't have that problem, preferring to indulge in a huge selection of gorgeous Art Glitter colors!)  Did you know that you can color Art Glitter?  Well, you can.  The secret is the use of transparent colors.  I only used two glitter colors here.  REALLY!

MATERIALS:
Art Glitter Ultrafine Transparent 85 Crystal
Art Glitter Ultrafine Transparent 273 Cornsilk
Dreamweaver Stencil LM 2011 Poppy Circle
Double Sided Adhesive Paper
A Soft Bar Soap such as Dreamweaver Handmade Hawaiian
Stencil Brushes, one large, three small
Adirondack Pigment Ink in Sunset Orange, Terra Cotta, Lettuce and Bottle
Paper Towel
Cardstock
Dotted Cardstock
Ribbon

DIRECTIONS:
1)  Rub soap across the back of the stencil until it appears to be covered with a cloudy film.
2)  Use the large stencil brush to brush off all the clingy crumbled bits from the stencil.
3)  Expose one side of the double sided adhesive paper and place on the soaped side of the stencil, leaving a little border around the edge.
4)  Pour Cornsilk Glitter over the stencil and the paper on the edges.  Press down a little with your finger.
5)  Use the large brush to brush off the excess glitter.
6)  Ink up one of the smaller brushes with one ink color and lightly tap off a little color on the paper towel.
7) Stencil the color onto the glitter.  Repeat with all the colors until the piece looks shaded and colored the way you like it.  Let the pigment ink dry a little.
8)  Place project face down on a flat surface and carefully peel paper off the stencil.  Keep the stencil flat.
9)  Pour Crystal Art Glitter over the entire thing. 
10)  Carefully brush off the excess.
11)  Assemble.

The edge of the paper is the original Cornsilk color.  Like I mentioned earlier, this ONLY works with transparent colors.  You should chose a color that goes with every color that you want to paint with.  In this case, the Cornsilk color is light and yellowy, which goes well with both the greens and the oranges that I used.  The best part?  When the card sparkles, the use of the base color causes it to look more cohesive.  Take a look.....
Yes, you CAN make a colorful project with only two colors of glitter!  (Of course, with so many colors available, you don't have to.....)   Consider the gorgeous transparent colors next time you purchase Art Glitter, and Glitter On!
Come visit my blog for more fun!
Laura