Showing posts with label designer dries white adhesive. Show all posts

Tuesday, December 18, 2012

Let There Be Peace On Earth

I find myself going into the holiday season with a little quieter than normal, and I think that today's post reflects that.  It is still glittery, and full of the sparkle of the season, but just a little more subdued than my normal posts. It gives thought to "PEACE ON EARTH".

MATERIALS:
Art Glitter Designer Dries Clear Glue with Fine Metal Tip
Art Glitter Designer Dries White Glue with Fine Metal Tip
Art Glitter Dries Clear Fabric Glue
Art Glitter Ultrafine Transparent in 85 Crystal
Art Glitter Ultrafine Transparent in 312 Fresh Green
Art Glitter Ultrafine Transparent in 196 Lion's Mane
Art Glitter Ultrafine Opaque in 347 Golden Orange
Art Glitter Ultrafine Opaque in 278 Poppy
Acrylic Paint in brown, white and dark blue
Double Sided Adhesive Paper--I used Dreamweaver's
Small Round Punch
Star Punch--mine was the Martha Stewart Radiant Star
Muslin Fabric
Canvas Fabric
Tim Holtz Alterations Dies in Pine Tree, Deer, and Holly Berries
Tim Holtz Alterations Texture Fades in Damask
Manual Die Cut Machine
Grunge Board
Various Colors of Green Cardstock
9" Grapevine Wreath
Small Stencil Brush
1 1/2" Fine Gauge Metal Wire or Twist Ties
Tombow Markers in various greens
Small Mister
Paint Brush
Paper Towel
DIRECTIONS:
1)  Paint the wreath.  Make the bottom half white and the top half blue
2)  Use the manual die cut machine to cut deer from Grunge Board, seven trees from green cardstock, and several holly leaves from both muslin and canvas.
3)  Paint deer brown.  Let dry.
4)  Stack the trees in two groups--one of three and one of four.  Make sure to flip a couple upside down to vary them.  Stagger them and glue with Dries Clear.  Let dry.
5)  Texture the deer through the die cut machine with the texture folder.
6)  Squeeze out some Dries Clear on some plastic.  Use the stencil brush to brush lightly on the deer.
7)  Glitter deer with Lion's Mane.  Let dry.

8)  Use Designer Dries White to make "snow" areas on trees.  Cover with Crystal and let dry.
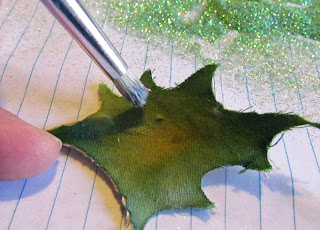
9)  Color muslin holly leaves with Tombow markers.  It will not look perfect.

10)  Spritz leaves with water.  Place on paper towel and let dry.

11)  Match up dried leaf with a canvas leaf.  Use fabric glue on the canvas leaf, place top of metal or twist tie onto canvas leaf and cover with muslin leaf.  Let dry.  Repeat for all leaves.

12)  When leaves are dry, use stencil brush to brush fabric adhesive just on the edges. 
13)  Cover with Fresh Green.  Let dry.

14)  Punch several dots and one star from the double sided adhesive paper.
15)  Remove one side of the star.  Dip it in Golden Orange and press down.
16)  Remove one side of each circle and press into Poppy.
17)  Glue trees onto wreath with Dries Clear.  Make sure to cover edges between white and blue.
18)  Put leaves into place using the wires and gluing down the parts that touch the wreath with Dries Clear.
19)  Glue deer down with Dries Clear.
20)  Remove backing from double sided star and berries, placing them on the wreath with the adhesive.

That is it!  A thoughtful holiday wreath.  I wish for Peace on Earth this year.  Happy Holidays, and a Glittering New Year to All!
 Laura


Saturday, July 2, 2011

Glittered New 4th of July Pinwheels by Emily M. Miller


Oh the joys of 4th of July! I live on the busiest corner of small town U.S.A. And on the 4th of July there are all kinds of activities going on at the park next door. We’ve been there almost 20 years now, everyone knows that I put my pinwheels out every year and well…they’ve seen better days!


So my answer to all sprucing up problems? Art Glitter of course!

Materials:

Pinwheels

Scotch Tape

Art Glitter Ultrafine Opaque Glitter: #291 Fire Engine, #140 Canadian Blue

Art Glitter Ultrafine Pearlescent Glitter #189 Pearl

Art Glitter Designer Dries Clear Adhesive (DDC)

Art Glitter Designer Dries White Adhesive (DDW)

Art Glitter Ultrafine Metal Tip

Paint Brush


Start by bending over the top pinwheel tips into the center and tape them into submission. Then paint glue (DDC) onto the 4 bottom ‘wings’ and glitter with Fire Engine Red. Let dry, take tape off.

Remove the circle disk at the end of the horizontal post and glitter it your choice of color. Set aside to dry.

Carefully glue (DDC) and glitter center of top pinwheel Canadian Blue. Let dry 10 min. or so and finished off ‘wings’ with Canadian Blue. Let dry.

The thing you want to be careful about is making sure you don't get glue on your center post. You want to make sure your pinwheel will still spin easily.

Do some brushing off of excess glitter at this point. That is if you don't want to pollute your pearl glitter with blue glitter like I did!

Then you can start drawing on designs with Designer Dries White adhesive, using the Ultrafine Metal Tip on your adhesive spout and fill in with Pearl glitter for a perfect sparkly white effect.

Now my only problem is I have to get 10 more of these done...now! Oh well, it will be worth it!


Just wanted to share an updated photo of my poor wagon I glittered 4 years ago. See it in our gallery when it was beautiful...http://www.artglitter.com/gallery/galEmilyMMillerGlitteredWagon.html So why am I showing this photo? Because this thing has been out in the Arizona sun, wind and elements for 4 years with virtually no shelter in the last two years and it still sparkles!

I promise to take better care of my pinwheels. Have a wonderful 4th!

Wednesday, May 5, 2010

Cinco de Mayo Margarita by Emily Montenaro

Today I have a slushy, sparkly, BIG margarita for you in celebration of Cinco de Mayo! This 5” x 7” card is sized to fit an A7 envelope and I chose a beautiful white shimmer cardstock for the card base. I decided to go the old fashioned route and cut out the margarita glass shape manually (gasp!) I found an image online and printed it to make a template. Then I traced it onto colored cardstock (but you could skip this step and print it directly on the back of your cardstock) and carefully trimmed it. The inner portion of the glass is filled with Dries Clear adhesive and Key Lime glitter.

I purposely was a little messy with the adhesive to give it a slushy look – so fun! Of course, the glass needed to be rimmed, so I used Dries White adhesive with neutral glitter to make it look salty. For the lime, I stamped a Spiral Daisy in green ink and punched it out with a circle punch. I wanted the peel of the lime slice to be a darker green, so I outlined the edge of the circle with a Copic marker and followed with more Key Lime glitter. Here is the link to the public domain image that I used for the Margarita Glass: http://commons.wikimedia.org/wiki/File:Margarita_Glass_(Welled).svg Happy Cinco de Mayo!


Supplies:
Art Glitter Ultrafine Transparent Glitter in Key Lime and Angel Dust
Art Glitter Designer Dries Clear Adhesive
Art Glitter Designer Dries White Adhesive

Art Glitter black stamp pad (must heat-set on shimmer paper)
A Muse Artstamps Make Margaritas and Spiral Daisy rubber stamps
A Muse Artstamps Shimmer Couture cardstock in white
A Muse Artstamps 4-bar notecards in Lime and Sky Blue
Clearsnap Fluid Chalk ink in Lime Pastel
Copic original marker in Lettuce Green
1 ¼” Circle Punch
Foam tape
Scissors

Friday, November 27, 2009

Glittered Toy Blocks, Storybook Toy Dolls and Bottle Brush Trees by Lisa Kettell


How many times have you walked into a store, saw colorful holiday trees for every occasion and in every color, some are pink, aqua and tinsel silver, others are extra enhanced with chunks of mica flakes, snow and glass glitter. Well I have found many ways to change the look of plain green trees from bottle brush to floral and wire Christmas trees, all you need is a tree, some bleach and Art Glitter.

Materials:
Art Glitter
-Art Glitter: Designer Dries Clear Adhesive
-Art Glitter: Variety of Ultrafine Transparent Glitter

-Art Glitter: Variety of Ultrafine Opaque Glitter
-Art Glitter: Variety of Fine Glass Glitters (For various effects)

Paints/Dyes
Acrylic paints: variety of bright, pastel and metallic colors
Flocking: variety of colors

Other
Hand sculpted clay figurine or store bought plastic or paper figurine
Small-medium sized bleached bottle brush trees (refer to tree bleaching and dye instructions)
Container of water
Tools: paintbrush, scissors, hot glue and hot glue sticks
Other: crepe paper, paper, tinsel garland, tinsel chenille stems, small bulbs, millinery flowers, tiny pompoms, sequins, tiny pearl strands, flocking


Directions for Glittering Toy Blocks
1. Coat the lettered rim part of a toy block with Dries Clear Adhesive.
2. Sprinkle wet adhesive with glitter of choice, let dry then slightly tap off excess.


Directions for Toy Block Dolls
1. Attach figurine of choice to toy wooden block using hot glue, let set a minute.
2. Begin decorating your figurine w/ flocking, texture glitter or glitter of choice. Adhere these textures using Art Glitter Dries Clear adhesive, let dry and tap off the excess.
3. Decorate your toy top with a small bottle brush glittered tree, glittered crown, glittered hat or mini bell, berries, millinery, crepe paper and tinsel.
4. Coat the toy block base using a variety of Art Glitter products.

Tips:
-Use basic wooden square shapes, instead of toy blocks and coat w/glitter.
-Use cupcake/sugar craft figurines and picks instead of sculpted ones.
-Hot glue toy blocks to a floral wreath, add a holiday word banner and coat the blocks in various coordinating glitter colors.
-Spell out your favorite holiday word using toy blocks and glitter.


Glittering and Bleaching Trees

Materials:
Art Glitter
Art Glitter: Designer Dries Clear Adhesive
Art Glitter: Designer Dries White Adhesive
Art Glitter: Faux Snow
Art Glitter: Vintage Fine Glass Glitter #611 Antique Silver
Art Glitter: Vintage Fine Glass Glitter #613 Diamond Dust
Art Glitter: Variety of Fine Glass Glitters (For various effects)

Paints/Dyes
Acrylic paints: variety of bright, pastel and metallic colors
Ink, Koolaid
Spray paint base coat
Spray paint or hair color spray paint: variety of bright, pastel and metallic colors
Bleach

Other
Small-large sized trees (bottle brush or holiday Christmas trees)
Large plastic storage container (for big trees)
Small plastic or foil pan (for small-medium trees-bottle brush)
Painters ventilation mask(for spray paint)
Newspaper
Recycled box (for spray paint)
Container of water
Tools: paintbrush, old salad tongs, scissors, hot glue and hot glue sticks
Other: tinsel garland, tinsel chenille stems, small bulbs, millinery flowers, tiny pompoms, sequins, tiny pearl strands, flocking


Directions for Bleached and Glittered Bottle Brush Trees:
Use in ventilated area, I recommend outside or in garage
1. Place bottlebrush trees in a large pan, cover with bleach, turning trees with tongs every 5-10 minutes or so until completely bleached and no green color remains. Smaller trees will bleach faster, larger ones longer.
2. Let dry for 24 hours on a stack of newspapers or disposable plastic plate.
3. Once trees have dried, begin painting or dying them. To spray paint color on them, place in a recycled box and spray paint with the color or your choice. To dye them follow the drink mix recipe below, once dyed, let dry.
4. Once your trees have been colored and dried, apply designer dries clear adhesive to them. With a paintbrush paint the adhesive onto all the edges.
5. Next sprinkle some #611 Antique Silver Glass Glitter or # 613 Diamond Dust onto the pinecone, let dry, shake off excess. For snowy trees apply the Dries White adhesive followed by Faux Snow.


Directions for Bleached and Glittered Large Christmas Trees:
Use in well ventilated area, I recommend outside your house
1. Place medium to large trees in a recycled box or on a bed of newspapers, place tree onto this area, put on ventilation mask, and spray paint with the spray paint base coat, let dry 10 minutes, repeat.
2. Now spray paint with color of choice, the more coats you spray the brighter your trees. Always follow spray paint manufacturer instructions.
3. Once trees have been spray-painted and dried, apply Designer Dries Clear adhesive to them. With a paintbrush paint the adhesive onto all the edges.
4. Next sprinkle some #611 Antique Silver Glass Glitter or # 613 Diamond Dust onto the pinecone, let dry, shake off excess. For snowy trees apply the Dries White adhesive followed by Faux Snow.
5. Decorate with tinsel, tinsel garland, bulbs, millinery and glittered ornaments.


Koolaid Drink Mix Dye Recipe
In medium sized bowl mix the Koolaid powder with 1/4 to 1/3 cup white vinegar. For brighter colors use less water and more powder. For softer colors use more water. If Koolaid is not available replace with food coloring or inks.

Pour Koolaid dye over your trees and turn w/tong until completely dyed, repeat until desired color is achieved, let set and dry 24 hours.

Tips:
-Try glittering your trees with a variety of glass glitter colors
-Paint stripes onto your bottlebrush trees.
-Turn the trees into dolls using clay or foam heads, and other embellishments
-Glitter Christmas tree stems each with a different color or with two favorite colors, how about pink glass glitter on one stem and silver glass glitter on another stem.