Showing posts with label faux snow. Show all posts

Thursday, October 24, 2013

Ornamental Fun


This month at Art Glitter we got to work with the Northwoods Rubber Stamp Company.
I have never used their stamps before but was pretty impressed with such detail. The ink went on very smooth and the image turned out perfect.


 Supplies:
 
Patterned Paper
Copic Markers
Twine
 
 
After stamping the image onto my cardstock I colored with copic markers then added glitter.
 
Be sure to check out Art Glitter and if you purchase $ 25.00 of AG product
and use NW20 coupon code you can save 20%.

My Blog: zippity-do-dah-tabitha.blogspot.com


Friday, April 26, 2013

Mermaid Paper Crown

For my final project as an Art Glitter Design team member, I am going to make a Mermaid Paper Crown, similar to the Spring Queen crown I made for my very first project a year ago. Wow, how time flies!!
Here is what I used:
  1. #358 - Jungle Green - Ultrafine Opaque Glitter
  2. #232 - Michigan Moss Green - Ultrafine Opaque Glitter
  3. #46 - Summertree Blue/Green - Ultrafine Opaque Glitter
  4. #113 - Sky Blue - Ultrafine Opaque Glitter
  5. #89 - Martini - Ultrafine Transparent Glitter
  6. #71 - White Gold - Ultrafine Opaque Glitter
  7. Faux Snow Glitter
  8. Fantasy Fiber - Mint Sparkle
  9. Want 2 Scrap - Nestabling pearl frames #4059
  10. Assorted seashells - all sizes - including 2 small sand dollars and two small starfish - Michael's sells little boxes of random colored seashells in various sizes and shapes
  11. Fresh water pearls and loose pearls
  12. Hot glue gun
  13. Assorted thick paper
  14. A few acrylic paint colors - you pick!
  15. 2 different colors of crepe paper
  16. Ribbon - I used May Arts BM66 - 3/8" Blue/Green Reversible Ribbon
  17. 2 rivets
And I used 3D Embossit Art Glitter Adhesive to give the areas I glittered a little bit of a lift. The beauty of this "under the sea" themed crown is that it doesn't have to be perfect or symmetrical. It should have imperfections, have an organic feel to it and don't plan it out too much. Have fun, make a mess and let loose! I started with my paper elements first. I traced a crown onto a thick white construction paper and cut that out, and then I quickly free-handed some seaweed "s" shapes and curves and cut those out. All these pieces got a super quick coat of acrylic paint. I used a deep turquoise green and a more avacado green on the seaweed. Use whatever colors you like! Pink, purple... have fun! I then added a crepe paper fringe to the bottom of the crown in green and blue.
I then added the Want2Scrap pearl self-adhesive bling frame to the center of the crown and cut up another frame to use on the sides of the crown. These are so easy to use and will really give this crown a finished look.
More glitter on the seaweed! I used all the green colors on the seaweed to give it lots of color, shimmer, sparkle and texture.
I then glued down the seaweed to the crown and added the fantasy fiber on the base of the crown using a hot glue gun.
Next, I took my seashells and glittered about half of them in random blue and green glitter colors. After these dried, I hot glued them to the bottom of the crown in a loosey-goosey sort of way. I also glued down some fresh water pearls I had laying around and wound them around the shells. I had two sand dollars and those each got a covering of the clear Martini glitter and the starfish got the complimentary white gold glitter. I think that's my favorite part!
After the shells went down, I added more pearls, some faux snow, the rivets on the ends of the crown and laced through some ribbon. The finished crown was quite heavy, but it looks so fun!


And of course, Meg wanted to be a little mer-dog for the afternoon ;)


To see more projects and art by Carrie, check out her blog Violet Cottage.


Saturday, April 6, 2013

Heart of Fire - Faux Opal Pendant


Most of my glitter collection is made up of Art Glitter Ultra Fine glitters.  I love all the colors and the brilliant sparkle!  But I am absolutely mesmerized by the dazzlers and chunkier styles.  My project today encases Dazzler Glitter and Faux Snow in a resin to create a faux opal effect.

For this project I used:  Art Glitter Dazzlers - #62 Treasure (my fave!!), Art Glitter Faux Snow, Deep bezel pendant (from Metal Gallery), Lisa Pavelka Magic-Glos UV Resin.  UV Light (optional, but very helpful!),  Toothpicks.


Begin by adding UV resin to the interior of the bezel.

Spoon a little Treasure Dazzlers into the bezel.

Use a toothpick to mix the glitter and resin, adding more resin as necessary.  Spread the mixture evenly over the base of the bezel.  Be sure to wipe any excess off the rim of the bezel.  Set under a UV light or direct sunlight - 5 - 10 minutes.  Resin is set when you cannot dent it with your fingernail.


Add more resin to the bezel and spoon in a little Faux Snow.

Again use a toothpick to mix the resin and snow and spread a layer over the gold layer.  Make this layer a little uneven in spots so the the gold shows through here and there.  

The glitter & resin mixture will be lumpy at this point.  Press it down a little so you don't have any pieces that stick out of the resin.  Wipe the bezel edges clean, and set under UV Lamp or direct sunlight.

To finish, add a generous layer of resin.  Use a toothpick to draw the resin out to the edges of the bezel.  It is self-leveling, so it will form a nice rounded, glass-like surface.  Use a pin or toothpick to remove any air bubbles that form before setting this layer under UV lamp or direct sunlight.

Once the resin is set.  Simply add a jump ring (or two) and put the pendant on your favorite chain.  

Please visit my blog for more glittering fun!!


Thursday, December 6, 2012

Christmas Tray with Dreamweaver Stencils and Art Glitter

Hi all!  I don't post very often as the team is so talented, but I really wanted to share this SPARKLING project. 

Supplies:  a Tray from McGuffey Woodworking, Crackle Paint, Dreamweaver Stencils and TONS of Art Glitter and Embossing Paste. 

You will notice I used all sorts of embellishments as the tray evoloved.  I will show you panel by panel then the entire project.

I started by taking the back off the tray and then painting all the areas.  I used an acrylic paint with a crackle paint over the top.  I added embellishments/stenciled images before placing the tray grid back on the tray.

 It is difficult to see but I added Crystal Glitter to the side panels for some glimmer.
 In this panel the skates are done in paste and then crakle paste.  I dusted the panel with Crystal Glitter and then filled the small bottle with "snow".  This is a combination of Crystal Glitter and Faux Snow from Art Glitter.

This pretty little snowflake was added to the panel in Pearl White and then covered in Crystal Glitter.  (Crystal Glitter is my favorite!)
 This panel was done with paste and then I very carefully added my colors.  I used Black, Twig, Fire Engine Red, Sedona Sun, White and I am not sure of the yellow, you can choose the yellow of your choice!

More Faux Snow in the bottle and again, a light dusting of Crystal Glitter.

I think this is a fun and very pretty project for your mantel or for gift giving!  I am glad I could share this with you all today!  Enjoy the SPARKLE!

Kristi

Saturday, January 14, 2012

Elegant Votive Candle by Candy Spiegel


You can be sure of one thing when you live in Michigan — during the winter, the days are short and generally cloudy.
Christmas lights and holiday fun helps get me through November and December, but when the decorations come down in January, the cloudy, dark days can easily bring a person down.
So, I decided to extend the sparkle of the holidays right through winter by making an elegant candle holder.
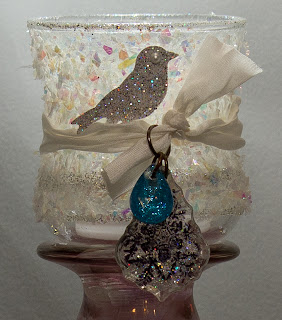
I started with an inexpensive, plain votive cup. (I got mine at the Goodwill store for less than a dollar.)
At first, I planned to add just a bit of sparkle to the bottom third of the cup, so I started with strips of 1/4 inch Sticky Tape, like this.


Leaving the top of the tape on, I went in between the lines with Designer Dries Clear Adhesive and added a light layer of  glue.
NOTE: You will want to use your Ultrafine Metal Tip for this and really spread the glue around. If you put it on too thick, it may drip down the side of the glass.
On the glue, I sprinkled Ultrafine Transparent Glitter in Blue Rain (120).


Then, I peeled off the covering on the tape and added Faux Snow. And this is where I got a bit carried away … In fact, I loved the look of the Faux Snow so much, I used Designer Dries Clear Adhesive to cover almost the entire exterior of the cup! It reminded me of a sparkly sweater and I just kept going and going.
Then, using my finger, I applied a little adhesive to the top rim and dipped it in some additional glitter.
I let the cup dry over night and then gently brushed off the excess.
Naturally, I wanted a little more added to the votive. I found a couple of clear beads from Maya Road in my stash and went to work making embellishments for my votive.
The first one has a flat back, so I used Art Glitter’s Very Black Permanent Stamp Pad and a Tim Holtz snowflake stamp to add a bit of design to the back.


I then heated it to set the ink, covered the back lightly with a layer of Designer Dries Clear Adhesive and dusted it with the same Blue Rain glitter I used on the glass.
Then, I thought that as beautiful as this white and silvery votive was, I still might like a little color. So, I took a smaller bead and covered one side with adhesive and then a layer of Microfine Opaque Bahaman Blue (512).  Because the surface was not flat, this was a bit more difficult and I had to repeat the process once the first layer was dry. Keep in mind that if you do the same, make sure to smear the adhesive with your finger … Designer Dries Clear Adhesive can dry with a bit of dimension that you will be able to see in your finished product if you don’t smear it out.
Next, I attached a bit of ribbon and a few jump rings.


But, it still didn’t feel quite finished to me.
So, I adhered a piece of Sticky Paper to a scrap of white cardstock and then ran it through my Sizzix Big Shot with the small bird die from Tim Holtz. Then, I removed the protective layer off of the Sticky Paper and covered the image in the same Blue Rain glitter. For a final touch, I added an eye with Ranger’s Liquid Pearls and then attached it to the votive with Designer Dries Clear Adhesive. Because I was attaching it to the Faux Snow on glass, I had to hold it for a minute or two before it took hold.


Then, I inserted a flameless tea light and …


CAUTION: I have no idea how Faux Snow or glitter will hold up to heat or a flame, so I would recommend ONLY using flameless lights inside the votive. They are safer and just as pretty!
This is sure to keep the winter blues away!
I received Art Glitter products in exchange for this post.

Wednesday, December 14, 2011

Freehand Glittered Holiday Cards by Barbara Trombley

What could be easier than a few swishes of the glue bottle, a dash of glitter and voila a beautifully handcrafted holiday card!


Barbara’s Designer Dries Clear adhesive with the Ultrafine Metal Tip attached coupled with her exquisite glitter make her smooth, flowing designs simply divine!

Did you know this is exactly how Barbara got started? By making homemade Christmas cards for friends and family she developed a handmade greeting card business that grew into her glitter manufacturing business of today.

She started out with cheep white glue and that big metallic glitter of old. Soon it was apparent how popular her ideas were and she needed quality materials. Hence the industrial strength Designer Dries Clear adhesive designed by a calligrapher, (Barbara) it is forever flexible and will hold glitter for over 30 years. At least that is how long it has been around, I’m sure it will last longer!


Here’s Barbara sharing her talents with a class of glitter enthusiasts, learning how to freehand holiday designs on cards.


They did a great job!


Barbara’s products have grown so much from just glitter to the organic pleasures of Elements Earth Textures shown in the wreath above. Faux Snow, Glass Beads, Vintage Glass Glitter and even Dazzlers, all favorites for the holiday season!


Speaking of Glitter for the Season…make sure you take advantage of our 25% off all Art Glitter products sale, it will be over soon! We also have free shipping though the month of December. So Get Your Glitter On Now!!!

Visit our SALE page for more details!

Monday, July 26, 2010

Sweet Happiness Sign by Cassandra Midkiff

One of my favorite pieces to create are these altered signs with inspiring words on them. For this project I decided to go with "sweet, happiness." I found these chipboard words at Michaels in the dollar bin and knew I had to work them into some of my projects.


Materials used:
Art Glitter Ultrafine Transparent Colors: #166 Atlantis, #100 Sea Shell, #288 Deep Blue Sea, #219 Lilypad, #215 Wild Rose
Art Glitter Ultrafine Opaque Colors: #113 Sky, #28 Twilight
Art Glitter Shards Vintage Glass Glitter: #922 Swan Lake
Art Glitter Faux Snow
Art Glitter Designer Dries Clear Adhesive
Brown ink pad
Chipboard word "happiness"
Forget me not flowers and scrapbook flowers
Wire
Dresden Trim
Rhinestones
Jewelry embellishments
Elmer's craft boards that measure: 7" by 2 3/4"
Scrapbook paper

Directions:
I always start by gluing my scrapbook paper to the board and aging the edges with my brown ink pad. Next I drill my holes where I want to place my wire for hanging. I put down a layer of the Designer Dries Clear Adhesive as wide as my chipboard word and then sprinkled the Faux Snow on top. I love layering I think it creates a lot of dimension to each piece. After the Faux Snow is dry I glue down the chipboard word. Because all of the lettering in happiness is different it gave me the idea to use a different color glitter on each letter. To do this I simply added my Designer Dries Clear Adhesive to each individual letter and added my glitter. It took a little time but I think the result is worth is!


After happiness was completly dry I added a few spots of #215 Wild Rose glitter surrounding it. Then I layered three scrapbook paper flowers to create a big beautiful flower. For each layer of the flower I added some glitter then glued it together with my Designer Dries Clear Adhesive. I also love to use the Dresden foil trim in my pieces (you can find this in several shops on etsy) and jewelry findings. I attached my wire to the holes I drilled, I like to play with the wire adding embelishments to it such as my forget me nots and plastic flower findings.

Finally you have a beautiful piece to hang up and enjoy. These are quite popular in my etsy shop jupiterdesigns.etsy.com.