Monday, February 13, 2012
Glitter Notebook by Candy Spiegel
I created it using the lace technique created by Barbara Trombley, the owner of Art Glitter.
I love this technique because although it looks difficult, it is super easy! For a visual demonstration, click here …
First, adhere a piece of cardstock to cover the back cover of the book. I use a corner rounder to trim the right edge.
Now, to the fun part … Adhere a piece of Sticky Paper (with the protective cover to the sticky side up) to the front of the book and corner round the edges. Peel off the backing and position a piece of lace to the Sticky Paper. I used Lace Pattern 2.
Apply the background color (I used Ultrafine Transparent #85 Crystal).
Carefully remove the lace and apply the second color (I used Ultrafine Opaque #1 True Red).
Place a sheet of scrap paper over the top and gently run a brayer across the top to make sure the glitter is set well. Tap the book on a table to shake off the excess.
And now the finishing touches:
Cut the bookplate with a Tim Holtz Die out of cardstock and then paint it with Adirondack Dabber in Gold.
Stamp the quote (from Tim Holtz) in the center of the bookplate with Archival Black Ink and lightly color the edges with Vintage Photo Distress Ink. Adhere it with Designer Dries Clear Adhesive. Attach the bookplate with brads.
Using Art Glitter Designer Dries Clear Adhesive and the Ultrafine Metal Tip, designate places for the beads (Glass Beads #817 Pearlies) including a very thin ring around the inside of the bookplate. Add the beads and let sit for a few minutes. Then, very gently, push the beads into the glue and shake off the excess.
For a final step, fill the bookplate with a bit of Glossy Accents and let dry.
(I received Art Glitter products in exchange for this post).
Saturday, January 14, 2012
Elegant Votive Candle by Candy Spiegel
You can be sure of one thing when you live in Michigan — during the winter, the days are short and generally cloudy.
Christmas lights and holiday fun helps get me through November and December, but when the decorations come down in January, the cloudy, dark days can easily bring a person down.
So, I decided to extend the sparkle of the holidays right through winter by making an elegant candle holder.
I started with an inexpensive, plain votive cup. (I got mine at the Goodwill store for less than a dollar.)
At first, I planned to add just a bit of sparkle to the bottom third of the cup, so I started with strips of 1/4 inch Sticky Tape, like this.
Leaving the top of the tape on, I went in between the lines with Designer Dries Clear Adhesive and added a light layer of glue.
NOTE: You will want to use your Ultrafine Metal Tip for this and really spread the glue around. If you put it on too thick, it may drip down the side of the glass.
On the glue, I sprinkled Ultrafine Transparent Glitter in Blue Rain (120).
Then, I peeled off the covering on the tape and added Faux Snow. And this is where I got a bit carried away … In fact, I loved the look of the Faux Snow so much, I used Designer Dries Clear Adhesive to cover almost the entire exterior of the cup! It reminded me of a sparkly sweater and I just kept going and going.
Then, using my finger, I applied a little adhesive to the top rim and dipped it in some additional glitter.
I let the cup dry over night and then gently brushed off the excess.
Naturally, I wanted a little more added to the votive. I found a couple of clear beads from Maya Road in my stash and went to work making embellishments for my votive.
The first one has a flat back, so I used Art Glitter’s Very Black Permanent Stamp Pad and a Tim Holtz snowflake stamp to add a bit of design to the back.
I then heated it to set the ink, covered the back lightly with a layer of Designer Dries Clear Adhesive and dusted it with the same Blue Rain glitter I used on the glass.
Then, I thought that as beautiful as this white and silvery votive was, I still might like a little color. So, I took a smaller bead and covered one side with adhesive and then a layer of Microfine Opaque Bahaman Blue (512). Because the surface was not flat, this was a bit more difficult and I had to repeat the process once the first layer was dry. Keep in mind that if you do the same, make sure to smear the adhesive with your finger … Designer Dries Clear Adhesive can dry with a bit of dimension that you will be able to see in your finished product if you don’t smear it out.
Next, I attached a bit of ribbon and a few jump rings.
But, it still didn’t feel quite finished to me.
So, I adhered a piece of Sticky Paper to a scrap of white cardstock and then ran it through my Sizzix Big Shot with the small bird die from Tim Holtz. Then, I removed the protective layer off of the Sticky Paper and covered the image in the same Blue Rain glitter. For a final touch, I added an eye with Ranger’s Liquid Pearls and then attached it to the votive with Designer Dries Clear Adhesive. Because I was attaching it to the Faux Snow on glass, I had to hold it for a minute or two before it took hold.
Then, I inserted a flameless tea light and …
CAUTION: I have no idea how Faux Snow or glitter will hold up to heat or a flame, so I would recommend ONLY using flameless lights inside the votive. They are safer and just as pretty!
This is sure to keep the winter blues away!
I received Art Glitter products in exchange for this post.
Friday, September 16, 2011
Big Bling Luggage Tag by Emily M. Miller
This is an altered photo of her and her baby beagle. I scraped off the background and painted it too. I decided to use this laminate from 3M because it is really thick, double sided, and just the right size for a 4x6 print. I also printed out her address info on copy paper. Tore around the info, ran the edges across a couple ink pads and glued it onto the backside of a cereal box. (See backside at end of post).
I trimmed a little off the long side of the photo so I could have more space for the laminate sides to adhere together. I glued the photo onto the other side of the address info and let it dry a little. Then I placed the photo inside the laminate, leaving extra space at top to cut out a hole. I just free-hand cut out the hole with a zacto knife. You can see it’s not perfect, but who cares? Glitter will take care of that!
I used my bone folder to get a really good seal. Pressing the edges and as close to the photo sides as possible. The laminate was pretty slick so I sanded the edges for a better glue surface to stick to.
I wanted lots of bling with different sizes and usually that means I’ll grab for my Gala Glitz. But this will be handled quite a bit and I can’t use glass! So my next favorite big bling is Dazzlers. Here’s what I used:
D55 Queen’s Robe
D52 Rockettes
D44 Hollywood (stars)
Microfine Opaque Glitter #502 Diva Gold
Here’s how to get a quick easy mix, without mixing all your glitter together: Lay down your Designer Dries Clear adhesive. You can either paint it on or do the lazy messy method I use, take your ultrafine metal tip off and draw a thick line of glue, then smear it across your area with your finger. Start with your largest size of glitter, (the stars), take a small pinch of them and drop them on the glue sparingly. Then take the next size, (Queen’s Robe), and sprinkle some more on. Then fill in the rest with an ultrafine or microfine glitter (#502 Diva Gold). You’ll love the results! Be sure to work in sections so you can get it all done while the glue is wet, white and shiny.
I also edged the photo, the hole and sides with Queen’s Robe and Rockettes for a nice finish. (AND Because I smeared the glue on, the sides weren’t completely covered and I wanted to fix the hole too!)
I don’t know if any of you do this, but when ever I’m working with these larger glitter sizes and I have a left over pile of mixed pieces, I save it in a special jar, a sort of a kitchen sink concoction. I’ll use that later for a quick edging to finish off a piece. I have another one set aside for glass glitter and beads.
Here’s the backside with her address info blurred out. I just did a quick border with my left over glitter pile from the front side. As you can see the front is not quite dry. My theory was that I didn’t need to do the backside since it would show through from the front. I didn’t have time to find out if that was true, had to mail it off to her before it completely dried, but I’m sure it looks great. It has to…it’s glitter!
Saturday, July 30, 2011
Dazzle Dangles by Emily M. Miller

Oh these are fun! I designed this project for a kids class and it went wonderfully! We started out filling bottle caps with different Dazzlers and covering the logo side with Ultrafine Hologram Opaque Glitter #136 Chromosphere.
There are also a myriad of seed pods here too. We brushed Designer Dries Clear Adhesive onto Yucca, Agave and Acorn tops then sprinkled with more Dazzlers! My favorite Dazzlers at the moment are several Hexis: D29 Confection, D55 Queen's Robe, D52 Rockets, D56 Dragonfly, D53 Gold Crown; Flakes: D38 Blue Eyes, D37 Lollipop, D42 Sherwood. The Slivers worked quite well for this project too.
Of course you can use just about any glitter product in the bottle caps and on the seed pods. I prefer the larger cut glitter products like the Shards Vintage Glass Glitter, Glass Beads and Gala Glitz. Since this project was for kids we didn't use any glass products and stuck to the Dazzlers and I was really happy with the results. See the two lower Yucca pods above? They are covered with #815 Waterdrops (clear) Glass Beads, they look like moth wings!
While these were drying we had fun with Fantasy Film! Our stamp theme is bugs. We stamped Fantasy Film on several bug stamps in various colors. This was a perfect opportunity to use up some Fantasy Film scraps. Then we cut the bug images out, leaving approx. a ¼ inch border and room at the top to put a little hole above the image for wire. You can cut yours out closer to the image if you want.
Next I put holes into every piece. The Fantasy Film pieces were easy, I used a utility knife for their holes. The other pieces required a nail and hammer, not too difficult! Which is good because I had to do this step for ALL of us!
Then we wrapped wire through each dangle (or around a stem) and left the top as a hook. And I say we left the top as a hook because instead of cutting strips of wire, we used ornament hangers! It was a perfect match and I tell you what, a new favorite short cut of mine for wiring projects!
Then I cut three different kinds of ribbon the length of my arms outstretched. We laid the three strands out flat on a table, distributed the pieces among the three strands and placed them evenly along their length. To tie them on, first start with the center dangle and tie a knot around its wire hook, then work your way down on both ends. Don't worry about getting each dangle in its perfect spot...it just doesn't matter!
All that is left is tying a knot at the top of all three ribbons and finding a spot to hang it.
I hesitate to use this photo, it is so horrible! The lighting is off and I couldn't get my dangles to stop moving! So I apologize, but I wanted you to see how it looked in full length. My students' Dazzle Dangles looked better than mine! Enjoy!!!
Thursday, November 18, 2010
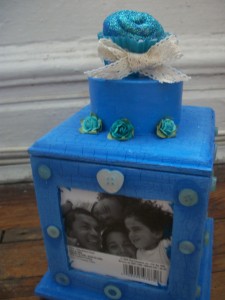
Glittery Cupcake Photo Box by Diane Gonzalez

It may not be the best photo in the world, but I love this project! I had so much fun with it.

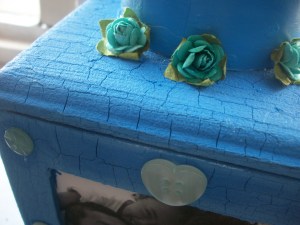
You can see the crackle finish. The flowers I got from my swap partner. The cupcake is hand sculpted, and on top, there is a lovely coating of Art Institute Ultrafine Opaque Glitter in the shade of Twilight.

There’s a better shot of the crackle finish. This little box? It’s by Plaid Crafts, and you can get it anywhere that you purchase their products.
Pretty cool, right? I really like it. Oh, and this little item is for sale, if you’re interested.
The Craftaholic
Tuesday, October 12, 2010
Glitter Fairy House by Fawnda Norman
When Halloween is over you can get one of these pumpkins on sale and make it into a cute little fairy house!
Here is what you will need:
1-Medium size foam pumpkin (found at a craft store and also at target)
1-scrap piece of cardboard
1- shape knife
1- piece of scrap fabric
1- button (not pictured)
ribbon (not pictured)
Hot Glue Gun (not pictured)
Art Glitter - Ultrafine Opaque Colors: Dubonnet #6, Cavalado #109, Old Gold #65, Brown #58
Art Glitter Designer Dries Clear Adhesive
1. Draw and outline of what you want your Door to look like. You want it to be a big door so that you can fit all your fairy stuff inside!
2. Cut out your door using a sharp knife. Be very careful while you are doing this!
3. Cut out a piece of cardboard to use as a floor in your fairy house.
4. Use a brush to spread the Art Glitter Dries Clear Adhesive on the cardboard and sprinkle the glitter on. Shake off the excess glitter. I use Brown # 58.
5. Use your glue gun to secure your floor to the pumpkin.
Also use the hot glue to attach a piece of scrap fabric to the lip of the pumpkin (this is going to act as a hinge for out door)
Hot glue the other side of the fabric to the lip of the door you cut out.
6. Make some fairy furniture out of cardboard and other supplies you can find around your house! Decorate them with glitter! I used: Dubonnet #6, Old Gold # 65, Brown #58
7. Cut a piece of ribbon long enough to wrap around the stem and hot glue it on to the door, Hot glue a button over where the ribbons overlap. Make sure you can get the loop around the pumpkin stem before you glue!
8. Using your Art Glitter Dries Clear Adhesive, make some swirly shapes around the door and sprinkle the glitter on and tap off the excess.
Cavalado #109
Add some more around the inside of the door.
Dubonnet #6
Take it outside and see if you can attract a fairy or two to live in this cute little house!
You can make these Fairies easily from Pink and Green Mama's Tutorial!
I, of course, added some glitter to mine! : )
Tuesday, October 5, 2010
Glimmer Trees by Christine Lehto
For my business I make an assortment of sculptural pieces to make into pins or magnets. I recently made a sculptural tree design that was looking for something beyond the basic coat of acrylic paint. After adding some pizzazz with Art Glitter to some dull looking brads for a previous project, I decided that my new tree design would be a perfect candidate for a similar glimmer treatment. I make my sculptural pieces with resin after I first make an original piece in clay and make a silicone mold from that. With two newly cast, white resin trees ready to be decorated, I decided to make a tree to symbolize summer and one to symbolize autumn. Once my assortment of glitter grows, I’d like to make a tree to represent each of the four seasons.
To make my sparkly trees, I used a variety of glitter and I also tried a microfine glitter this time. I love the sparkle of glitter, but in order to prevent a “sparkle” overload, I varied the sparkle intensity by incorporating some types of glitter with less intense glimmer. This is when using the ultrafine pearlescents are a perfect choice. They are still rich, gorgeous colors, but just with a more subdued bling factor. Using the ultrafine transparent glitters also fit in well to keep the bling intensity under control. I also used a microfine opaque glitter, which gave an additional sparkle effect not seen in any of the other varieties of glitter. The microfine glitter gives a smoother, more uniform glitter effect whereas the ultrafine opaque gives a varied sparkle effect where the glitter sparkles at a variety of angles.
I really liked how my glimmer trees turned out. To try out a varied glitter project for yourself just remember the simple “variety” formula which can be altered with other glitters of your choice. The recipe for my summer tree was: 1 ultrafine transparent + 1 ultrafine pearlescent + 1 microfine opaque + 2 ultrafine opaque = a varied palette of glittery goodness.
For the summer tree I used: 44 Kelly (ultrafine opaque), 519 Reed (microfine opaque), 241 Fresh Lime (ultrafine transparent neon), 182 Astro Turf (ultrafine pearlescent) and 58 Brown (ultrafine opaque)
For the autumn tree I used: 91 Orange Crush (ultrafine transparent), 177 Florida Orange (ultrafine pearlescent), 1 True Red (ultrafine opaque), 62 Copper Canyon (ultrafine opaque) and 58 Brown (ultrafine opaque)
***Note: I also hand-painted an additional pair of trees to symbolize summer and fall, but they just don’t hold the same charm as the glittery ones. After something is glitter-fied, nothing else compares to it.