I wasn't going to do any more snowflake projects (for a while), but then I got a jar of Art Glitter Faux Snow and couldn't wait to play with it. I looked around my shop for something to cover in snow and this little paper mache snowflake said "PICK ME"....So I did.
This is a quick and easy ornament project. It is very kid friendly. These would be great as teacher gifts, or write a personal message on the back and use them as gift tags.
I started by painting the snowflake white with acrylic paint. After that dried I sprayed the front side down with Helmar V2 Vellum Adhesive. While the adhesive was still wet, I placed the snowflake on a clean sheet of paper and sprinkled on the Faux Snow.
I shook off the excess snow and put it back in the jar. Then I sprinkled the ornament with Art Glitter Ultra Fine Glitter - Pearlescent - #183 Blue Angel. The glitter filled in any spaces on the adhesive that the snow had not filled.
Then I used purple and blue printed card stock to stamp "Let it Snow" and used Helmar Quick-fix Adhesive runner to adhere it to a purple backing. I used Helmar 450 Quick Dry Adhesive to attach the card stock to the snowflake. This glue is thick and worked great to glue on the textured surface of the snowflake. I finished with a swirl of rhinestones from Want2Scrap. I used a little of the 450 Quick Dry on the areas of the rhinestone swirl that extended over the "snowy" surface.
The Art Glitter Design Team is teaming with Helmar Adhesives to bring you great new projects. You can't help but have fun when you mix sticky stuff and glitter! Come back soon for more glittering sticky fun.
Please visit my blog to see another Faux Snow project - http://kc-distractedbyshiny.blogspot.com/
Thanks for stopping!
KC
Saturday, September 15, 2012
Thursday, September 13, 2012
Amazing Autumn Banner with Linda!
Hi folks! Linda here and I'm sharing the steps I took to create this Autumn banner using Art Glitter.
Autumn is my absolute most favorite time of the year. I just love all its glorious colors of red, gold, browns and yellows.
Notice how the banner sparkles and shines - just like the pretty Autumn-colored leaves glistening in the sun after a light mist of rain. I achieved that look by adding Art Glitter's No. 305 Goldenrod Ultrafine Transparent glitter to the edges of all the pennants, the edges of the rosettes, the chipboard letters and a light sprinkling on the leaf die cuts.  Begin Here's how, by cutting your pennant pieces, either free-hand or with a die. I used Spellbinder's Nested Lacy Pennants. The rosettes are cut using Sizzix Sizzlits Mini Paper Rosettes die and were cut from one strip of double-sided paper (Cherry Truffles by Quick Quotes) so it easily gives you two color palettes to work with.
I wanted to add glitter only to the edges so I squirted a dime-size pool of Designer Dries Clear (DDC) onto my non-stick craft sheet and used a 1/2-inch paint brush to carefully go around all the edges. DDC dries quickly when painting it on so make sure to work quickly and in small segments. Have all supplies ready to go before painting. I pour my container of Art Glitter into a JudiKins Snappy Tray but a small sandwich container would work just as well. You'll also need a water bucket for the paint brush. The glue dries quickly and the brush will need periodic cleaning. So, I paint one edge of the pennant with DDC, dip it into the glitter and tap off the excess. Repeat all the way around.

I use the same painting technique on the rosettes - just lightly brushing the edges with DDC, then dipping into the glitter. The center pennant is then processed through my Xyron 2.5" Create-a-Sticker for complete coverage; place it on the background pennant. Assemble the rosettes, stack them together (using DDC) and adhere them to the pennant as well.

Cut or purchase chipboard letters. I painted mine gold because I'm using a transparent glitter and the background will show through. Place them face-down into a Xyron 1.5" Create-a-Sticker. This puts solid adhesive coverage on the top of the letters. Peel the protective cellophane covering off the letters and dip them into the Goldenrod Ultrafine Transparent Glitter; tap off excess. Adhere these to the center of the stacked rosettes to spell out Autumn.
Look at that glorious sparkle! The chipboard leaves are from Quick Quotes Bag of Chips. They were inked with Aged Mahogany and Brushed Corduroy Distress Inks, randomly tapped with Piccolo Enamel Powder Adhesive, sprinkled lightly with ultra thick embossing enamel (UTEE) and heat set. While the enamel is still warm, lightly pinch the Goldenrod glitter over the top and heat again to set it in the enamel. This step really makes these leaves glisten!
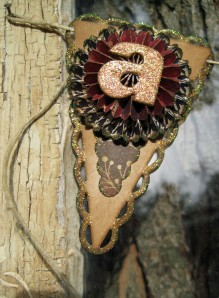

My intention for my altered vintage window frame was to have several interchangeable banners for the different seasons and holidays - I'm well on my way!
Visit my blog for more Art Glitter inspiration!
 Begin Here's how, by cutting your pennant pieces, either free-hand or with a die. I used Spellbinder's Nested Lacy Pennants. The rosettes are cut using Sizzix Sizzlits Mini Paper Rosettes die and were cut from one strip of double-sided paper (Cherry Truffles by Quick Quotes) so it easily gives you two color palettes to work with.
I wanted to add glitter only to the edges so I squirted a dime-size pool of Designer Dries Clear (DDC) onto my non-stick craft sheet and used a 1/2-inch paint brush to carefully go around all the edges. DDC dries quickly when painting it on so make sure to work quickly and in small segments. Have all supplies ready to go before painting. I pour my container of Art Glitter into a JudiKins Snappy Tray but a small sandwich container would work just as well. You'll also need a water bucket for the paint brush. The glue dries quickly and the brush will need periodic cleaning. So, I paint one edge of the pennant with DDC, dip it into the glitter and tap off the excess. Repeat all the way around.

I use the same painting technique on the rosettes - just lightly brushing the edges with DDC, then dipping into the glitter. The center pennant is then processed through my Xyron 2.5" Create-a-Sticker for complete coverage; place it on the background pennant.
 Assemble the rosettes, stack them together (using DDC) and adhere them to the pennant as well.

Cut or purchase chipboard letters. I painted mine gold because I'm using a transparent glitter and the background will show through. Place them face-down into a Xyron 1.5" Create-a-Sticker. This puts solid adhesive coverage on the top of the letters. Peel the protective cellophane covering off the letters and dip them into the Goldenrod Ultrafine Transparent Glitter; tap off excess. Adhere these to the center of the stacked rosettes to spell out Autumn.
Look at that glorious sparkle! The chipboard leaves are from Quick Quotes Bag of Chips. They were inked with Aged Mahogany and Brushed Corduroy Distress Inks, randomly tapped with Piccolo Enamel Powder Adhesive, sprinkled lightly with ultra thick embossing enamel (UTEE) and heat set. While the enamel is still warm, lightly pinch the Goldenrod glitter over the top and heat again to set it in the enamel. This step really makes these leaves glisten!


My intention for my altered vintage window frame was to have several interchangeable banners for the different seasons and holidays - I'm well on my way!

Visit my blog for more Art Glitter inspiration!
Tuesday, September 11, 2012
Art Glitter and Canvas
Today I want to share with you a fun project that I made for a friend of mine.
I started with a white 8"x10" canvas that I got at a local craft store. I wanted to make a fun inspirational sign, so I looked for a simple, but fun, quote. Once I decided on the quote, I cut out the lettering on my Cricut Expression 2 using vinyl. I took the background of the vinyl letting and placed it on the canvas. Be sure to place this exactly where you want it. Once it is on, be sure to press firmly and make sure all of the edges are on well. This will determine if any paint will seek through the edges. The better sealed the more crisp the letters will look.
Using Designer Dries Clear adhesive, I filled in the letters that I wanted glittered. I then poured on #601 Royal Rose Vintage Glass Glitter.
After it dried, I painted the remaining letters with green acrylic paint. Once everything thing was dry, then I peeled back the vinyl to reveal what the sign.
Below is a close up of the glittered letters.
You could make this sign with practically any saying, and any size! Make it your own, and use colors your love! I just recommend that there is glitter on it! I hope you enjoyed my project today, be sure to stop by my blog, http://oneheartscrapper.blogspot.com for more glitter fun!Saturday, September 8, 2012
Glittered Cupcake Halloween Rosette
We're quickly getting closer to my favorite time of year... Fall! And Halloween is especially my favorite! Is it wrong to start decorating now?
I took this blank rosette:
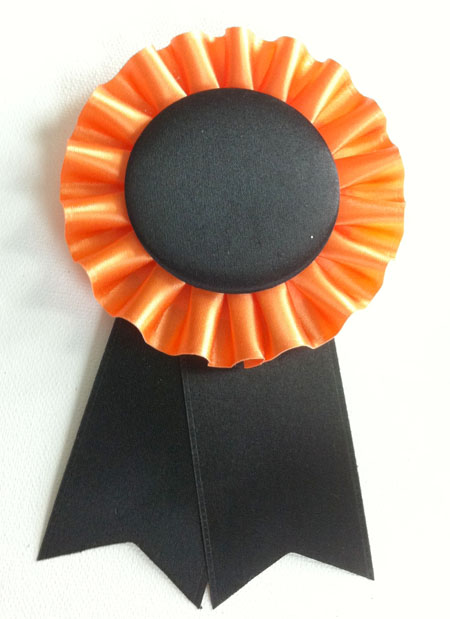
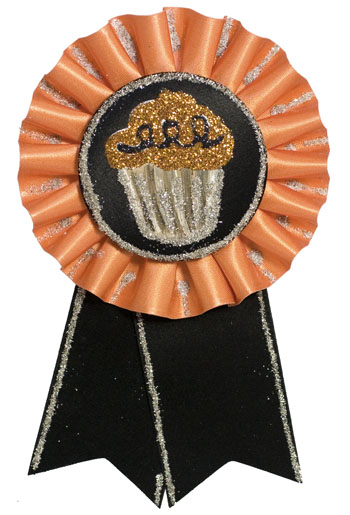
And with some paint and glitter, I turned it into this:
After it sat out for a few weeks... the silver in the antique silver glitter tarnished a bit, which is awesome, and now it looks like this:
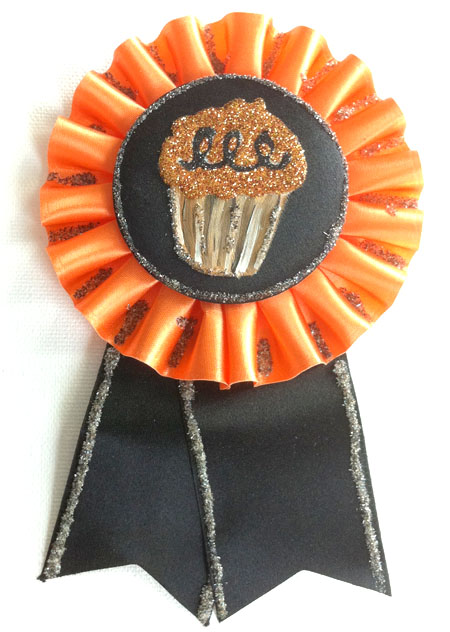
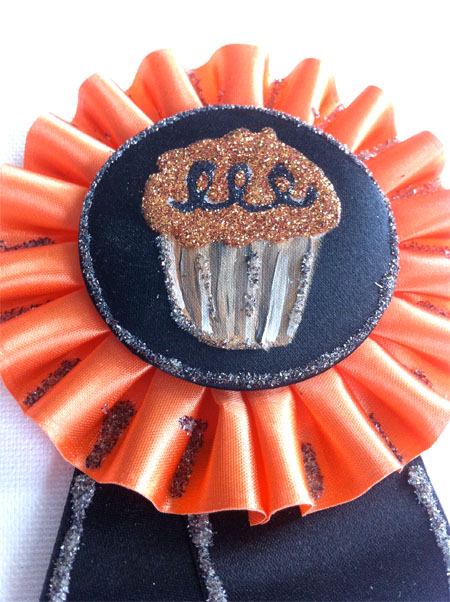
I love how the silver glitter has *real* silver in it and tarnishes... giving it a wonderful effect!
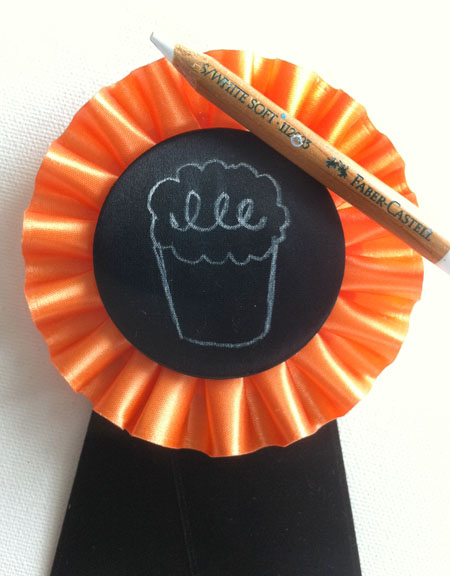
To create this piece, I first sketched out my cupcake using a white chalk pencil. I LOVE using chalk pencils because if you don't like your first sketch, just rub it away with a damp clean cloth! I then painted on the bottom of the cupcake in brown acrylic paint. The top of the cupcake was created using glue and glitter. I then outlined the circle and tails of the rosette with glue and added the vintage glass silver glitter and added the same vintage silver glitter to the inside of the ruffles.
Here is the glitter I used:
I took this blank rosette:


- #611 Antique Silver Vintage Fine Glass Glitter (My absolute favorite!)
- #79 Ultrafine Opaque Glitter - Black
- #56 Ultrafine Opaque Glitter - Pumpkin Orange
- And I used Designer Dries Clear adhesive, too!
Thursday, September 6, 2012
"Bling Sun" Fabric Art by Emily M. Miller
Fabric, Bling from Want 2 Scrap and Art Glitter…WAY too much fun!
Play Things
Art Glitter Ultrafine Opaque: #27 Navy
Art Glitter Ultrafine Pearlescent: #183 Blue Angel, #175 Retro Red, #174 Pink Cadillac, #179 Tang, #178 Duck Tail #186 Purple Polka Dot, #193 Martha’s Yard
Art Glitter Ultrafine Transparent: #93 Lemone’, #86 Angel Dust
Art Glitter Designer Dries Clear Adhesive (DDC) with Metal Tip attached
Art Glitter Sticky Tape
Art Glitter Sticky Sticks
Want 2 Scrap Bling: Swirls Finesse-LeCreme Pearls, Baby Bling Rhinestones-Brown
Laurel Burch Celestial Fabric and coordinating background fabric
Fabric scissors
E6000
Matte Board
Sharpie
Ribbon
Spray Adhesive
Walnut Ink Spray
Memories Mist: Iced Coffee
Maya Road: Bronze Thick Photo Edges
Choose your fabric selections and decide how large you want your piece to be. Then cut your matte board and fabric accordingly. Spray one side of the matte board with a spray adhesive and glue background fabric down with an inch of fabric overlapping matte board, flip over. As you can see I’ve started by gluing opposite sides down with DDC adhesive.
Glue other two sides down. At an angle, cut overlapping fabric corners off as shown.
Spray glue onto backside of focal fabric and center it onto your background. You’ll notice in the next shot that my edges are not perfect, but that’s okay, I’ll fix that later.
Start with your larger bling from Want 2 Scrap. These swirls finesse from Want 2 Scrap were absolutely PERFECT with my Laurel Burch fabric. And they are so easy to use. Just lay the transparent sheet of bling on top of your project to see where you want the bling to go, cut it to size, peal and place down!
I wanted to add some smaller bling that comes in individual pieces (baby bling!). To avoid going crazy I employed a sticky stick to do my detail work. Just push the end onto gem and slide off.
Push lightly in place and use a pin tip or fingernail to release gem. So much easier than going crazy trying to use your fingers! I have many other things that make me crazy so it’s nice to lesson that load.
Now I’m going to fix my edges. Unroll a stretch of Sticky Tape over your fabric edge and place sticky side down paying attention to getting your line straight. Sometimes my tape overlaps the fabric, and in a few spots there is a gap, that I will fix too!
Lay tape on opposite sides; remove red protective covering and lay tape down on other two sides. Then trim the ends to make nice perfect corners. Remove protective cover. Now you can begin to glitter! Spoon navy glitter over open tape and rub glitter into tape with finger. Tap off excess and do all sides.
Now to fix those gaps, just add a line of glue and cover with same glitter color. If you are not great at making a straight line…like all of us, dashes are a lot easier. Cover with glitter then go back and connect your dashes with more glue and glitter.
This is my Mess O Glitter! I use basket coffee filters to catch my glitter. And you see my selection of glitter is mostly Pearlescent, it works PERFECTLY with this fabric. As a matter of fact it works great with all of Laurel Burch’s bright patterns. A must have!
I glued and glittered in dot patterns that resemble the fabric and bling. I also made dots on the yellow background fabric. Fun, easy, beautiful.
You may be wondering why I'm using Designer Dries Clear and NOT Fabric Dries Clear. Easy, because if you aren't going to wash it, you don't need to use our Fabric glue.
I made another matte board slightly larger (black velvet) and ran a sharpie marker along the edges. Of course I slipped a few times and left marks on the white back side. So I sprayed it with walnut ink and a reddish spray ink. I’m quite pleased, it almost looks like wood!
Before gluing back matte board to front with E6000 I laid a ribbon loop in between. Let dry overnight weighted down. ONE LAST THING…matte boards are notorious for their corners getting banged up. Hammer down some metal corners and you’re done!
I hope you’ve enjoyed this fabric bling journey. I took tons of photos and could have made a slide show! I know, I’m a bit excessive sometimes, I can’t help it. Who knows, I may make that slide show some day. Check out my blog for more Art Glitter art and then some: blogbyemm.com
Tuesday, September 4, 2012
An Apple A Day
Well, I hope you Labor Day was fantastic. Today is the first day of school here in Michigan, so I decided to celebrate with an easy, elegant, glittering apple.
Here are the simple instructions:
MATERIALS:
One Plastic Apple
Spray Adhesive
Assorted Gemstones. I used a cluster that I bought at Michael's and a few additional red ones
Art Institute Designer Dries Clear Glue
Ultrafine Metal Tip for Glue
Art Glitter Microfine 516 Gold Tone
Art Glitter Microfine 508 Silver Moon
Art Glitter Ultrafine Opaque 62 Copper Canyon
Art Glitter Ultrafine Opaque 155 Red Velvet
DIRECTIONS:
1) Spray apple with adhesive
2) Cover with Gold Tone glitter
3) Adhere gems around the apple. Try for a pattern, but be aware that this will NOT be perfect, as the apple is not completely symmetrical. Any gems that do not adhere can be attached with Designer Dries Clear.

Of course, the idea is to bring an apple for the teacher, but I am thinking that this one might be too pretty to part with. (Of course, I AM the teacher!)
Thanks for checking out my post today. If you want to see what I did with the OTHER apple (shown in red on the picture above), stop by my blog at www.rememberinglifesmoments.blogspot.com. I will give you a hint, I started with the same thing, used different glitter, and have something really spooky to show for it! Hope to see you there!
Here are the simple instructions:
MATERIALS:
One Plastic Apple
Spray Adhesive
Assorted Gemstones. I used a cluster that I bought at Michael's and a few additional red ones
Art Institute Designer Dries Clear Glue
Ultrafine Metal Tip for Glue
Art Glitter Microfine 516 Gold Tone
Art Glitter Microfine 508 Silver Moon
Art Glitter Ultrafine Opaque 62 Copper Canyon
Art Glitter Ultrafine Opaque 155 Red Velvet
DIRECTIONS:
1) Spray apple with adhesive
2) Cover with Gold Tone glitter
3) Adhere gems around the apple. Try for a pattern, but be aware that this will NOT be perfect, as the apple is not completely symmetrical. Any gems that do not adhere can be attached with Designer Dries Clear.

4) Using Designer Dries Clear with the fine tip, surround your gems with Copper Canyon.
5) Use the fine tip and more Copper Canyon, create a pattern by attaching the sections in the same manner (your choice), all the way around the apple. Let dry.
6) Surround the Copper Canyon sections with Silver Moon. Let dry.
7) Go around the outside edges of the Silver Moon with Red Velvet. Also, add any additional "gems" needed with drops of glue covered in Red Velvet. Let dry.
8) Brush off any excess glitter. You are done!Of course, the idea is to bring an apple for the teacher, but I am thinking that this one might be too pretty to part with. (Of course, I AM the teacher!)
Thanks for checking out my post today. If you want to see what I did with the OTHER apple (shown in red on the picture above), stop by my blog at www.rememberinglifesmoments.blogspot.com. I will give you a hint, I started with the same thing, used different glitter, and have something really spooky to show for it! Hope to see you there!
Blog Candy and Challenge
The contest was to find the number of changes and leave a comment. Well, we did not have as many comments as I would have liked but I am so glad some played. For those that did play, I counted EVERY change made and there are 13! Sarah was the only one that got the number of changes correct. I did count each one as a change, not by square. The glitter under the jars and under the candy corn were counted as one each! I am going to do the random.org NOW.. and the number is 8!
If you are the 8th person to leave a comment I will be contacting you! Thanks for playing and Happy September!
Subscribe to:
Posts (Atom)


