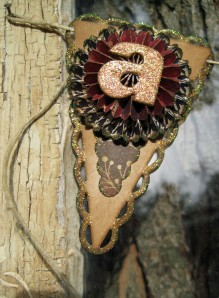
 Begin Here's how, by cutting your pennant pieces, either free-hand or with a die. I used Spellbinder's Nested Lacy Pennants. The rosettes are cut using Sizzix Sizzlits Mini Paper Rosettes die and were cut from one strip of double-sided paper (Cherry Truffles by Quick Quotes) so it easily gives you two color palettes to work with.
I wanted to add glitter only to the edges so I squirted a dime-size pool of Designer Dries Clear (DDC) onto my non-stick craft sheet and used a 1/2-inch paint brush to carefully go around all the edges. DDC dries quickly when painting it on so make sure to work quickly and in small segments. Have all supplies ready to go before painting. I pour my container of Art Glitter into a JudiKins Snappy Tray but a small sandwich container would work just as well. You'll also need a water bucket for the paint brush. The glue dries quickly and the brush will need periodic cleaning. So, I paint one edge of the pennant with DDC, dip it into the glitter and tap off the excess. Repeat all the way around.

I use the same painting technique on the rosettes - just lightly brushing the edges with DDC, then dipping into the glitter. The center pennant is then processed through my Xyron 2.5" Create-a-Sticker for complete coverage; place it on the background pennant.
 Assemble the rosettes, stack them together (using DDC) and adhere them to the pennant as well.

Cut or purchase chipboard letters. I painted mine gold because I'm using a transparent glitter and the background will show through. Place them face-down into a Xyron 1.5" Create-a-Sticker. This puts solid adhesive coverage on the top of the letters. Peel the protective cellophane covering off the letters and dip them into the Goldenrod Ultrafine Transparent Glitter; tap off excess. Adhere these to the center of the stacked rosettes to spell out Autumn.
Look at that glorious sparkle! The chipboard leaves are from Quick Quotes Bag of Chips. They were inked with Aged Mahogany and Brushed Corduroy Distress Inks, randomly tapped with Piccolo Enamel Powder Adhesive, sprinkled lightly with ultra thick embossing enamel (UTEE) and heat set. While the enamel is still warm, lightly pinch the Goldenrod glitter over the top and heat again to set it in the enamel. This step really makes these leaves glisten!


My intention for my altered vintage window frame was to have several interchangeable banners for the different seasons and holidays - I'm well on my way!

Visit my blog for more Art Glitter inspiration!


No comments:
Post a Comment