

Supplies
- Art Glitter Designer dries clear Glue
- Ultra fine Metal Tip
- Art Glitters: #35 Peacock, #123 Dusty Blue, #235 Mustard, #237 Lichen, #272 Water Color, #6 Teal Gala Glitz, #174 Pink Cadillac, #109 Cavalado, #364 Dreams, #183 Blue Angel
- Art Glitter Sticky tape
- 4 of the Authentique Summer Collection papers
- 4 pieces of Stampin up card stock (2 blue, 2 yellow)
- Seam Binding & Baker's twine
- Buttons
- Martha Steward lace punch
- Fiskars tiny flower punch
- flat back and drop pearls
- May Arts Leaves
- ribbon roses
- mulberry leaves
- Ranger's Vintage Photo Distress Ink
Step One
Heather started out with three sheets of 12 by 12 coordinating sheets of cardstock. They were scored at 6 inches and folded in half. Then each sheet was cut into 3, 4 inch pieces. You will need 7 folded pieces for a book.

Step Two
Next she cut out 16, 3.75" by 5.75" pieces of the Authentique Summer Collection paper.

Step Three
Heather applied sticky tape to the back of 6 of the folded cardstock pieces. All pieces were put together, to form a book. The edge that doesn't have any tape will be at the top of the book (this will leave an opening for tags).

Step Four
Once all your pages are put together, your book will look like the photo below.

Step Five
Heather distressed the edges of the Authentique papers with a pair of scissors, then inked all the edges with Ranger's Vintage Photo Distress ink. She also inked the edges of the cardstock book. On her cover piece she added a little cut in the upper right, and curled the edges in. Using Art Glitter Designer glue, she glued the Authentique papers to the cardstock base.

Step 6
Next she cut a piece of the Authentique paper to measure 4" by 2". She scored at 3/4" flipped the piece and scored again at 3/4" to create a book binding. Distressed the edges with scissors, then applied Ranger's Vintage Photo Distress ink to the edges. Heather used her Crop-O-Dile to punch two holes in the center of the binding. Please refer to photo below for placement.

Step 7
Next she cut out 6 pieces of the cardstock measuring 4" by 5". Each of these were inked with Ranger's Vintage Photo as well. She used the left over bits of the Authentique paper to create 12 labels measuring 1.5" by .5". Inked the edges and using a Sharpie Marker added the names of the Months. Then using the Designer glue she adhered them to the cardstock bases. Notice that February, April, June, August, October and December are not pictured, they are on the backs. Please refer to photo below for placement.
 Step 8
Heather added May arts leaf trim across the top of each of the 6 sheets (front and backs) adhering it with Designer glue, then outlined each month's label. Please refer to photo below for placement.
 Step 9
Peacock, Blue Angel, Lichen and Pink Cadillac, glitters were used on the sheets. Please refer to photo below for placement of glitter.
 Step 10
Pink seam binding was laced through the binding and tied into a shabby chic bow.
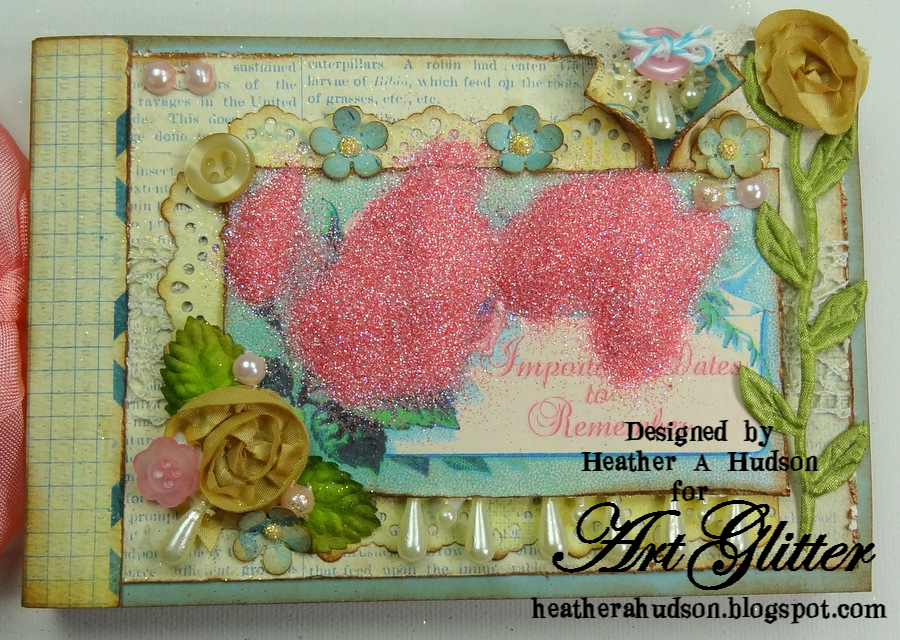
Heather used a Fiskar's flower and Martha Stewart lace punch and scraps of the Authentique papers to help embellish the cover. Edges of the pieces were inked with Ranger's Vintage photo. Using the Ultra fine metal tip Heather applied glue to the center of the punched Authentique flowers. The "Important Dates to Remember" sentiment was added in GIMP (free online program) to a free image Heather found at the Graphic Fairy. Ribbon roses, May Arts leaves, buttons, pearls and lace were also used to embellish the cover.
 Step 11
Mustard Glitter was added to the flower centers.
 Step 12
Excess glitter was removed then Designer dries clear glue was added to the rose, butterfly wings and rose buds using the ultra fine tip applicator.
 Step 13
Cadillac Pink Glitter was applied. This is the technique Heather uses through out her project.
 Step 14
Designer Dries clear glue was applied to the cover and Cavalado glitter was applied to leaves, Teal Gala glitz applied to the outer edges, lichen to the lace punch pieces, image banner and binding, Dreams glitter to the butterfly, Water color glitter to the image edges, Dusty blue to butterfly,
 Step 15
Art Glitter was added to the Authentique papers that were used as the backgrounds of each page. The book is a gift, and the recipient will add their own photos.
Broken lines using the Ultra Fine Tip and Designer dries Clear glue and Mustard, Peacock and Lichen Glitters were applied.
 Hexagon shapes of the Authentique paper were outlined with Ultra Fine Tip applicator and Designer dries clear glue. Peacock, Mustard and Lichen Glitters were applied.
 Mustard Glitter was added to the hexagons and Dusty Blue Glitter was added to the filigrees and leaves.
 Peacock Glitter was applied to the Authentique paper below.
 Heather used the Ultra Fine Tip Applicator to free hand some leaves and scrolls on the the Authentique paper below. Lichen glitter was applied.

Dots of glue were added to the Authentique paper. Mustard and Dusty blue Glitters were applied.
 Heather used the same techniques and Glitters on the duplicate pages of her book.
Here are some close up photos of Heather's Cover.
 Upper right.
 Close up of bottom.
 One final shot of the Cover.
Thank you for stopping by and hope you enjoyed Heather's Tutorial using Art Glitter and Authentique Papers!
Feel free to stop by and see Heather's other projects using Art Glitter on her blog.
heatherahudson.blogspot.com


Remember, for the entire month of June any order you place at http://artglitter.com/ of $25 or more you can use the coupon code of AQ20 for a 20% discount! You can also be entered in a prize drawing at the end of the month by commenting on this blog all month long! One comment per person per post!

Next she cut out 6 pieces of the cardstock measuring 4" by 5". Each of these were inked with Ranger's Vintage Photo as well. She used the left over bits of the Authentique paper to create 12 labels measuring 1.5" by .5". Inked the edges and using a Sharpie Marker added the names of the Months. Then using the Designer glue she adhered them to the cardstock bases. Notice that February, April, June, August, October and December are not pictured, they are on the backs. Please refer to photo below for placement.
Heather added May arts leaf trim across the top of each of the 6 sheets (front and backs) adhering it with Designer glue, then outlined each month's label. Please refer to photo below for placement.
Peacock, Blue Angel, Lichen and Pink Cadillac, glitters were used on the sheets. Please refer to photo below for placement of glitter.
Pink seam binding was laced through the binding and tied into a shabby chic bow.
Heather used a Fiskar's flower and Martha Stewart lace punch and scraps of the Authentique papers to help embellish the cover. Edges of the pieces were inked with Ranger's Vintage photo. Using the Ultra fine metal tip Heather applied glue to the center of the punched Authentique flowers. The "Important Dates to Remember" sentiment was added in GIMP (free online program) to a free image Heather found at the Graphic Fairy. Ribbon roses, May Arts leaves, buttons, pearls and lace were also used to embellish the cover.
Mustard Glitter was added to the flower centers.
Excess glitter was removed then Designer dries clear glue was added to the rose, butterfly wings and rose buds using the ultra fine tip applicator.
Cadillac Pink Glitter was applied. This is the technique Heather uses through out her project.
Designer Dries clear glue was applied to the cover and Cavalado glitter was applied to leaves, Teal Gala glitz applied to the outer edges, lichen to the lace punch pieces, image banner and binding, Dreams glitter to the butterfly, Water color glitter to the image edges, Dusty blue to butterfly,
Art Glitter was added to the Authentique papers that were used as the backgrounds of each page. The book is a gift, and the recipient will add their own photos.
Broken lines using the Ultra Fine Tip and Designer dries Clear glue and Mustard, Peacock and Lichen Glitters were applied.
Dots of glue were added to the Authentique paper. Mustard and Dusty blue Glitters were applied.
Here are some close up photos of Heather's Cover.
Feel free to stop by and see Heather's other projects using Art Glitter on her blog.
heatherahudson.blogspot.com
Stunning work... Loved the tutorial... Thank you for the inspiration... Hugs May x x x
ReplyDeleteThis is gorgeous--love the papers and the addition of the glitter.
ReplyDeleteWow...This is stunning.
ReplyDeleteI like the vintage look you added to this project.
ReplyDeleteI love this, just the right amount of glitter too. Very nice
ReplyDeleteBeautiful mini! I love how precise that tool allows you to be!
ReplyDeleteGreat tutorial! Gorgeous date-keeper!
ReplyDeleteBOLB Hugs!
Wow this is fabulous Heather, wonderful job and gorgeous!!
ReplyDeleteGreat tutorial. I never think to accent things with glitter. Love how your project looks....gorgeous!!
ReplyDeleteHeather what a wonderful project and great tutorial! This would make an awesome gift for someone. The ultra fine tip is amazingly precise, definitely have to get that! :)
ReplyDelete~Deb~
Ok, I am definitely sold on glitter now. It makes all the difference in the world!
ReplyDeleteThe ribbons, pearls and glitter give the gorgeous paper such a lift. It's all so very pretty.
ReplyDeleteHeathers work is always spectacular and the glitter just makes it shine even more! Great tutorial too. ~Diane
ReplyDeleteThis is a gorgeous mini!
ReplyDelete