Tuesday, September 7, 2010

Welcome Art Glitter's New Guest Designers

Wow, anther 3 months have flown by and it's time to meet our new Art Glitter Guest Designers.

First I'd like to thank our outgoing trio of incredibly talented designers, Amy Anderson, Cassandra Midkiff and Lori Mendenhall. You were such an exciting group, very diverse and open to give of yourselves and your designs. I thank you very much. Please keep in touch with them with these links above and as always you can find them in our Art Glitter Guest Designer page: http://www.artglitter.com/guestdesigners.html

Please join me in welcoming our new set of diverse and talented designers:My name is Christine Lehto. I try my best to stay young at heart and remember how much wonder can be found in the smallest, simplest things. One of my goals in my artwork is to try to capture the wonder of new things. I strive to reflect and symbolize the enchantment of a young person dreaming in much of my creative endeavors. I live in a small town in Wisconsin where I can take bike rides along a nature trail during the non-Winter months. Riding outside in nature is like a mini getaway each time I ride and I discover the beauty of nature in its smallest details along with my camera. I earned my BFA degree at UW-Oshkosh with an emphasis in drawing and sculpture. While attending school, I discovered my love of watercolors and sculpting with Apoxie Sculpt. This is when and where Lilly the Ladybug (the main character from my storybook) took shape and blossomed into a variety of subjects for my work. Both Lilly and I hope you enjoy the work of Lilly Bug Studio and discover, "the wonder of new things."

I have an online Etsy store, Lilly Bug Boutique, where I create and sell a selection of products from limited edition prints and sculptures to pins, pens and magnets. I design all of my items and I take pride in creating items with superior craftsmanship. One of my most recent collections are my UpCycled sculptures made with burned out light bulbs, named the"Recyc-a-lites" and empty plastic or glass bottles, named "Re-Bottled." Currently I am also looking into the prospect of licensing my artwork and publishing my watercolor illustrations for children's picture books.

Please contact me with any requests, questions or comments.
e-mail, christine@lillybugstudio.com
Etsy shop, http://www.lillybugboutique.etsy.com
Website, http://www.lillybugstudio.com
Facebook, http://www.facebook.com/lillybugboutique
Blog, http://www.lillybugblog.com


I’m a mixed media artist, with a specialty in altered art book work and shrine boxes. I describe my style as “Vintage City Grunge”, and take my creative inspiration from the artist Jean Michel Basquiat, The Buddha, Nature, and from my collections of vintage paraphernalia including records, perfume bottles and vintage cookbooks.

Since 2007 I’ve been blogging, writing, creating, making, inspiring and loving life under the alias “The Craftaholic”.

I have an etsy shop, called Sweet Buddha Designs, and teach art and craft classes throughout New York City. Teaching creative arts classes is my calling, and I am always looking to expand.


I am a 30-something from St. Paul, Minnesota. I am a wife, mother, daughter, sister and friend. I adore all things crafty. I enjoy figuring things out for myself and I feel pride in making my own things. I love to repurpose and recycle items I already have into something beautiful! I also co-author a craft blog with my best friend at firefliesandjellybeans.blogspot.com. When I am not crafting, you will find me reading a good book, playing with my son, or watching a movie with my hubby. Some of my favorite things include: new clothes, summer, Harry Potter, sleep, and peanut butter!

Stay tuned, I've seen what's in store for us and it is fun!

Thursday, August 26, 2010

Halloween Bird Houses by Amy Anderson

To finish my Art Glitter posting series, I bring you my favorite holiday - Halloween. By the way, it's me again, Amy from Mod Podge Rocks! This is my sixth and final post for Art Glitter, and it has been a blast. I've laughed, I've cried . . . I've felt the full range of emotions while completing my glitter projects. I wasn't a glitter lover before I started this gig, but I'm definitely converted! I have to say, Art Glitter has some of the most BEAUTIFUL glitters I've ever seen. I mean it.

So what did I make this time? Some Halloween birdhouses! My thoughts are that these would look great on a mantle, as a centerpiece or even just for fun decor somewhere in your house. I even added some black butterflies, which I think is a nice touch. In my humble opinion.

Gather These Supplies:
Mini-birdhouses - at most craft stores for $1
Art Glitter - Ultrafine Opaque: #79 Black
Art Glitter Designer Dries Clear Adhesive
Mod Podge Satin
FolkArt Acrylic Paint - Metallic Plum, Cast Shadow, Medium Gray, Plum Vineyard, Licorice
Martha Stewart Butterfly Punch
Scrapbook paper, 2 sheets of black and white patterns
Cardstock, 1 piece of either black or purple (I used Lavender)
Prima Fabric Flowers
Making Memories Halloween embellishments
Flat paintbrush
Ruler
Candle or a small piece of wax
Scissors or craft knife and mat
Pen or pencil
Sandpaper

Your first step is going to be to trace the roofs of the birdhouses - I didn't show that here because I'm thinking you can handle that step . . . on one birdhouse I used polka dots, and the other, damask. These were scraps I already had laying around, so I encourage you to use pieces from your stash as well.

I love painting! I especially love painting birdhouses because they go quickly. On my two-tier birdhouse I painted Medium Gray, and on the larger single-hole birdhouse I painted Metallic Plum. Coat completely and allow to dry.

Time to distress! You do this by rubbing a candle (or piece of wax) and parts of your birdhouse - this includes the edges, etc. Rub firmly but don't cover the entire thing. The wax is going to act as a paint resist, so you want to use conservatively.

Paint over the entire birdhouse with your second color. I distressed both birdhouses with the candle, and on the two-tier I painted Plum Vineyard. My other birdhouse got a coat of Cast Shadow. Coat completely and allow to dry.

Once completely dry, take your sandpaper and start sanding lightly. I like to use a coarser paper, like 100 grit or so. I sand lightly in the areas where the wax is, and there is where the paint comes off when you sand! The effect is very cool, just be careful not to sand too hard or you'll see the wood underneath. Don't worry about the sanding marks on the paint either. Those will disappear when you Mod Podge.

Paint the roofs, bases and perches of your birdhouses with Licorice.

Apply Mod Podge to the top of your birdhouse roof. Make sure it's a medium layer.

Remember the paper that you cut before, for the roof? Take that paper and adhere to the roof, being sure to smooth thoroughly. I always do it with a brayer to make sure to get all of the bubbles out. You can wipe any extra Mod Podge that comes out the edges with your brush. Allow to dry for 15 - 20 minutes.

Seal the birdhouses with Mod Podge - seal the entire birdhouse, not just the roof. Allow to dry.

Time for some glitter action! I applied Mod Podge to the edge of the birdhouse roof (oh, and notice the additional Halloween paper for a cute background) . . .

then I glittered! I did this with the edges of the roofs, the perches and the bases of the birdhouses.

Same goes with some of the fabric flowers.

For some additional embellishments, I took my Martha Stewart butterfly punch and made some butterfly cutouts for the front of the single-hole birdhouse. I also glittered those. I allowed the glitter to dry on both birdhouses.

The final step is to apply all embellishments to the birdhouses. My two-tier birdhouse got some Making Memories Halloween brads, including two cute spiders with rhinestones. The single-hole birdhouse got the butterflies on the front and then the glitter flowers (with some additional chiffon/tulle ones from the pack) on top. I used the Designer Dries Clear to secure all of my embellishments. I love that glue; works great! Allow the birdhouses to dry for 24 hours before using them.

I guess this is it, huh? I've had such a great time here, and I'm 4-ever a glitter lover from now on! Stop by Mod Podge Rocks anytime; and come by in the next week for an Art Glitter giveaway! Thanks for having me and hope to see you soon.

Monday, August 23, 2010

Glittered Mermaids by Cassandra Midkiff

One of my favorite pieces to create are mermaids. I have always been drawn to them and Art Glitter adds that extra magical quality to my mermaid pieces.


I love to use the glitter in unique places, especially for my climbing sparkling seaweed, which can be seen in every mermaid piece I create. For my seaweed I draw with an ink pen my seaweed pattern and then using the fine tip on the dries clear adhesive I fill in the seaweed leaves, next I choose colors such as; #207 Spring Creek, #215 Wild Rose, #232 Michigan Moss and #219 Lilypad to fill them in.


The glittering face of the moon is another area you will find Art Glitter, #100 Sea Shell and #741 Shell White are two of my favorites for this use.


My mermaids are always a little modest so I sprinkle a little of the Art Glitter on their chest and tummy's a set I love for this area is the Shabby Chic Pee Wee Kit.

I have been delighted to share some of my tricks and tips and project ideas. Art Glitter is such a wonderful product and has so many uses. Thank you for having me as a guest designer, remember to visit me at www.jupiterdesigns.etsy.com

Thursday, August 19, 2010

Nature Scene Pendants featuring “Elements” by Lori Mendenhall

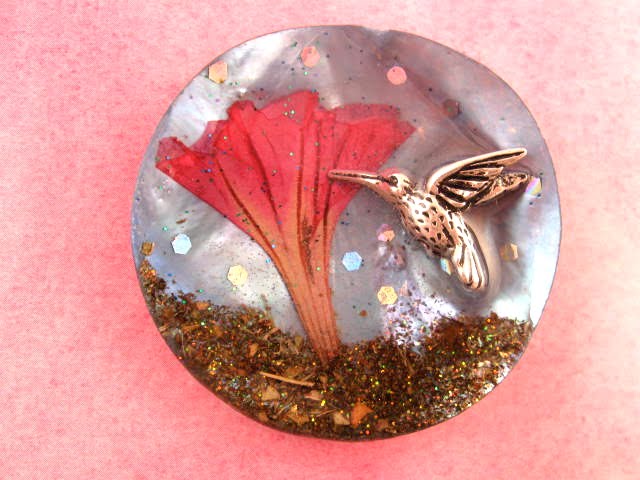
I create many outdoor scene pendants, so you can imagine my delight when I discovered the Elements line. Think of Elements as “nature glitter” - not sparkly, but with just a hint of glimmer. Want to create a nature scene? Elements is a clean and easy way to do it! They look really natural because they are – and they even smell good too.


The bases of these pendants are 40mm mussel shells. The scene is glued down and then after the glue is completely dry it’s encased in resin.

To lay down the “grass” I spread some Designer Dries Clear Adhesive and sprinkled on #13 Sod. Then I laid down a beautiful dried flower. Remember, anything that will be embedded in resin must be completely dry. I added a hummingbird that had come to sip some nectar. To give a special final touch, I glued down some single Dazzlers D34 Northern Lights.


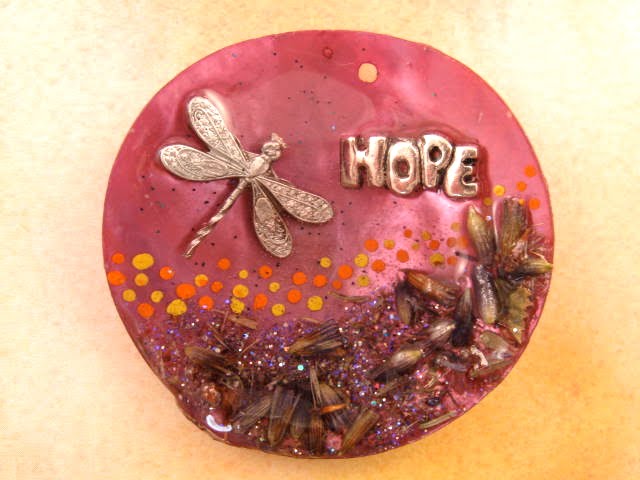
This pretty flower field is actually a layer of #21 Alpine. I added some colorful flower dots using paint, and added a couple of charms to create a peaceful scene.


For this next piece I tried something really different. I mixed # 21 Alpine with gel medium from Liquitex. The color in the Elements material tinted the gel medium and a very chunky earthy substance was born. I envisioned soft earth that a unicorn would gallop through on his way to a castle. Damsel in distress not included.

Monday, August 16, 2010

Marie Antoinette Art Doll by Cassandra Midkiff

Art Glitter is very versatile, I love using it in all of my projects including my art dolls. Everything can use a little sparkle.


Materials used:
-Art Glitter: #202 Pansy and #211 Glacier
-Fabric Dries Clear Adhesive
-Muslin and poly stuffing
-Chenille white fabric & fabric scraps
-Forget me nots/fabric flowers
-pearl beads
-acrylics
-rhinestone jewelry
-pom pom trim & seam binding


After sewing together my dolls body with muslin and poly stuffing I painted her arms, legs and face with an acrylic paint and let dry. During that time I used a chenille white fabric to create her hair also stuffed with the poly and attached it to her head. For her dress I used some fabric pieces I had from previous projects I pleated parts and added the fabric flowers, forget me nots and trim. To add sparkle I used my Fabric Dries Clear Adhesive and covered her feet sprinkling on #202 Pansy Art Glitter, after drying I added on small pieces of pom pom trim.


The finishing touches are her rhinestone necklace made from a piece of a vintage choker, her hand painted face with acrylics and her sparkling piece of cake. For the cake I sewed together more of my fabric scraps and added a forget me not flower with a pearl in the center. I liberally added some Fabric Dries Clear Adhesive to the edges of the cake to make some sparkling poofy frosting with #211 Glacier Art Glitter. I sewed the piece of cake to one of her hands. Now she is ready to quip "let them eat cake."

Thursday, August 12, 2010

Glitzy Fall Plaque by Amy Anderson

I'm getting excited about fall so I decided that my fifth blog post should be a celebration of the upcoming season! Yes friends, it is I - Amy from Mod Podge Rocks! I attended CHA and went on a few vacations, but I never forgot about my "gitter-bligations." I kind of went a little nuts this time with so many glitters, but hey, that's what I'm here to do.

I'm celebrating fall with a plaque. I am going to attach a ribbon and hang mine inside, but you are welcome to do whatever you want with yours. It's small enough to hang on an outdoor wreath on your front door, or on your mantle if you please. I love the colors. Yes, I'm very excited about autumn weather. Here's how you make my plaque.
Gather These Supplies:
Walnut Hollow 5" x 7" wood plaque,
Art Glitter - Ultrafine Opaque: #65 Old Gold, #56 Pumpkin, #132 Saddlebag, #234 Turquoise, #58 Brown
Art Glitter Designer Dries Clear Adhesive
Mod Podge Matte
FolkArt Acrylic Paint - Metallic Copper, Dark Brown
Martha Stewart Double-Sided Flora Sticker Roll
Scrapbook paper, 1 sheet - I used Making Memories
Wood letters - spelling "its fall"
Flat paintbrush
Ruler
Scissors or craft knife and mat
Pen or pencil

Measure a 5" x 7" rectangle from your scrapbook paper and use your craft knife to cut out. Set aside.

Paint your plaque with the color of your choice - I used Metallic Copper since it coordinated with my paper and glitter. Give a few coats and allow to dry.

While your plaque is drying, paint your wood letters with Dark Brown. Give a few coats and allow to dry.

While your letters are drying (I'm a huge multi-tasker!), go back to your plaque and apply a medium coat of Mod Podge.

Adhere the scrapbook paper and smooth down. Smooth thoroughly until all of the bubbles are gone. You'll see up above that I have some extra Mod Podge on the sides - that's okay. I wiped away the Mod Podge that squeezed out the sides with my brush. Set aside to dry for 15 - 20 minutes.

Take your flora sticker roll and cut out the stickers that you plan to use so that you can organize them on your plaque. I used my craft knife to separate them. Set aside.

The wood letters should be completely dry. Using your Designer Dries Clear glue and a brush, spread glue over the top of the letters . . .

and apply your Brown glitter. Shake the excess glitter off and set them aside to dry completely.

Go back to your plaque and apply a top coat of Mod Podge. Allow to dry and then add another coat. Allow that coat to dry.

The Martha Stewart stickers are awesome - you simply position them down individually, smooth and then peel away. The leaf sticker is left behind.

You then spread glitter directly over the sticker and tap off. Voila! The glitter is left behind on the sticker. It's a quick and easy way to glitter in a shape. I used several of the stickers with glitter colors to create my floral pattern.

To finish the project, glue the letters down with your Designer Dries Clear glue. You'll notice in the finished photo that I added an apostrophe between the "t" and "s" to finish my saying. No one wants bad grammar on their plaque!

Hang your plaque wherever it suits you. I'm hoping that by hanging this in my kitchen, it will make it so. See you soon - and don't forget to stop by Mod Podge Rocks any time for great decoupage inspiration and tips.

Monday, August 2, 2010

Glittery Polymer Clay Pendants by Lori Mendenhall

Polymer clay has been a staple in my jewelry for the past four years. I never tire of working with it because of the versatility and beauty of what can be created. Polymer clay is soft and easy to work with until it’s baked. Once baked, it is very hard and durable.


Glitter is perfect for spicing up polymer clay pieces! You can mix it into a translucent clay for a subtle effect, or apply it on top before baking for a more dramatic effect. Once the clay is baked, the glitter must be sealed in order to protect it from coming off over time. It can either be sealed with an acrylic finish such as Pledge with Future or Varathane. It can also be covered with 3-D glazes such as Diamond Glaze (Judikins), Glossy Accents (Ranger), or Triple Thick (Art Deco). I prefer resin but this might not be everyone’s cup of tea. That’s fine, the other sealers are totally sufficient to protect your gorgeous glitter.


It’s quite simple to make these pendants.

1. Condition and roll out the clay to the desired thickness.
2. Texture the clay with any implement you want.
3. Cut out the shape with a cookie cutter.
4. Add any decorative touches and insert a wire loop for hanging.
5. Apply glitter!
6. Bake at 275 (check the package, as some clay cures at different temperature.)
7. Seal the piece to protect the surface.