There is something fun about playing with paper, glue and glitter.
Today my project involves all three.
I wanted to make a wreath for inside my house, as a wall statement. Which I plan on hanging in my craft room.
Products Used:
Designer Dries Clear Adhesive
Art Glitter #27 Navy Ultrafine Opaque Glitter
Art Glitter #60 Sahara Ultrafine Opaque Glitter
Ultrafine Metal Tip
Tombow Stamp Runner Dot Adhesive
Metal Hoop
Paper, Any kind you want! I used Authentique Genuine Collection
Paintbrush
Twine
I started by taking a gold ring that I purchased at a local craft store. When I was there I found perfect paper for the project as well!
I ending up cutting 6"x6" paper into 6" by 1/2" strips. I picked a few different patterned paper and cut them until I had a good pile on the table. You can always cut more.
I took a strip of paper and wrapped one end of it around the metal hoop. Using the Tombow Stamp Runner Dot Adhesive, I then stamped a dot a glue on the end of the strip and adhered it to itself.
I did this all the way around the hoop until there was no room to add another.
I added a little twine loop to what I would consider the top, and then added more strips. This time I put them on the back of the wreath. I continued to use the Tombow Stamp Runner Dot Adhesive and put a dot of adhesive at the top of each strip and placed it on the edge of the ring between two of the already attached strips.
I completed the circle so it looked nice and full.
Next I used Designer Dries Clear Adhesive and brushed the glue onto each end. I started by using the Navy glitter on all the longer pieces, and the Sahara glitter on the shorter pieces.
I wanted to add some more glitz to it, so I drizzled Designer Dries Clear Adhesive up and down the strips of paper and around the ring using the Art Glitter Ultrafine Metal Tip, then sprinkled on the glitter!
A beautiful glitzy paper wreath!
I hope you enjoyed my project today. You could also do this with different holiday papers to celebrate each season or special occasions!
Be sure to stop by my blog, http://oneheartscrapper.blogspot.com today! I have another glitter project to share with you!
Tuesday, November 13, 2012
Saturday, November 10, 2012
Glittered Vintage Thanksgiving Sign with Art Glitter and Tombow
Today I'll be making a hanging Thanksgiving sign out of a vintage postcard that I found at an antique shop.

I scanned that postcard in, blew it up and printed it. I used a piece of chip board, for the base of the sign.

I used pinking shears to cut out the enlarged vintage postcard copy and the "give thanks" page (see below) and outlined the image using Art Glitter Vintage Glass Golden Glow #612 Glitter and Art Glitter Designer Dries Clear glue to put that glitter on.

I then got an 8 1/2" x 11" piece of white card stock and used one of my Tombow Dual Brush Pens #098 in Avocado green to write "Give Thanks" over and over and over again to use as a background for my sign...

Here's the sign as I added more colors of glitter. Art Glitter Vintage Glass Red Damask #608 Glitter, Ultrafine Opaque Cat Eyes yellow glitter #361, Ultrafine Transparent Clear Glitter #89 Martini, and Ultrafine Opaque Calvado Green #109.

While the glitter dried, I started to put together my antique crepe paper border. I decided to use my new Tombow Stamp Tape Runner to put this together...

I have to say... I was very pleasantly surprised! Normally when I put on a crepe paper edge ruffle like this on anything, I use hot glue or wet glue and I make a MESS. This tape was easy to put down in straight line...

And as I folded the crepe paper, I could turn the Stamp runner vertically and push down the handle to give me just a small square of the tape. It was awesome!

The great part about the tape is that it's not permanent until you press it down hard and leave it for a while. If I put down the crepe paper, but didn't like it, I had time to move it and it didn't tear the crepe paper.

So I was able to finish the frame in no time... it's the fastest crepe paper border I've ever done!

I then quickly added my orange crepe paper. Which is just white crepe paper painted with orange watercolor to give it a muddled-faded look.

I then put down my "Give Thanks" page, again using the Stamp Runner.

And then the Thanksgiving postcard...

I then put down some Tombow Mono Multi Liquid glue, which is acid free and has two sides with two different applicators. One with a flat nose, for putting it onto paper, and one with a fine tip for smaller projects. This glue is super sticky and stretches, too. I put my ribbon into a daub of glue on one side, then the other. (*Something to mention... this glue smells fantastic! It has an orange, Juicy Fruit gum smell to it that is light and citrus-y. A lot of different glues smell harsh... but this one was quite pleasant!)

Added some glittered flowers that I got at Michael's...

And a bow on top... and it's finished!

Cute!
Carrie...


Carrie...
Thursday, November 8, 2012
Imitating Fall Splendor
For the month of November the Art Glitter Design Team is working with Tombow products and I wanted to share a project I created with both these products. I was fortunate to receive a set of Tombow markers with my favorite color range - earth tones! The theme I chose to create my project around is Fall. It's been so beautiful here in Michigan this year. The colors are so bright and vibrant - they just pop and really make you take notice, especially when the sun shines. I just wanted to imitate those colors and bring that fresh, colorful feeling into my home.
I started with a 10-inch-by-10-inch primed canvas. To add a background color I scribbled Tombow Markers no. 969, 837, N57 and N35 onto the canvas then spritzed with plain water. I held the canvas up and twisted and turned it to control where the colors ran and how. Then I spritzed it with a homemade mix of Heirloom Gold Perfect Pearls and water to add a golden Fall shimmer.
The Tombow markers are water base so they'll react nicely with the water. When you achieve the look you like turn a heat gun on the canvas to stop the reacting.
I needed Fall leaves so die cut them in a variety of colors, dry embossed, inked the edges and coated them in Clear Rock Candy Crackle Paint and left them to dry for several hours. They crinkle and curl and actually look like a bunch of fallen leaves when done!
I wanted to use a tag on the canvas so I used the same Tombow markers to color a Fred Mullet leaf stamp. Then I spritzed the stamp with plain water till I could see little color beads on the rubber then stamped onto the tag. I love the look this makes. It's creates a watercolor effect and the colors are very vibrant. I heat set the tag then spritzed it lightly with the homemade shimmer mix to add a touch of shimmer to the tag. I distressed the edges of the tag and ran the Tombow markers around the edges, mixing the colors and making sure to set some color in the cracks and tears. Then I held the tag over the non-stick craft sheet and spritzed just the edges with water. This makes the colors run and absorb into the tag edges to create a wonderful distressed look.
I wanted to add some glitter to the tag as well but didn't want a straight solid line. After checking my tools I decided to try a stipple brush. I squeezed some Tombow MONO Liquid Glue onto my craft sheet using its Broad Tip, dipped my stipple brush into it then stippled the craft sheet till I was left with just a light coating of the glue on my stipple brush. Then, I stippled around the edges of the tag, sprinkled on the glitter and used a clean brush to brush most of it off. It turned out great - just a thin coating of the glitter was left on the tag.I added a brad charm to the top, some Filmstrip Ribbon with staples and tied some pretty ribbons around the tag and added some decorative pins to the knot.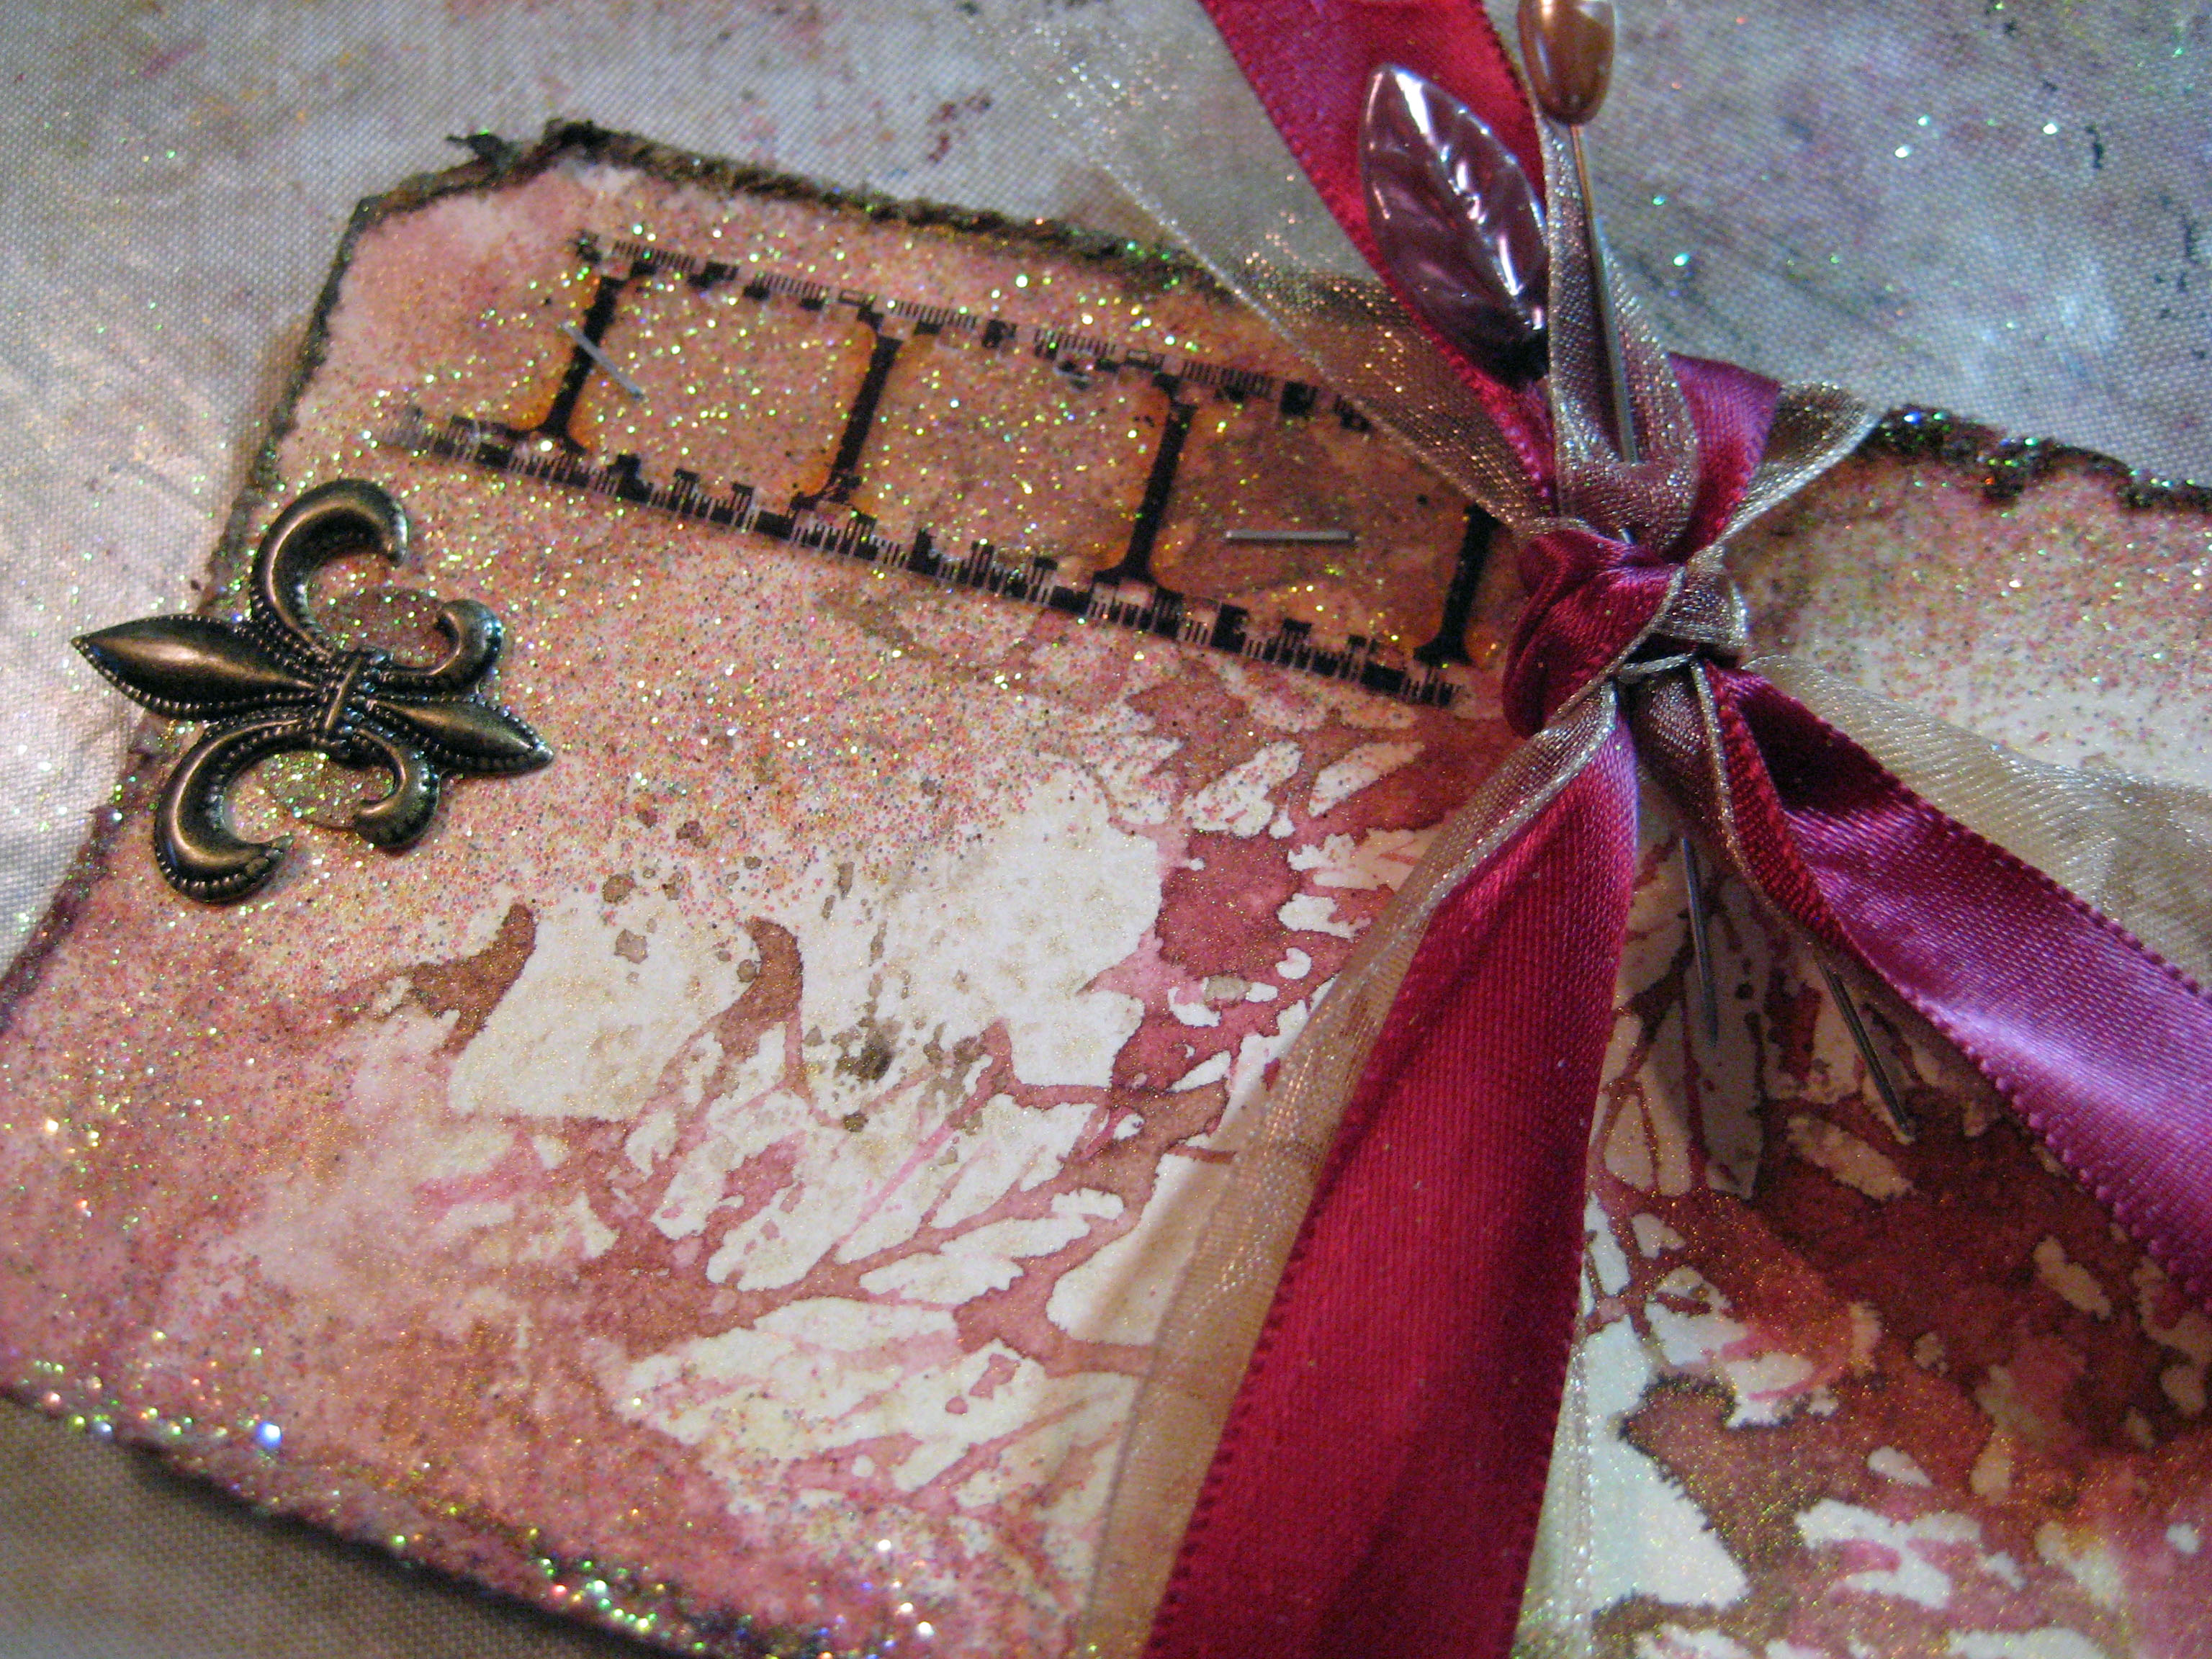
For the title I used die-cut chipboard letters and coated them in the same glitter used throughout the project, Art Glitter Gingerbread No. 243. It's the perfect color for Fall, with its mix of golds and reds. It blended it perfectly with the Tombow markers used for this project. After coating the chipboard letter in glitter I glued them in place on the canvas using the Tombow MONO Liquid Glue. This glue has duo tips, which came in handy. I used the Pen Tip to glue the letters to the canvas so I wouldn't get too much glue on the letters. This prevents it from squishing out from under and making a mess. I also used the Pen Tip on the glue to adhere all the leaves and acorns to the canvas. I put just a tad bit of glue on the high point of the leaf, spread it a bit with the glue tip and pressed the leaves and acorns in place, one at a time. By adding the glue only to the high points it allows the curled leaves to remain curled and add dimension to the project.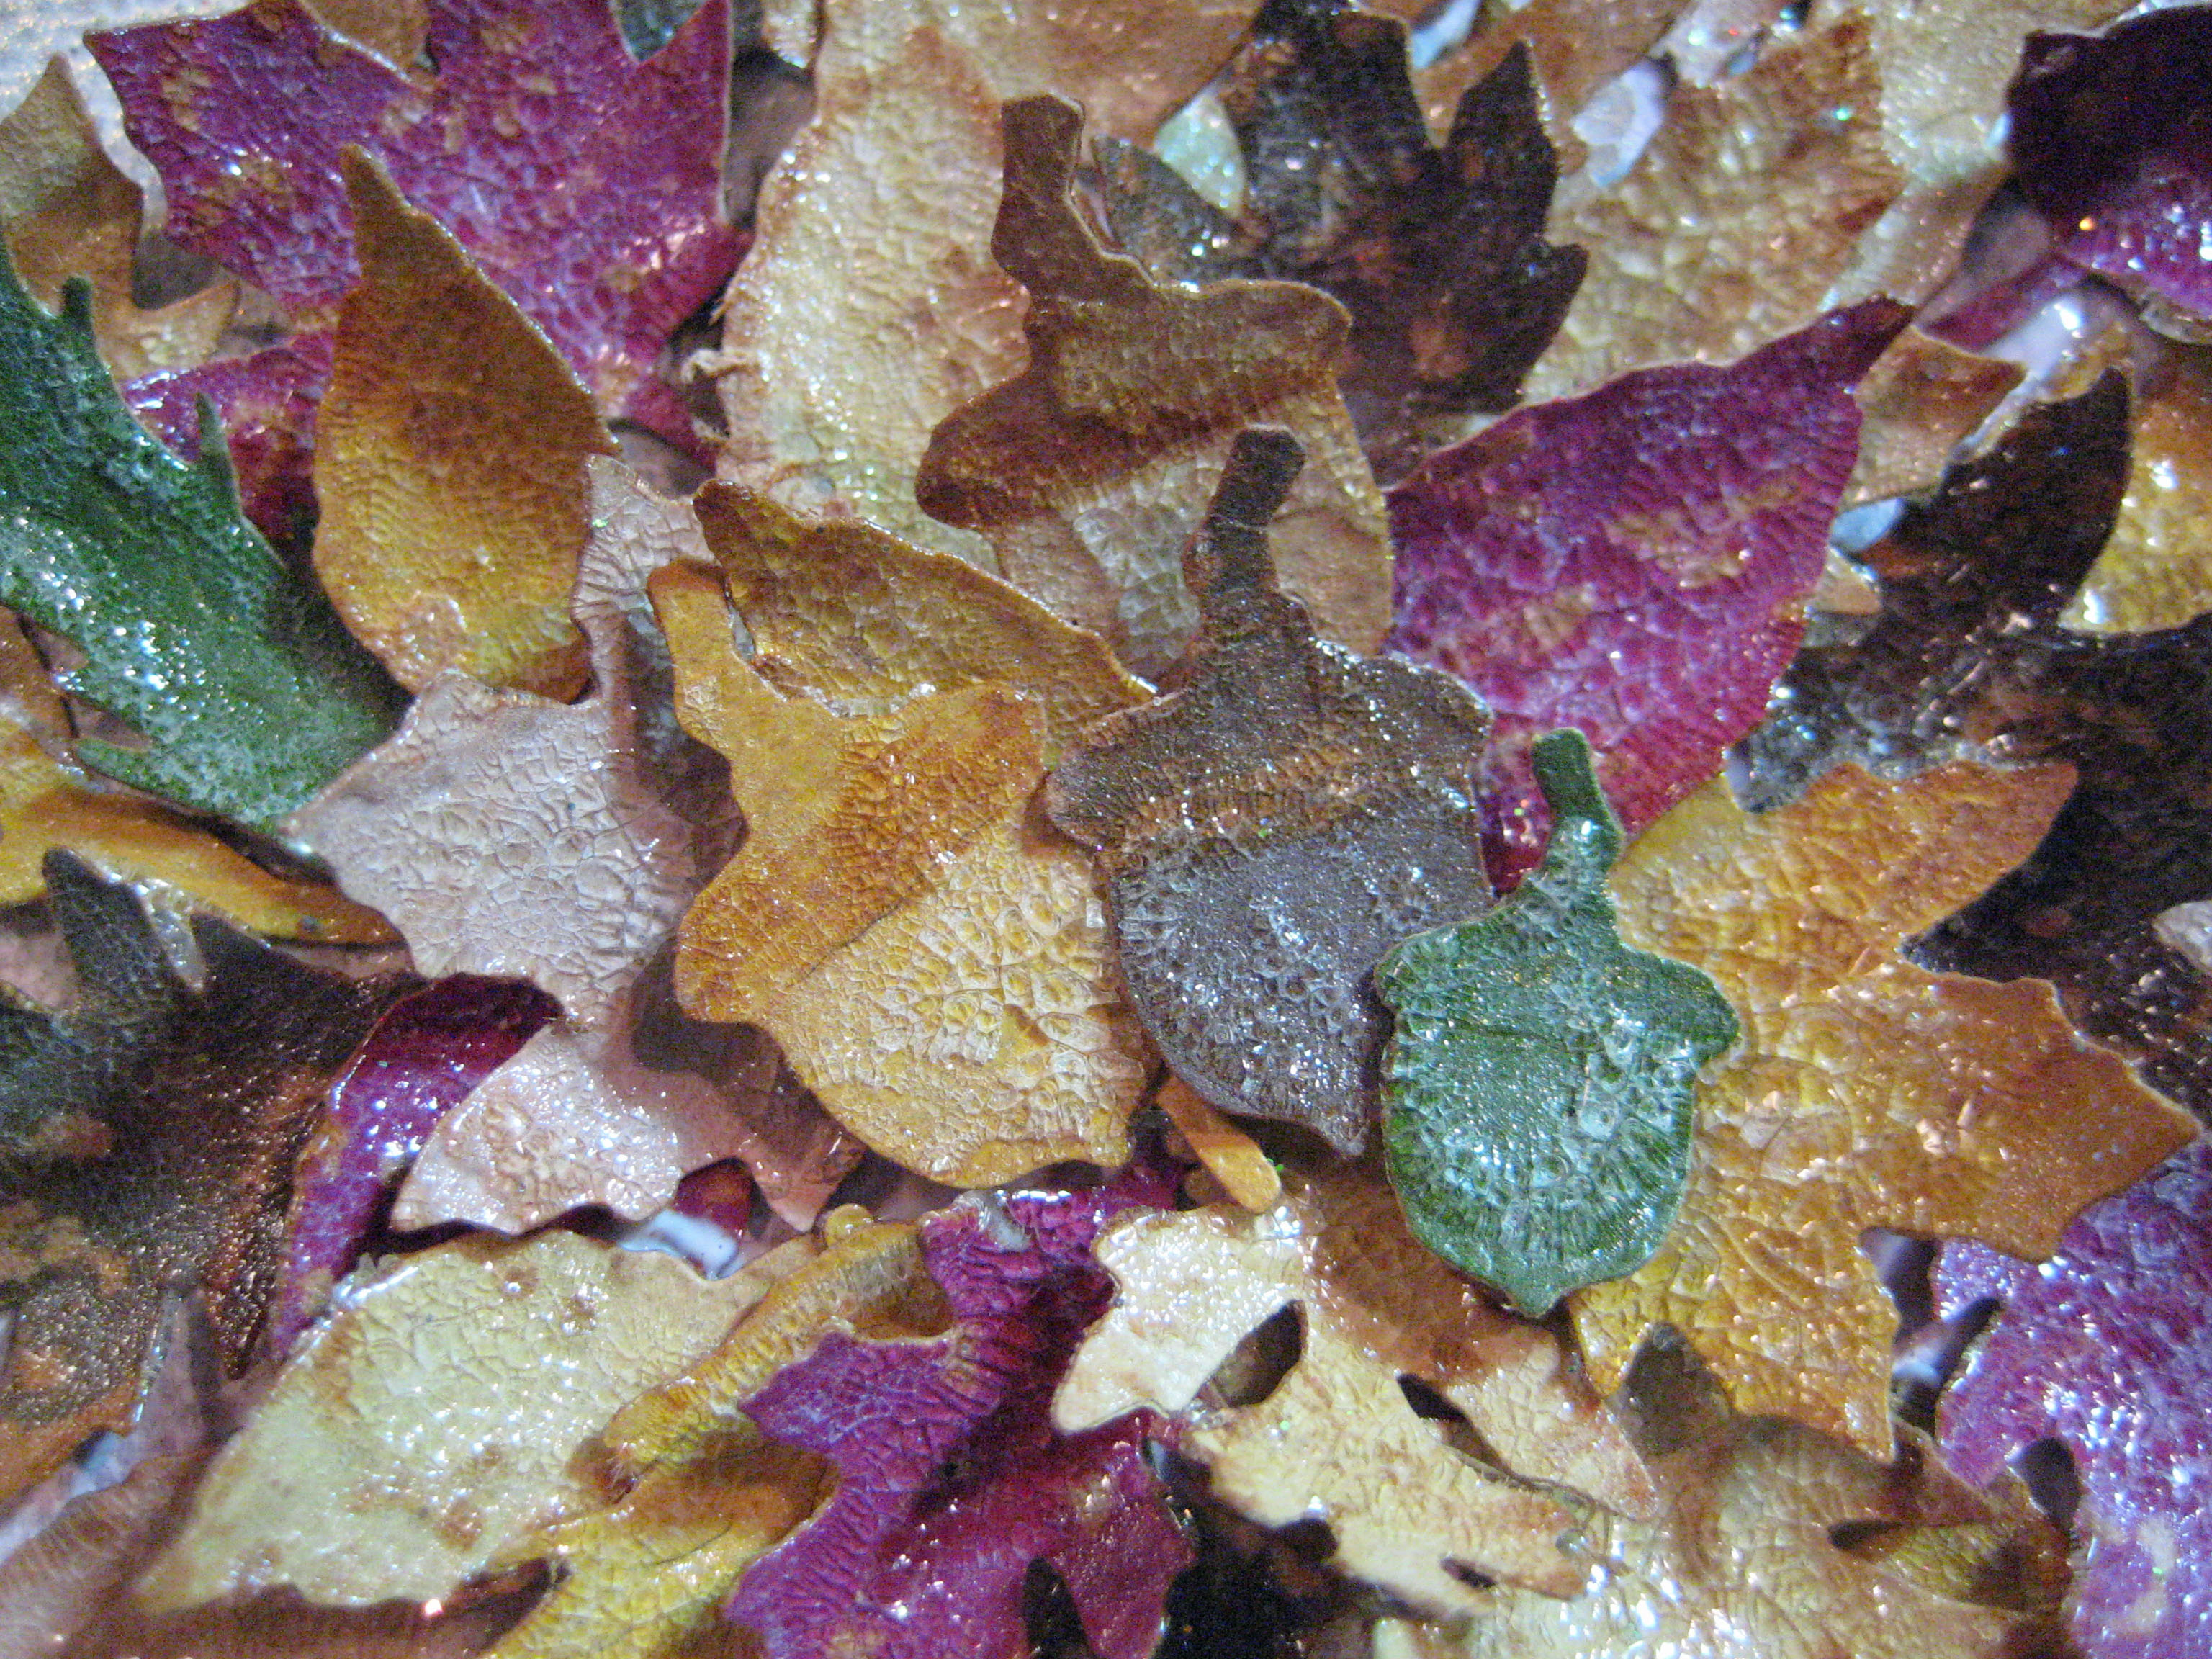
I also added a few leaves and an acorn to the corner of the tag and a metal corner tip to one corner of the canvas.
The tag is glued on last and I used just a squiggle of the Tombow glue down the center back of the tag and pressed it in place. By using the glue only in the center the edges retain their slightly curled dimension. A variety of the techniques I used on this project are ones I've done before, but, the stippling of the glue to add a light, random coat of glitter was a new one for me. Have you stippled glue before to add glitter?
Thanks for letting me share!
Linda

The Tombow markers are water base so they'll react nicely with the water. When you achieve the look you like turn a heat gun on the canvas to stop the reacting.

I needed Fall leaves so die cut them in a variety of colors, dry embossed, inked the edges and coated them in Clear Rock Candy Crackle Paint and left them to dry for several hours. They crinkle and curl and actually look like a bunch of fallen leaves when done!

I wanted to use a tag on the canvas so I used the same Tombow markers to color a Fred Mullet leaf stamp. Then I spritzed the stamp with plain water till I could see little color beads on the rubber then stamped onto the tag. I love the look this makes. It's creates a watercolor effect and the colors are very vibrant. I heat set the tag then spritzed it lightly with the homemade shimmer mix to add a touch of shimmer to the tag. I distressed the edges of the tag and ran the Tombow markers around the edges, mixing the colors and making sure to set some color in the cracks and tears. Then I held the tag over the non-stick craft sheet and spritzed just the edges with water. This makes the colors run and absorb into the tag edges to create a wonderful distressed look.

I wanted to add some glitter to the tag as well but didn't want a straight solid line. After checking my tools I decided to try a stipple brush. I squeezed some Tombow MONO Liquid Glue onto my craft sheet using its Broad Tip, dipped my stipple brush into it then stippled the craft sheet till I was left with just a light coating of the glue on my stipple brush. Then, I stippled around the edges of the tag, sprinkled on the glitter and used a clean brush to brush most of it off. It turned out great - just a thin coating of the glitter was left on the tag.I added a brad charm to the top, some Filmstrip Ribbon with staples and tied some pretty ribbons around the tag and added some decorative pins to the knot.

For the title I used die-cut chipboard letters and coated them in the same glitter used throughout the project, Art Glitter Gingerbread No. 243. It's the perfect color for Fall, with its mix of golds and reds. It blended it perfectly with the Tombow markers used for this project. After coating the chipboard letter in glitter I glued them in place on the canvas using the Tombow MONO Liquid Glue. This glue has duo tips, which came in handy. I used the Pen Tip to glue the letters to the canvas so I wouldn't get too much glue on the letters. This prevents it from squishing out from under and making a mess. I also used the Pen Tip on the glue to adhere all the leaves and acorns to the canvas. I put just a tad bit of glue on the high point of the leaf, spread it a bit with the glue tip and pressed the leaves and acorns in place, one at a time. By adding the glue only to the high points it allows the curled leaves to remain curled and add dimension to the project.

I also added a few leaves and an acorn to the corner of the tag and a metal corner tip to one corner of the canvas.

The tag is glued on last and I used just a squiggle of the Tombow glue down the center back of the tag and pressed it in place. By using the glue only in the center the edges retain their slightly curled dimension. A variety of the techniques I used on this project are ones I've done before, but, the stippling of the glue to add a light, random coat of glitter was a new one for me. Have you stippled glue before to add glitter?

Thanks for letting me share!
Linda
Tuesday, November 6, 2012
Greatful Mini Album wih Laura
I have been seeing so many people on Facebook lately posting what they are grateful for every day. I think that is a fabulous idea. I have created a simple to assemble project that is both Thanksgiving decor and a mini album about gratitude.
To see the place cards, go to my blog at www.rememberinglifesmoments.blogspot.com
Here are the instructions for the album.
MATERIALS:
Art Glitter Designer Dries Clear Glue With Metal Tip
Art Glitter Vintage Glass Glitter 906 Carnelian
Art Glitter Ultrafine Opaque 347 Golden Orange
Art Glitter Ultrafine Opaque 117 Goldilocks
Art Glitter Ultrafine Opaque 55 Hot Lava
Art Glitter Microfine Opaque 514 Bavarian Forest
Art Glitter Large Glass Beads 809 Fox Trot
Chipboard mini book pages (I bought two small albums at the Dollar Store, but you can cut your own).
Chipboard mini book covers with acetate inserts (these were part of the Dollar Store albums, but if you cut your own, you can easily insert the acetate)
Mat Stack (I used DCWV Autumn Melody)
Cardstock Mat Stack (DCWV Autumn Melody)
White Cardstock
Globecraft Memories Glastique
Die Cut Machine (I used my Silhouette)
Trimmer
Big Bite
5" Xyron
Adhesive
Brayer
Scissors
Archival Ink in Coffee
Three Metal Rings
Assorted Ribbons
The idea behind this book is that the place cards set on the table for Thanksgiving are written in and placed into the mini album as journaling.
DIRECTIONS:
1) Take pages out of Mat Stack and arrange with chipboard until album looks the way you want it.
2) Edge chipboard with Archival Ink
3) Use a little bit of Designer Dries Clear directly on the chipboard to make a box around the edge and an X through the center.
4) Place mat onto the page. Do this with every other page.
5) Use Big Bite to clear out the holes.
6) Repeat steps 3 through 5 on the remaining pages.
7) Cut leaf image with die cutter through 4 pieces of ivory cardstock.
8) Put all four leaf images through Xyron.
9) Stack 3 leaf images on top of each other.
10) Cut words and trim pieces from white cardstock.
11) Place words and trim upside down in Xyron machine.
12) Rub images and remove words and images one at a time from Xyron paper.
13) Flood sticky side of words, images and remaining leaf image with Golden Orange Glitter.
14) Place objects from 13 back into Xyron, right side up to make stickers.
15) Adhere glittering leaf cardstock in place over acetate on the back of the front page.
16) Adhere paper over the front and back of the covers, making sure that leaf image shows.
17) Flood top leaf image with Glastique and pour in the Vintage Glass Glitter. Let dry.
18) Cover top of Vintage Glass Glitter with another layer of Glastique and let dry.
22) Embellish with fancy cuts from the paper or the die cut machine. Add glitter colors to them. Keep it simple.
23) Take pictures and print on Thanksgiving if possible. Add to album. Use the place cards as journalling blocks (see my blog). Be sure to glue down the back of the place card and the little embellishment.
24) Tie ribbons around the rings.
Well, that is all for now. I hope you can find a little inspiration in something that is simply done at the end of the day. Good luck to you and Stay Glittery!
Laura
To see the place cards, go to my blog at www.rememberinglifesmoments.blogspot.com
Here are the instructions for the album.
MATERIALS:
Art Glitter Designer Dries Clear Glue With Metal Tip
Art Glitter Vintage Glass Glitter 906 Carnelian
Art Glitter Ultrafine Opaque 347 Golden Orange
Art Glitter Ultrafine Opaque 117 Goldilocks
Art Glitter Ultrafine Opaque 55 Hot Lava
Art Glitter Microfine Opaque 514 Bavarian Forest
Art Glitter Large Glass Beads 809 Fox Trot
Chipboard mini book pages (I bought two small albums at the Dollar Store, but you can cut your own).
Chipboard mini book covers with acetate inserts (these were part of the Dollar Store albums, but if you cut your own, you can easily insert the acetate)
Mat Stack (I used DCWV Autumn Melody)
Cardstock Mat Stack (DCWV Autumn Melody)
White Cardstock
Globecraft Memories Glastique
Die Cut Machine (I used my Silhouette)
Trimmer
Big Bite
5" Xyron
Adhesive
Brayer
Scissors
Archival Ink in Coffee
Three Metal Rings
Assorted Ribbons
The idea behind this book is that the place cards set on the table for Thanksgiving are written in and placed into the mini album as journaling.
DIRECTIONS:
1) Take pages out of Mat Stack and arrange with chipboard until album looks the way you want it.
2) Edge chipboard with Archival Ink
3) Use a little bit of Designer Dries Clear directly on the chipboard to make a box around the edge and an X through the center.
4) Place mat onto the page. Do this with every other page.
5) Use Big Bite to clear out the holes.
6) Repeat steps 3 through 5 on the remaining pages.
7) Cut leaf image with die cutter through 4 pieces of ivory cardstock.
8) Put all four leaf images through Xyron.
9) Stack 3 leaf images on top of each other.
10) Cut words and trim pieces from white cardstock.
11) Place words and trim upside down in Xyron machine.
12) Rub images and remove words and images one at a time from Xyron paper.
13) Flood sticky side of words, images and remaining leaf image with Golden Orange Glitter.
14) Place objects from 13 back into Xyron, right side up to make stickers.
15) Adhere glittering leaf cardstock in place over acetate on the back of the front page.
16) Adhere paper over the front and back of the covers, making sure that leaf image shows.
17) Flood top leaf image with Glastique and pour in the Vintage Glass Glitter. Let dry.
18) Cover top of Vintage Glass Glitter with another layer of Glastique and let dry.
19) Use Designer Dries Clear to make a bead of glue all the way around the window. Cover in glass beads and then a layer of Goldilocks Ultrafine Opaque.
20) Add Give Thanks to the cover.
21) Use rings to assemble book.22) Embellish with fancy cuts from the paper or the die cut machine. Add glitter colors to them. Keep it simple.
23) Take pictures and print on Thanksgiving if possible. Add to album. Use the place cards as journalling blocks (see my blog). Be sure to glue down the back of the place card and the little embellishment.
24) Tie ribbons around the rings.
Well, that is all for now. I hope you can find a little inspiration in something that is simply done at the end of the day. Good luck to you and Stay Glittery!
Laura
Friday, November 2, 2012
Ready for Christmas Fun
Well...Halloween is behind us, so you know what that means....time to get ready for Christmas! So today I'm sharing a very quick and simple Christmas card idea.
I started with some retro felt ornaments from Creative Impressions - Christmas Ornament Assortment.
I used a piece of Art Glitter Sticky paper - 4.25" x 5.5". After removing the protective sheet - I positioned the felt ornaments on the sticky side of the paper.
Then I used Art Glitter ultra fine glitter (#85 - Crystal) to fill in the open areas of the ornaments - rubbing the glitter into the sticky paper. Once the interior areas of the ornaments were finished, I covered the rest of the exposed sticky paper with Crystal glitter.
This glitter covered sheet was then attached to a piece of red foil card stock.
I was going to leave it at that, but then decided I needed to have a little gold for the hangers. I used a metal fine tip on the Art Glitter Designer Dries Clear Adhesive on the tops of the ornaments and drew lines from the top of the ornaments to the top of the card.
I covered the lines and ornament tops with Art Glitter ultra fine glitter - #139 Leather.
There is nothing better that glitter to add that extra special sparkly touch to all your holiday crafting! Please visit my blog for more glittering Christmas craft ideas!
Thanks!
Saturday, October 27, 2012
Halloween Clock and Gears Ornament
I got a lot of fun Globecraft Memories & Piccolo crafting materials in the mail, including a great kit to make a clear bubble style ornament, which I've always wanted to try!
I decided to go with the most forthcoming event, which is Halloween.
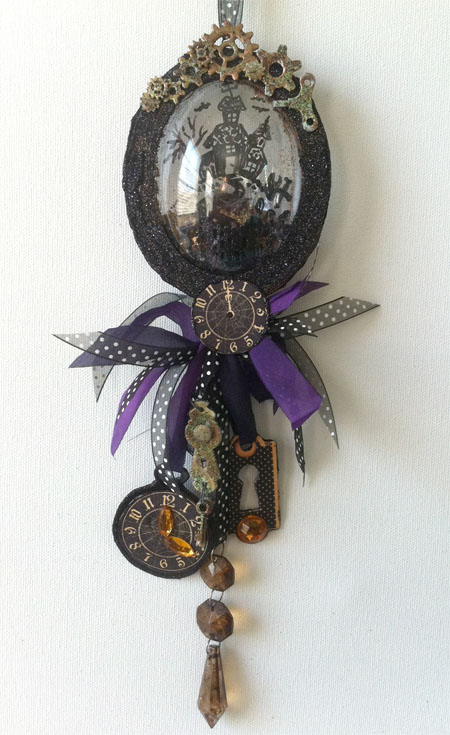
This piece has a lot going on and a lot to explain!

On the front bubble side I decided to have a glittered fence with a gate. The back bubble is filled with assorted glitter and large rhinestones. Sort of like a waterglobe. I decided that I wanted to have a clear acetate piece in the middle with a design on it, sandwiched between the two bubbles, so you could see all the way through it and to keep the glitter isolated to one side. So, the first thing I did was trace the bubble dome shape onto a piece of acetate and cut it out. I drew a design of an old spooky house on a hill in chalk on some black paper and put the acetate over it so I could paint the design onto the acetate.

I then used a tiny brush and some black acrylic paint to put the design onto the acetate.


While that was drying, I decided to get my gears and key charms all ready to to. In my Globecraft Memories and Piccolo sample pack, I got some super cool Piccolo paper charms. They've come up with a great product that gives you results like you would get with real kiln-based metal or porcelain enamel, but you don't need a kiln or fancy special tools and expensive supplies. For this project, I used the Steampunk Gears Charm Set and the Vintage Lock and Keys Charm Set. The instructions say to use embossing glue or ink, but I ended up using Art Institute Designer dries clear adhesive. Then, I liberally poured the special Piccolo Vintage Copper enameling powder on each piece and tapped off the excess. The instructions say to put one coat on the back of the charm, and two on the front, but I just put one large coat over each charm.


I let those dry and then marched them downstairs to "enamel" them. The instructions say to heat the enameling powder the same as you would embossing powder, to use a heat gun or put into a 400 degree oven for 60-80 seconds. I decided to try the hot plate approach (the only way I've ever used enameling powder). I made a little tin foil tray and put the charms in. Don't move them, don't flip them and don't try to pry them off of a cooled tin foil tray. I removed each charm from the still-hot aluminum foil tray using a straight pin, let them air cool and then put them down on my quartz countertops to cool them quickly. If you let them cool in the aluminum, they stick to it and it's fairly difficult to pry them off.

This technique produced some really REALLY cool results! The copper was bumpy, looked old and imperfect and there was plenty of that gorgeous green patina sprinkled throughout. I have often wondered how Disneyland made metal look old, rusty and full of patina, especially on the Pirates of the Caribbean ride... they must use a technique like this. I had a lot of fun doing this and can't wait to come up with more uses for it.
(Now I'm wishing I would have used it on that front gate I glittered on this piece... darn it!)

I then covered these pieces with Piccolo's Glastique Gloss to make each piece thicker, seal in the gorgeous color and give it a good solid sheen.

So, to take an inventory of what else I was going to put on or in my ornament... here are my gears, keys, a brown dangling crystal that I found in my junk jar, some Graphic 45 Halloween Clocks, a chipboard Keyhole charm from the Olde Curiosity Shop Line and a Graphic 45 paper fence that I ended up x-acto cutting out and glittering with Art Institute #79 Black Ultrafine Opaque glitter, some flat back crystals (I glued two together so they were round and could be put in the back snow globe bubble of my ornament) and some glitter that will go in the back bubble, too. I chose Art Institute Elements Beehive, which is like glitter, sand and lovely bits of earth all rolled into one, and Art Institute Fine Vintage Glass Glitter - #612 Golden Glow.


After I cut out and glittered that little gate (Still wishing I would have made it copper!), I glued it in front of my acetate house onto a chipboard ring, put down one of the clear dome bubbles, then put another ring on top which I glittered way ahead of time using Art Institute #79 Black Ultrafine Opaque glitter. I then used some heavy duty clamps to hold it in place while the excessive amounts of glue I used, dried.

After the glittered front ring was dry (oops, looks like it's going to need some touch-up glitter!), I laid out my gears and paper clock to get ready to glue them down...

And then I glued them on using Art Institute Designer dries clear adhesive.

While that was drying, I poured in the Beehive Elements Glitter and the Vintage Gold Glass Glitter into the back bubble and added those crystals I had set aside...

And carefully glued it to the back of the front dome and capped it off with the back black glittered chipboard oval. Again, I used way too much glue, so I made sure not to move this while it was drying, or the loose glitter would just stick to the sides (and then it's no longer a free-sprinking snow globe, but more of just a solid mass of glitter).
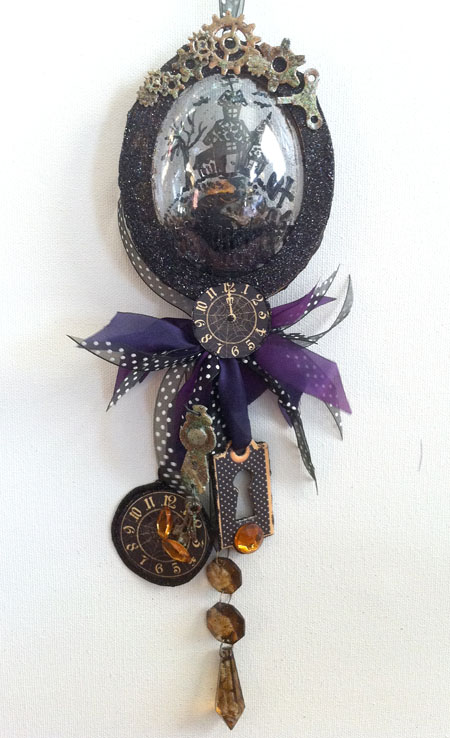
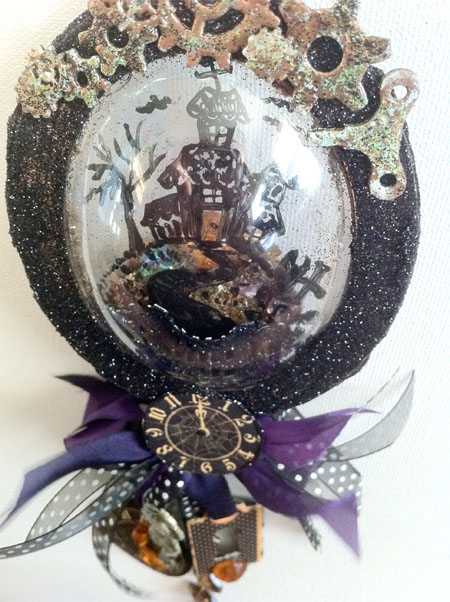
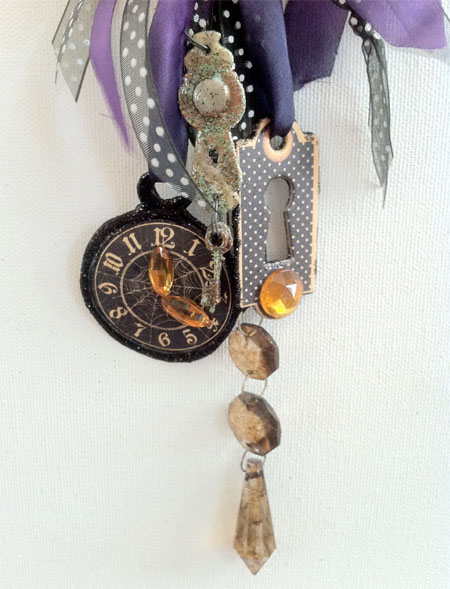
And here it is finished after I added all the keys, the pocket watch clock and that crystal and excessive amounts of ribbon!
For my first bubble ornament, it's not too shabby. It was a lot of fun to make... can't wait to make more!
I decided to go with the most forthcoming event, which is Halloween.


Subscribe to:
Posts (Atom)


