Thursday, March 28, 2013

Swapping Glittery ATC's


Howdy! Linda here to share my glittered ATC with you.

Linda Neff
linda-neff.com
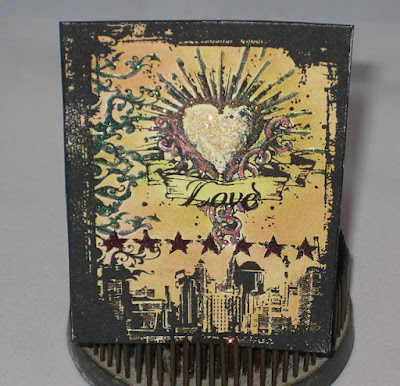
I belong to a very casual stamp club that meets monthly to share ideas and techniques. Our recent demonstrator opted to share varying techniques with us this month for creating ATC's (Artist Trading Cards). We enjoyed the techniques and information so much that we decided to hold an ATC swap at our next meeting in April. This is a sample of my ATC that I might use for the swap.

I started by stamping with Tim Holtz ATC - Urban Tatoo. I don't know what it is about the heart explosion but I just love it! I used a waterproof black ink to stamp my image on heavy-duty white cardstock. Then, using my Designer Dries Clear with Fine Metal Tip I started to outline parts of the stamped image and sprinkled on Art Glitter Cupid #735 Microfine Transparent Glitter. I love the microfine glitters due to their more vintage look rather than lots of sparkle.


When the heart was all glittery I moved on to the other designs. I used a darker pink for the stars from the Monochromatic Pink Mixed Pee Wee Kit.


The curly-cue designs running down the one edge were glittered with Art Glitter Elfin #705 Transparent Microfine Glitter.

 
When I had all the glittering done I added some Crackle Accents to the heart center and sprinkled on a pinch of a pink from the Monochromatic Pink Pee Wee Kit used on the starts. I set it all aside to dry while we fixed and ate dinner (it's nice to have a chore or project to do while waiting for a piece to dry, otherwise I'm usually tempted to rush it along and that's never good)!

When it was dry I simply colored it with a gently coating of Ranger's Distress Inks. One down, 12 more to go!


Saturday, March 23, 2013

Bunny Fun

Spring is just around the corner, and when I saw these bunnies, I think they were just telling me to glitter them. 


Supplies Used:
Designer Dries Clear Adhesive
Art Glitter in #12 Lush Pink Ultrafine Opaque, #23 Periwinkle Ultrafine Opaque, #103 Jonquil Ultrafine Transparent
Paintbrush
Ceramic bunnies

I started with the smaller of the two bunnies. I brushed on Designer Dries Clear Adhesive in patches and added the glitter as i went along. I covered the entire bunny, but left the center of the ears.


I then used the Jonquil glitter in the ears. 


 Once I finished the first one, I glittered the larger bunny in a different color. I wanted them to remind me spring was coming (even though it feels like summer every day here in Hawaii).


 They make a perfect pair! These would even look super cute in a babies room!


I hope you enjoyed these cute little bunnies. Be sure to stop by my blog, one.heart.scrapper. for another glittery project. 


Thursday, March 21, 2013

Last Call For Design Team Call


Art Glitter Design Team Call:

Beginning: February 11, 2013

Ending: March 22, 2013

New team members will be announced: April 1, 2013 (no Fooling!)

Term from May 1, 2013 through April 30, 2014

(First projects will be due April 29, 2013)


Do you love all things that sparkle and glitter? If so you may want to apply for the Art Glitter Design Team!


Here is what we would require from you:

1) A Blog: Sneak peeks for your posts that will be featured on the ART GLITTER blog at least twice per month. (your dates will be assigned) These posts must be live and on time. Since your posts are due to Kristi on specific dates you can schedule the sneak peek at the same time.**

2) Link:Your blog to social network sites such as Facebook, Twitter, Pinterest, etc.

3) Galleries:If you are a paper/mixed media artist your work can be placed in online galleries such as Split Coast Stampers, Two Peas in a Bucket, Paper Craft Planet or others.

4) Challenges: Any challenge posted along with cross promotions. (These will usually work alongside of your normal posts.)

5) Submit for Publication: At least 3 times per year you will submit to online/print publications. These would be projects NOT used on the Art Glitter Blog.

6) Audition Pieces: Your samples can be cards, scrap pages, nail art, body art and dimensional items. We want crafters to see all the multiple ways Art Glitter products can be incorporated into their projects. Your samples will need to demonstrate a variety of techniques and products as well. Patterned papers, stamps, stencils and embellishments from other companies can be added, but the Art Glitter products MUST be the focus. A list of supplies and tutorial need to be included with each audition piece.

7) New Products: You will be required to sign a form promising not to share any new product info before release.

8) Facebook: Facebook Account is how we communicate news and information to the entire team at once.

9) NOTE: You are free to belong to two other design teams as long as they are not direct competitors of Art Glitter. Please advise Kristi of the teams you are currently participating.

** Actual blog posts will need to be submitted in HTML format. This will be explained to you further if you are picked to be on the team. Don’t worry, it is easy!

Here is what you can expect from us:

1) Product: We will provide you with a beginning kit with various types of glitter and other products. ($50-$75 in Retail Value)

2) Additional Supplies: You will receive 3 additional shipments from Art Glitter at $50 in retail value. Some you may have choices, other times, depending on challenges and cross promotions you my receive what is best for those needs. (August/November/February.)

3) Facebook: You will be welcomed into Art Glitter Designer Page on Facebook.

4) Discount: You will have a wholesale discount of 50% for purchase of other Art Glitter product for your use. If you are interested in teaching locally, there are other ways that the company will be willing to help you so that your classes are profitable for all.

5) Publication: Another reward opportunity will be available to you for being published in any of the main industry magazines such as Paper Crafts, Just Cards, Scrap& amp; Stamps Arts, Stamper’s Sampler, and Nail Magazine etc. We understand that whether you are published is up to the editors. Please email a copy of your submitted design to Kristi. You will be provided with a list of Magazines and guidelines. Some publications pay for published work. Art Glitter will also compensate you with your choice of $25 payment or $50 in product. We take great pride in our Design Team Members, so any opportunity that we can help to promote you and your creativity will be made a priority. We will do our best to keep you updated on what publications are looking for. Keep in mind; most publications are working months in advance so a Christmas issue may have their call for submissions as early as March or April.


This is what we need from you by March 22, 2013:

1) Samples: at least two cards and a dimensional item or several nail art samples. Photos of your samples need to be emailed along with tutorials. This is important as your projects will be posted on the Art Glitter Blog, and your pictures need to be crisp, clean, clear, and well lit. Pay attention to spelling, grammar, and punctuation. We don’t expect you to be an English teacher, but these items affect how others perceive you and Art Glitter as well.

2) Bio & Photo Of You: A couple of paragraphs describing you…why you paper-craft or do nail art. How long have you been creating. Why do you want to be part of the Art Glitter Team? Why would you be a good addition to the team?


You will want to rely on US and we will want to rely on YOU. If you have any questions, please feel free to email Kristi at artglitterkristi@yahoo.com


Please email your samples by March 22, 2013, to:

Kristi Parker Van Doren
DT Lead – Art Glitter

Tuesday, March 19, 2013

Gala Glitz!!!


 Looking for some wall art?  You can make it easily enough with Art Glitter.  While I had a very specific material, which dictated certain glitter colors, you can use ANY material, motif and glitter colors.  Just make sure to use Art Glitter Fabric Glue.

MATERIALS:
Art Glitter Dries Clear Fabric Glue
Ultrafine Metal Tip
Art Glitter Microfine Transparent 715 Venus
Art Glitter Fine Vintage Glass Glitter in 605 Pink Cameo
Art Glitter Fine Vintage Glass Glitter in 603 Shamrock
Art Glitter Fine Vintage Glass Glitter in 609 Grape Arbor
Art Glitter Gala Glitz in Silver
16x20 Canvas
1/2 Yard Fabric
Staple Gun With Staples
Chipboard Letters
Globecraft Enamel/Embossing Powder Adhesive
Globecraft Piccolo Vintage Silver Enamel Powder
Heat Gun


1)  Lay fabric on top of canvas.  Flip over the fabric and canvas.
2)  Use the staple gun to staple down fabric on one of the 20" sides of the canvas.  Staple every 4 or so inches.
3)  Pull the fabric taut up and around the other 20" side and staple in place.
4)  Pull the fabric tautly up on a 16" side and staple in place.
5)  Pull the final side up and staple.  The whole fabric piece should be tight across the front.
6)  Fold corners and tuck to create a diagonal, as if wrapping a gift.  Staple down.
7)  Staple in between previous staples, pulling tighter whenever necessary to create a flat, tight fabric on the front of the canvas.
8)  Use the fabric adhesive and metal tip to add accents of glitter around the fabric.  I liked the look of Transparent Ultrafine and Fine Glass Shards, but you can use any kind of glitter you like.  Just make sure to use the finest glitter first so that it goes down only where you want it.
9)  Use embossing liquid on the chipboard letters and cover with enamel powder.

10)  Heat set and let cool.
11)  Use embossing liquid and powder a second time.
12)  When the second layer gets heated, it becomes sort of liquid and bubbly.  When it does this, cover immediately with Gala Glitz and let cool.
13)  Heat very quickly to blow off any loose glitz.  As the powder reheats, some of the glitz will move a little.  While the glitz will not melt, it is still a good idea to make this step quick, as you don't want the glitz to move completely off the letters.  Let cool.  This sets the glitz very firmly into the embossing powder.
14)  Adhere the letters by putting glue on the back and placing them onto the canvas.  Press down slightly for a few moments.

I really wish that the initial picture here did this project some justice, but I just know it doesn't.  The colors I chose are fairly close to the original fabric colors but, as I mentioned, you can chose any colors that you want.  Probably the best thing that this project did for me is make me realize how really cool the Gala Glitz product can be!  It is SOOO sparkly and using the embossing enamels really makes it stick.......You will be seeing more from me with that technique in the future!

Thanks for stopping by the blog today.  Come by and see me at mine sometime, www.rememberinglifesmoments.blogspot.com.

Saturday, March 16, 2013

Easter Eggs That Sparkle

Are you ready to add a little glitter to your Easter basket?  Today I'm glittering up a couple of Easter Eggs.  These eggs are real eggs that have had the yoke blown out.  You could use these same techniques on plastic, paper mache or ceramic eggs.  I wouldn't recommend it on eggs you intend to eat, for two reasons:  #1 - it would be tough to shell this egg and not end up with glitter on your hard-boiled egg, and #2 (more importantly) why would you want to destroy your art???
Begin by drawing your design onto your egg with a pencil or light colored Sharpie.  I used a silver Sharpie here so that it would show up better for illustration purposes.   If you use a blown-out egg, you have a hole at the top and bottom of the egg.  Use a wooden skewer to hold the egg while you work.  This will hopefully keep your fingers out of your design.

Use a metal fine tip applicator on a bottle of Art Glitter Body Glue and carefully trace your design.  Don't go to heavy with the glue or it will run off the rounded surface.  Once you've traced your whole design, set the egg aside to dry.  The glue is dry when it turns clear.

Use a dry brush and your first color of Art Glitter Ultra Fine Glitter - in this case Pink Diamonds.  Brush the glitter onto the desired sections of the design.  

Continue adding shades of glitter to your design.  Here I've added Country red to the teardrops and Pumpkin to the bottom sections of the "S"s.

The top sections of the S's were finished with Art Glitter Old Gold 

For this design, I made some simple 5 petal flowers and dots with the glue.  I brushed Pink Diamonds glitter onto the dots and the outer edges of the flowers.  Then I filled the centers of the flowers with Old Gold and then added some "leaves" in glue that were covered in Emerald Green glitter.

I am now totally addicted to glittering Easter Eggs and heading out to buy some more eggs!

Happy Easter all!!

Please visit my blog for more glittering fun!


Thursday, March 14, 2013

Fluttering Into Spring


I just felt the need to create something with a little Spring feel about it and just kept playing around until I came up with this design. Spring is in the air today here in Michigan. Birds are singing and sun is shining. Before you know it the butterflies will be fluttering around the garden.

I just received new colors of Transparent Microfine glitter from Art Glitter and wanted to use them on this project. So here's how I started.

Supplies:


I began by inking my tag so the butterflies would have some background color. Then I sprinkled some water onto the inked tag and waited about 20 seconds then heat set.


I originally had intended to cut the butterflies and use disconnected from the background tag, but once the images had been cut into the tag I liked the way they look and they could be propped up a bit.


To create texture and dimension on the tag I inked the large background stamp from Papillon CMS106 from Stamper's Anonymous and folded the butterflies forward (this way, they were not stamped) then stamped the tag background. I inked several different butterfly stamps and stamped onto the butterfly images. I used Coffee Archival Ink for this part so the lines would show slightly beneath the glitter when it is applied.


Then I used my paintbrush technique to paint the DDC onto each butterfly wing - one at a time - and then sprinkled with the glitter. The DDC dries very quickly when applied in this manner so work in small areas at a time.

I alternated the glitter colors among the butterflies and used Rose Bud Fine Vintage Glass Glitter on the butterfly bodies in the center of each.


It seemed a bit flat to me when I finished so decided to add a pop of gold. I used the Gold Metal Leaf for this. I squeezed a very small amount of DDC onto my non-stick craft sheet and smudged it on my finger and then smudged it onto the tag. I pressed the Gold Metal Leaf into the smudged DDC and let it set for a minute to dry, then brushed away any loose particles.

To finish it off I added the stamped sentiment and a pretty ribbon.

Linda Neff
linda-neff.com


Visit my blog to catch a look at another Art Glitter project I worked on recently.

Tuesday, March 12, 2013

Picture Perfect Glitter

This post is about frames and glitter. I wanted to share with you more than one way to glitter a frame. I am going to show you four different options when it comes to glittering your framed masterpieces.

All four methods are super simple. I am going to walk you through the first three, and explain the last one the best I can.

First. 

The traditional glittered frame. 


Products used:
#70 Moondust, Ultrafine Opaque Glitter
Designer Dries Clear Adhesive
Picture Frame
Paintbrush.

Simple. Using the paintbrush spread Designer Dries Clear onto the top of the frame (take out the glass while doing this).


Pour on glitter of choice, totally digging #70 Moondust!

Viola!


Second. 

Glittering the Mat. 

Products Used:
#97 Nirvana Ultrafine Transparent
Designer Dries Clear Adhesive
Picture Frame (with Mat)
Paintbrush

Remove the mat. Brush on Designer Dries Clear Adhesive. Pour on Glitter.

Be sure to dust off all excess glitter before you put it in the frame, so you get the minimum of glitter on the glass. Then put mat in frame with photo.

And complete.

Third. 

Glittering the Edges.

Products Used:
#30 Royale Ultrafine Opaque Glitter
Designer Dries Clear Adhesive
Frame with wide edges
Painter's Tape
Paintbrush

Tape the front of the frame. Paint the outside edges of the frame with Designer Dries Clear Adhesive. I recommend doing one side at a time. Pour on glitter. Shake and dust off.


Amazing.

Fourth. 

Glittering Behind the Image.


Products Used:
#624 Chocolatta Fine Vintage Class Glitter
Designer Dries Clear Adhesive
Piece of paper cut to fit the inside of the frame
Paintbrush
pencil
(and a frame too)

Trace around your image onto the piece of paper where you would like it to be inside where the mat would be. (Sorry I don't have pictures of these steps!) Remove image and brush Designer Dries Clear from the line out (to where the mat would hit (or further if you want to be safe).  Sprinkle on the glitter. Adhere the image to the paper. Fit in frame.

Be sure to dust off the glitter. I did not do so in this one, and you can see that some of the glitter is having its own little party on the back side of the glass.

I hope you can find a way to incorporate one of these fun ways to glitter up some frames in your own home. For another fun glitter project, be sure to stop on over to my blog, one.heart.scrapper. today!