Friday, December 28, 2012

Gift Bags for All Year Round

These are little gift bags I made to share some homemade peanut brittle with some friends and co-workers during the Christmas holiday. The word on the ornaments can be changed up to fit any occasion or theme for any time of the year.

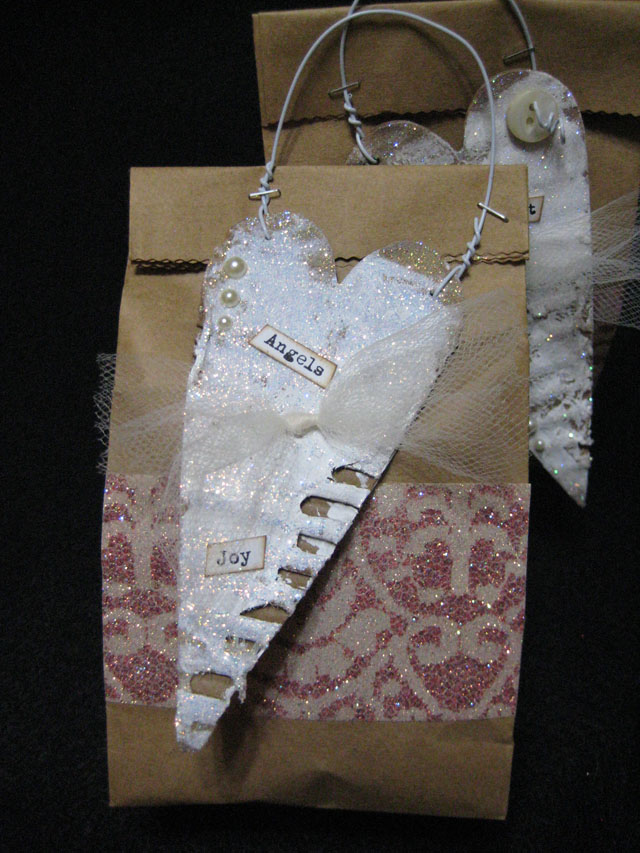
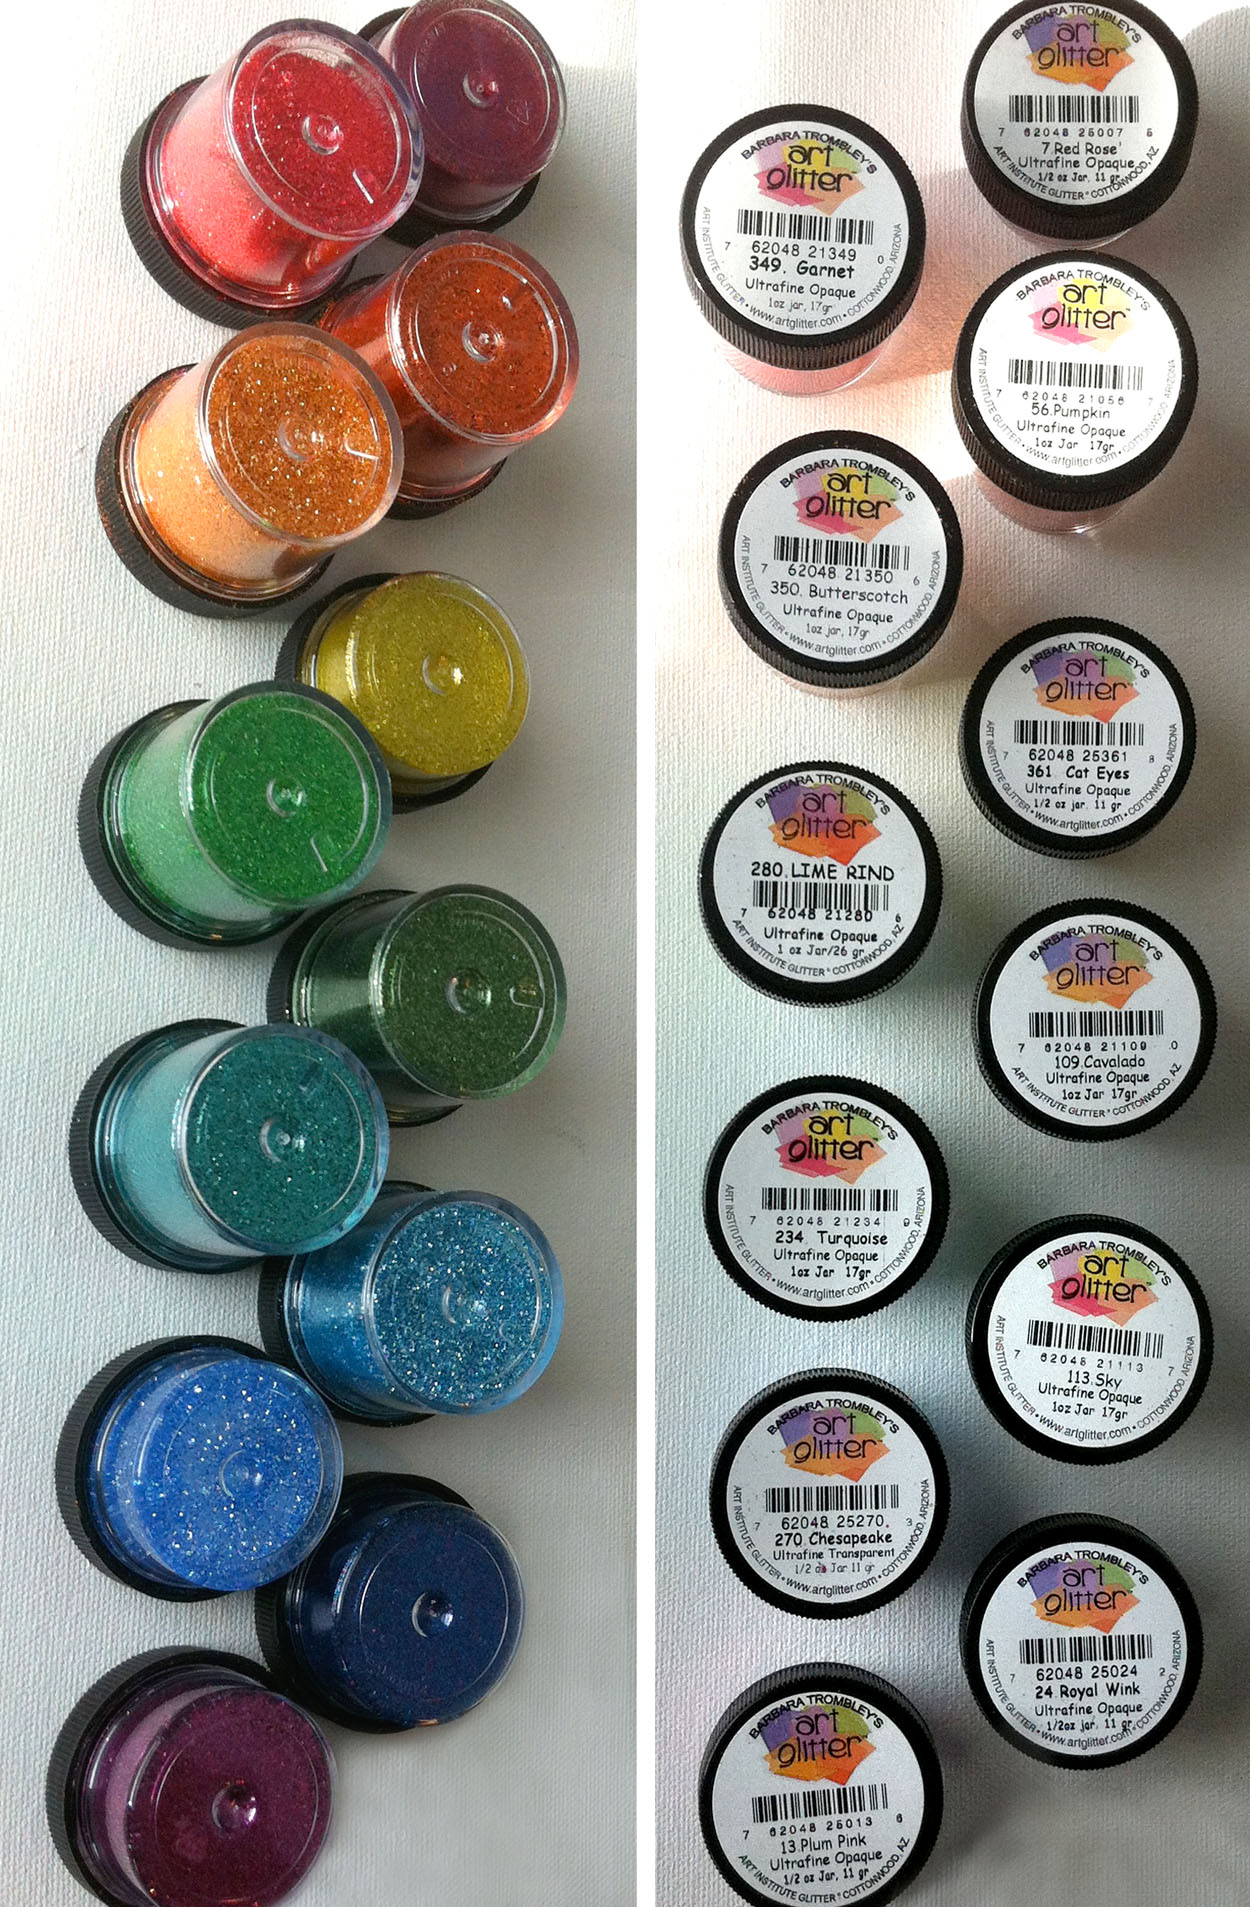
I started my making the heart ornaments from corrugated cardboard cut on my Vagabond using the Sizzix Hearts, Primitive die. I love this die and use it quite often in many of my projects. There are three size hearts on the die so it works perfectly as an ornament, scrapbook page element or a decoration on a card. I distress the hearts by spritzing with water and letting it soak for a minute or two to soften the paper covering. I chew up the edges with an Exacto, scissor blades or edge distresser and peel back some of the covering, exposing the corrugated layer beneath. I then paint it briskly with Gesso and set it aside to dry. When the gesso-ed hearts are dry I put them through my Xyron Creatopia face-down. This puts a layer of adhesive on the front. I peel off the Xyron backing and sprinkle with Art Glitter Microfine Transparent Winter White glitter. Tap off the excess and set aside while finishing the rest. When they're all glittered cut a 5-inch to 6-inch strip of cream or white tulle and tie a knot in the middle. Use Designer Dries Clear adhesive to attach the tulle to the center of the heart and clamp with a clip clothes pin till the glue is set. Xyron_Linda_Neff_Ornament_2012_clothespins 
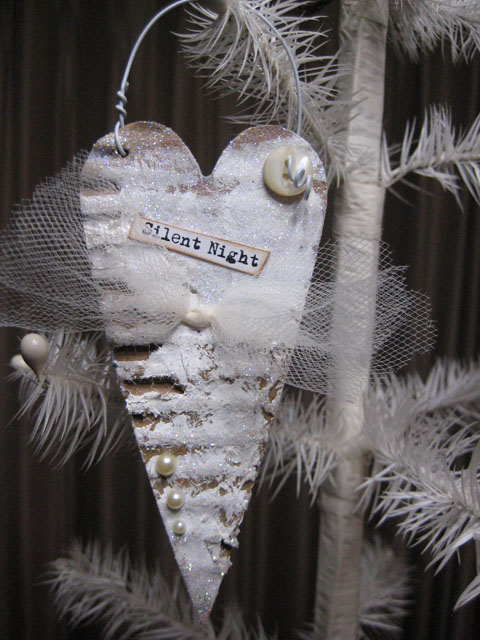
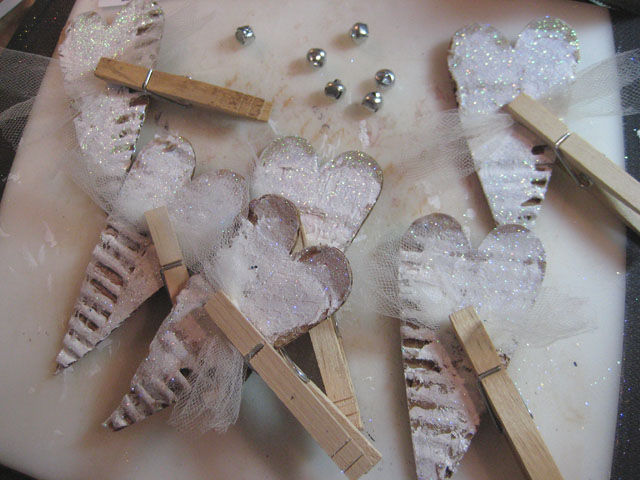
While the glue is setting up, cut and ink the edges of words or phrases that have been printed on white cardstock. Gather a few vintage buttons, bells, pearl gems or any other little embellish you wish to add. Once the hearts are decorated you'll want to pierce two tiny holes in the top and attach a thin white wire for hanging. Xyron_Linda_Neff_Ornament_2012_Photo_3 
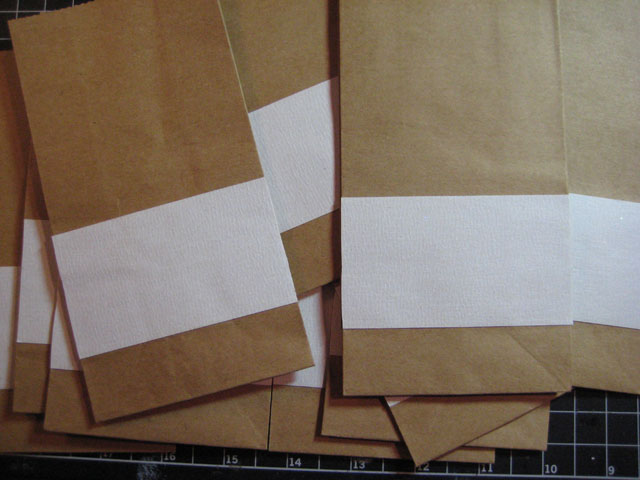
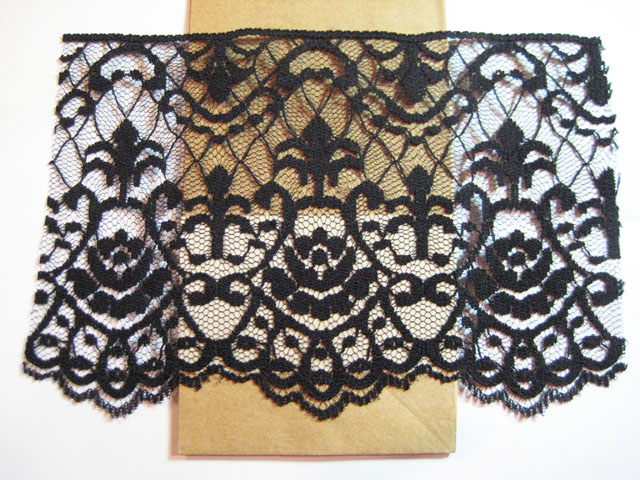
The gift bags were purchased at Michael's Arts & Crafts. There are 16 bags in the package for about $3. I love the natural craft color of the bags but wanted to dress them up a bit with a lacy strip. I used the faux lace technique from the Art Glitter blog. It's easy and does the trick. I used a 2-inch wide strip of double-sided tape and cut it to fit the width of the bag. It's taped to the front side of the bag and the top protector peeled back. Art_Glitter_Linda_Neff_Faux_Lace_bag3
  I lined up a strip of Lace Pattern and gently pressed it in place over the tape. Art_Glitter_Linda_Neff_Faux_Lace_bag I sprinkled one color of glitter over the tape with the lace pressed in place (Boysenberry Microfine Transparent) and gently rubbed it in with my fingers. Tap and brush the excess off then gently peel off the lace revealing a beautiful pattern but still open with some sticky areas. Then I sprinkled my second color (Sand Ultrafine Opague) over the partially-covered tape and gently rub the second color into the tape; use a glitter brush to remove any glitter that is not stuck down. And, you end up with these beautiful glittery gift bags! Art_Glitter_Linda_Neff_Faux_Lace_bag4

linda-neff.com

Tuesday, December 25, 2012

Merry Christmas From Art Glitter


Merry Christmas! 

Today may be filled with tradition, family, love, and hopefully some glitter too! 

My project for you today is a nice tree tablescape. That can still stay on the table after Christmas too!


I wanted to make a glitter Christmas Tree setting, but I wanted it to be non traditional. I decided to go with teals, pinks, purples, and greens.


Here is how I made it happen.

Products Used:
#184 T-Bird Ultrafine Pearlescent
#D29 Confection Dazzlers
#353 Provence Ultrafine Opaque
#356 Grape Nector Ultrafine Opaque
Designer Dries Clear
Designer Dries White (optional)
Small Faux Tree (I chose a white one)
Styrofoam Cones
Paintbrush

I decorated the white tree first. I started by adding Designer Dries Clear to the bottom branches of the tree. I just squirted it on in any random fashion. Mostly making sure to get some glue on every branch.


I then sprinkled on glitter to the branches. Shook it off, and then moved up the tree to add more colors until I got the desired look.


Once I finished the tree, I moved onto the cone trees.

I coated the entire tree with Designer Dries Clear. I purchased the refill, and just dipped my entire paintbrush into the container, and brushed onto the Styrofoam cone.


I then poured glitter all over the tree until it was completely coated. I let it completely dry. Then starting at the top (I used Designer Dries Clear, because I didn't have Designer Dries White - and I wanted the dries white look so I took the picture while still wet, but you could do whatever you would like to get the look you want) I squirted the adhesive so that it trickled down the side of the cone. Then I added Dazzlers to appear as crystallized snow.


As you can see on the table I made a little mess. It did not take long to clean up, and I reused all the glitter. I saved as much as I could putting back into each container after I used each color. But for all the extra that ended up in other places I collected at the end and made my own color by putting it in an old glitter container.

 
I know I will be able to use it for something! I love how all the colors go very well together too! Well I hope you enjoyed seeing the fun trees today, and I hope you are all having a wonderful holiday season. Mele Kalikimaka! Stop by my blog, one.heart.scrapper. for another glittery Holiday project!


Cherie


Saturday, December 22, 2012

Glittered Rainbow Baby Shoes Ornament

It's my friends' little girl's first Christmas. They are into rainbows, so I thought I would transform a pink porcelain baby shoes ornament into a snazzy rainbow pair.
I used a LOT of glitter. I made a mess. Embrace it. The results are worth it!
The glitter I used, from red to purple:
  1. #7 - Red Rose - Ultrafine Opaque Glitter
  2. #349 - Garnet Red - Ultrafine Opaque Glitter
  3. #56 - Pumpkin Orange - - Ultrafine Opaque Glitter
  4. #350 - Butterscotch - Ultrafine Opaque Glitter
  5. #361 - Cat Eyes Yellow - Ultrafine Opaque Glitter
  6. #280 - Lime Rind Green - Ultrafine Opaque Glitter
  7. #109 - Cavalado Green - Ultrafine Opaque Glitter
  8. #234 - Turquoise Blue/Green - Ultrafine Opaque Glitter
  9. #113 - Sky Blue - Ultrafine Opaque Glitter
  10. #270 - Chesapeake Blue - Ultrafine Transparent Glitter
  11. #24 - Royal Wink Blue - Ultrafine Opaque Glitter
  12. #13 - Plum Pink (Purple) - Ultrafine Opaque Glitter
And I used 3D Embossit Art Glitter Adhesive to give the areas I glittered a little bit of a lift. Here are the shoes prior to starting... (if you happen to want these shoes, I sell them on my website, too!)
First, I removed the bows from the shoes...
Then I smothered one shoe in glue using a paintbrush...
I then started slowly adding glitter in the red, orange, yellow, green, blue and purple order...
I did the same thing to shoe #2 and voila... here they are all finished:


With the leftover glitter (isn't it gorgeous?!), I made a few gift tags. I smothered each tag in glue using my finger and pressed it into the glitter, like so:


To see more projects and art by Carrie, check out her blog Violet Cottage.


Thursday, December 20, 2012

Art Glitter and 52 Kids!

I had the joyous pleasure of teaching the K-8th graders at the United Christian School in Camp Verde down the road from us this week. They know all about glitter now! Truly a craft worth cultivating for well rounded students! 

Here's the card the Kindergarten class made. It's a snowman made from recycled white lids at Art Glitter and Faux Snow! The face and buttons are  #850 Model T Grande Beads, and we used Sticky Tape to attach the lids to the cards so they could work on them without waiting for them to dry. And of course we used Designer Dries Clear Adhesive for all the projects. We could have used our Dries White Adhesive to make the snow whiter, but I don't use it with children so they don't ruin their clothing.


They were so focused! I love using Faux Snow with the little guys because they can get their hand in it and not get TOO messy. Really turned out great!


The 1st and 2nd graders made some fabric ornaments, which I sadly did not get any photos of, but they had a few more minutes afterward and we glittered some pine cones. I always bring pine cones in case I need something quick and easy to fill in some time and the kids just love them.


We used all Opaque Ultrafine Art Glitter. It is a little more forgiving for kids to use. Meaning, it doesn't cross pollute as much as Transparent.


You can see my friend Miss Kathy in the purple with the 1st graders above. She's so wonderful. I have bling strands or sometimes referred to as shimmers in my hair... she told the kids that I had been working at Art Glitter for such a long time that I had started to grow glitter in my hair! A few fell for it, but most thought it through and called her on it!


We didn't even attempt the glitter hair story with the 5th-8th graders. Of course they've seen the shimmers before! So many boys (one girl above) working diligently on their butterflies! This is a larger version of Barbara's Butterfly image printed on our Transparencies.


Always a big hit we used all Ultrafine Transparent colors here. The girls were in heaven! When it dries you cut the butterfly out and add ribbon so you can hang it in a window or on the tree.

The 3rd and 4th graders made Bling Bells. It's a recycled tin can glittered to the max with a pipe cleaner and bell for hanging and ringing.

Again we used a rainbow of Ultrafine Opaque Art Glitter colors and some Hexi Dazzlers. They were so creative, it's great to see the diversity of designs they come up with.

If you make this project, start at the top and work your way down. Don't worry about the glitter that clings to the walls while you are moving along. You can brush all that off when it is dry. Much fun!


Thank you United Christian School for sharing your talented and well behaved students. And thank you Art Glitter fans for joining along. If you ever need any advice or ideas on creating glitter classes for students of any age, give us a call!  - GlitterEmm........

DON'T FORGET TO TAKE ADVANTAGE OF OUR 25% OFF SALE THROUGH DEC. 25TH Details here...

HAPPY HOLIDAYS!

Tuesday, December 18, 2012

Let There Be Peace On Earth

I find myself going into the holiday season with a little quieter than normal, and I think that today's post reflects that.  It is still glittery, and full of the sparkle of the season, but just a little more subdued than my normal posts. It gives thought to "PEACE ON EARTH".

MATERIALS:
Art Glitter Designer Dries Clear Glue with Fine Metal Tip
Art Glitter Designer Dries White Glue with Fine Metal Tip
Art Glitter Dries Clear Fabric Glue
Art Glitter Ultrafine Transparent in 85 Crystal
Art Glitter Ultrafine Transparent in 312 Fresh Green
Art Glitter Ultrafine Transparent in 196 Lion's Mane
Art Glitter Ultrafine Opaque in 347 Golden Orange
Art Glitter Ultrafine Opaque in 278 Poppy
Acrylic Paint in brown, white and dark blue
Double Sided Adhesive Paper--I used Dreamweaver's
Small Round Punch
Star Punch--mine was the Martha Stewart Radiant Star
Muslin Fabric
Canvas Fabric
Tim Holtz Alterations Dies in Pine Tree, Deer, and Holly Berries
Tim Holtz Alterations Texture Fades in Damask
Manual Die Cut Machine
Grunge Board
Various Colors of Green Cardstock
9" Grapevine Wreath
Small Stencil Brush
1 1/2" Fine Gauge Metal Wire or Twist Ties
Tombow Markers in various greens
Small Mister
Paint Brush
Paper Towel
DIRECTIONS:
1)  Paint the wreath.  Make the bottom half white and the top half blue
2)  Use the manual die cut machine to cut deer from Grunge Board, seven trees from green cardstock, and several holly leaves from both muslin and canvas.
3)  Paint deer brown.  Let dry.
4)  Stack the trees in two groups--one of three and one of four.  Make sure to flip a couple upside down to vary them.  Stagger them and glue with Dries Clear.  Let dry.
5)  Texture the deer through the die cut machine with the texture folder.
6)  Squeeze out some Dries Clear on some plastic.  Use the stencil brush to brush lightly on the deer.
7)  Glitter deer with Lion's Mane.  Let dry.

8)  Use Designer Dries White to make "snow" areas on trees.  Cover with Crystal and let dry.
9)  Color muslin holly leaves with Tombow markers.  It will not look perfect.

10)  Spritz leaves with water.  Place on paper towel and let dry.

11)  Match up dried leaf with a canvas leaf.  Use fabric glue on the canvas leaf, place top of metal or twist tie onto canvas leaf and cover with muslin leaf.  Let dry.  Repeat for all leaves.

12)  When leaves are dry, use stencil brush to brush fabric adhesive just on the edges. 
13)  Cover with Fresh Green.  Let dry.

14)  Punch several dots and one star from the double sided adhesive paper.
15)  Remove one side of the star.  Dip it in Golden Orange and press down.
16)  Remove one side of each circle and press into Poppy.
17)  Glue trees onto wreath with Dries Clear.  Make sure to cover edges between white and blue.
18)  Put leaves into place using the wires and gluing down the parts that touch the wreath with Dries Clear.
19)  Glue deer down with Dries Clear.
20)  Remove backing from double sided star and berries, placing them on the wreath with the adhesive.

That is it!  A thoughtful holiday wreath.  I wish for Peace on Earth this year.  Happy Holidays, and a Glittering New Year to All!
 Laura